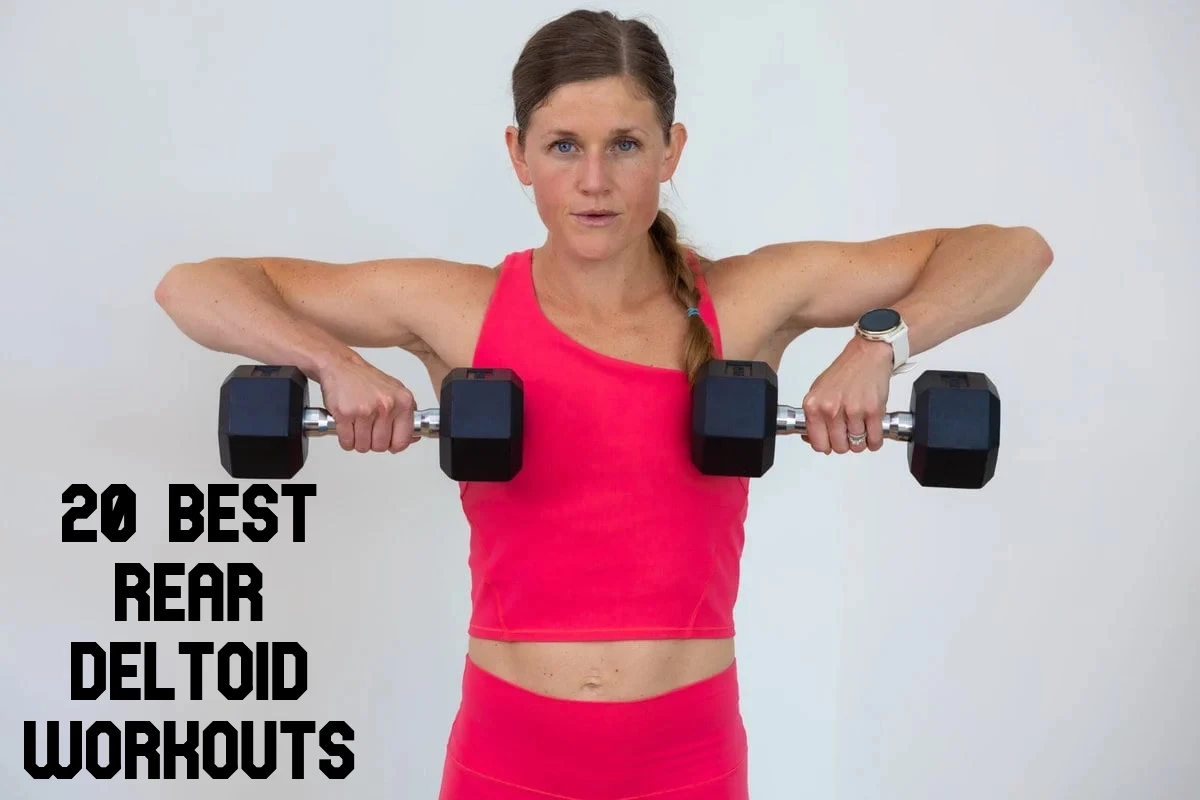
20 Best Rear Deltoid Workouts
Table of Contents
Introduction
- The posterior deltoids assist in a range of pulling activities in addition to stabilizing the shoulder joints.
- You might incorporate a deltoid exercise into your routine to provide your shoulders with a comprehensive workout.
- To be able to lift, push, and pull without getting hurt, you need powerful shoulders.
- Working a variety of muscles from various positions is necessary to build shoulder strength.
- In many workouts and daily activities, the front of your shoulder the anterior deltoid, in particular, tends to be relatively dominating.
- For instance, the anterior deltoid helps with pressing exercises like the bench press and is involved in elevating your arms in front of you.
- However, it’s also crucial to strengthen the middle and posterior deltoids.
- When you walk or pull a lawnmower cord, for example, your posterior deltoid stretches your humerus behind you, while your middle deltoid elevates your arms out to the sides.
- When you rotate your hands out to perform the I’m not sure motion, your posterior deltoid muscle helps you externally rotate your shoulders as well.
- Together, these muscles support the stability of your shoulders so that you may do daily tasks like holding heavy grocery bags at your sides with your arms lowered.
- However, it might be challenging to target the rear deltoids in the gym.
- You may strengthen your shoulders generally and your rear deltoid muscle by performing these 6 exercises.
- Consider including a few of these exercises in your weekly strength training regimen.
20 Best Rear Deltoid Workouts
Following are the 20 Best Rear Deltoid Workouts For Sculpted Shoulders
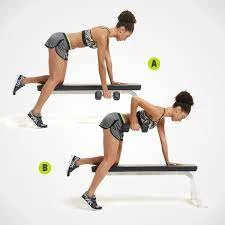
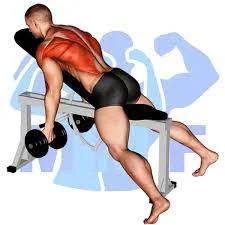
Single-arm bent-over row
Steps To Follow:
- Raise your knee and left hand on the bench.
- Maintain a straight left elbow.
- With your foot planted firmly on the ground for stability, gently extend your right leg behind you.
- Sustain a flat back and a neutral spine.
- Raise your right hand to a medium-to-heavy dumbbell grip while extending your arm toward the floor.
- To bring your upper arm about in line with your lower chest, bend your right elbow and draw it up and back.
- Firmly compress your shoulder blades together at the top of the exercise.
- With control, reduce the weight.
- After ten to twelve repetitions on one side, go on to the opposite arm.
- Work with three sets maximum.
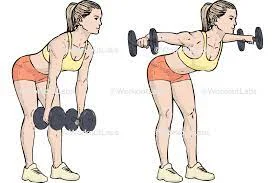
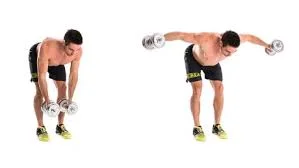
Standing bent-over lateral raise
Steps To Follow:
- Hold a pair of dumbbells with your palms pointing in opposite directions.
- Place your feet shoulder-width apart, slant your knees slightly, and hunch forward at the hips while maintaining a straight back.
- Your elbows should be relaxed and the weights should be together beneath your chest.
- Extend your arms until they are parallel to the floor, and spread your arms out like wings.
- Tense your shoulder blades at the highest point of the workout.
- Slowly and carefully, return the weights to their initial position.
- Light enough weights should allow for 10–12 repetitions.
- Increase to 2-4 sets.
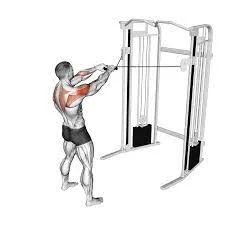
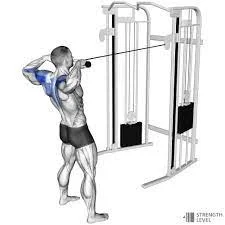
Cable machine high pull with ropes
Steps To Follow:
- Set up your feet hip-width apart and face the cable machine.
- Attach the rope handle to the cable attachment after adjusting it to around chest height.
- Place your feet hip-distance apart and take a step backward so that your arms are out in front of you.
- As you pull the ropes toward you, they will separate.
- Stretch your elbows back out to the beginning stance gently and methodically.
- A lightweight enough weight should allow for 10–12 repetitions.
- Increase to 2-4 sets.
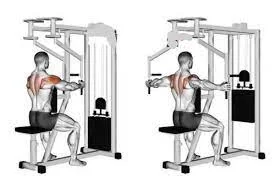
Rear deltoid machine
Steps To Follow:
- Facing the pad, take a seat on the machine. For this exercise, you are in the perfect posture, even though it will look like you are sitting on it backward.
- In order for the handlebars in front of you to be level with your shoulders, adjust the seat height.
- With your hands on the handles and your palms facing either way, push your arms back until they are straight or slightly bent.
- As if they were a set of elevator doors, squeeze your shoulder blades together.
- Place your hands in front of you and hold this posture for two seconds before moving back to the beginning.
- Apply control and slowness to this.
- Perform ten to twelve repetitions.
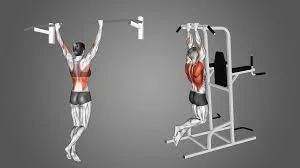
Assisted pullup
Steps To Follow:
- Make adjustments to the weight deduction on the machine’s side.
- Select the appropriate quantity and set.
- Climb onto the knee pad and push it down once it is low enough for you to rest both knees on.
- You should have hip-width between your knees.
- With your palms pointing away from the center, grasp the outside handles above you.
- Straighten the arms and lower oneself to the position from which to begin.
- Bring your chin up to reach or exceed the handles by extending your upper body.
- After a few seconds of holding the pose, carefully lower yourself.
- Maintaining your shoulder blades engaged is important.
- Press them down and back again.
- Work up to 10–12 repetitions starting with 6–8 reps.
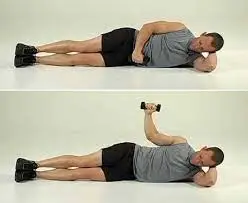
Side-lying external rotation
Steps To Follow:
- While lying on your side, grasp a small dumbbell.
- Place your upper arm on your side with your elbow bent 90 degrees.
- Put a towel roll in between your upper arm and your body if you have broad shoulders.
- Keep your upper arm attached to the body and, to the greatest extent possible, spin your arm around your torso.
- After holding it for one or two seconds, carefully return it to the beginning position.
- Perform ten to twelve repetitions.
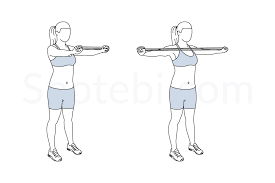
Band Pull-Apart
Steps To Follow:
- With your feet shoulder-width apart, take a tall posture and place your palms face down on a long resistance band in front of you.
- Hold out your hands at shoulder height and shoulder width apart.
- As you put your feet on the ground, tighten your glutes, tuck your hips, and gently bend your knees.
- Tuck your head in, compress your shoulders, and use your core. Maintain this tension.
- Breathe in and out while you draw your band apart, bending your elbows slightly or maintaining your arms straight.
- Pull until your back delts constrict as a result of your shoulder blades compressing together.
- Feel the tightness in the backs of your shoulders by holding for a little moment.
- Breathe in, resist the band’s resistance, and gently bring your hands back to the beginning position.
- To draw again and again, exhale.
- For the necessary amount of repetitions, keep going.
Standing Cable Face Pull
Steps To Follow:
- At eye level, connect the rope attachment to a cable machine.
- Grip the ends with your hands facing each other in an overhand grip.
- Maintaining your arms straight, take a step backward while facing the cable machine until you experience adequate resistance and strain.
- Maintain a shoulder-width gap between your feet.
- Keep your hips tucked in, bend your knees just a little, and squeeze your glutes.
- Take a breath and let go of the rope as you approach your face.
- Once the rope’s ends are on each side of your face, flex your elbows and continue pulling.
- Your back delts will hurt if you squeeze your shoulder blades together.
- Pause here, keeping your elbows up.
- With your arms back in the beginning position, slowly release the strain that the cable is providing. Repeat.
Dumbbell Reverse Flye
Steps To Follow:
- With your knees slightly bent and your feet shoulder-width apart, grab your dumbbells and stand.
- As your upper body becomes more parallel to the floor, hinge your hips back.
- With your elbows gently bent and your palms facing each other, extend your arms slightly forward.
- To maintain a neutral posture and safeguard your back, tuck your chin, contract your abs, and clench your glutes.
- Raising your arms till they are parallel to the floor requires inhaling and then exhaling.
- Consider raising with your elbows.
- Maintain a straight arm and wrist posture.
- At the peak, firmly compress your shoulder blades together without unnecessarily arching your back.
- Feel the isometric contraction of your posterior delts.
- As you inhale, slowly return your arms to the beginning position.
- Breathe out and do it again.
Inverted Row
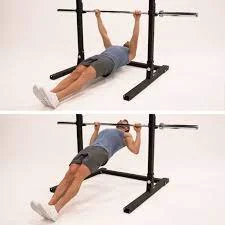
Steps To Follow:
- Place the handles of your TRX or bar at waist height, or higher if you want extra support.
- Hold on with an overhand grip while lying below with your toes up, heels driving into the floor, and your entire body straight.
- Extend your palms slightly in excess of your shoulder level.
- Tuck your hips in, compress your glutes, retract your head, and depress your shoulders.
- Imagine that your hips, feet, and shoulders are all in a straight line, like that of a hard plank.
- Maintain tension at the bottom of this posture.
- As you raise yourself till your hands or chest touch the bar, take a breath and release it.
- Keep your ribs down while squeezing your shoulder blades together at the top.
- As you inhale and exhale to repeat, steadily descend.
- Maintain a straight posture throughout the exercise.
- For the necessary amount of repetitions, keep going.
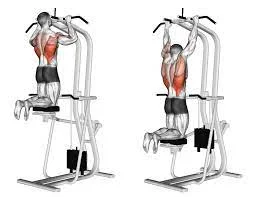
Wide-Grip Pull-Up
Steps To Follow:
- Grab your bar with hands wider than your shoulders and an overhand grip.
- Lift your feet off the floor.
- To work your back and lats, droop your shoulders.
- Feel your back delts helping to rotate your shoulders outward.
- Pull your head back while tensing your core and glutes.
- To experience the tension, linger here.
- Inhale and exhale to boost your self-esteem.
- Raise your torso to the bar and consider pushing your elbows slightly behind you and down toward the floor.
- Lift your chin off the counter.
- Put pressure on the upper part of your shoulder blades.
- After lowering yourself gently and maintaining a straight arm position, repeat.
Wide-Grip Lat Pulldown

Steps To Follow:
- Put a long bar to a lat pulldown device.
- Sit up straight, place your feet level on the floor, and reach the bar with ease by adjusting your seat.
- Grab the bar with hands wider than your shoulders and an overhand grip.
- Droop your shoulders, contract your abdomen, and pull your head back.
- Keep your spine straight and this tension while you softly lean back.
- Breathe in and out while you lower your bar to your chest.
- Think about lowering your elbows to the floor.
- Maintain a straight wrist position.
- Feel your back delts by squeezing your shoulder blades together and down toward the bottom.
- Return to your starting point with the bar and overcome the opposition to rise again.
- For the required amount of repetitions, repeat.
Bent-Over Barbell Row
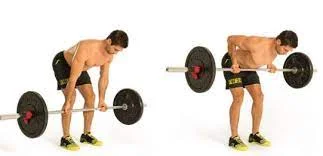
Steps To Follow:
- With your feet shoulder-width apart, your knees slightly bent, your hips tucked, and your glutes softly squeezed, stand up straight.
- Using a prone grip and hands somewhat wider than your shoulders, hold the barbell.
- To work your abs, bring your navel in closer to your spine.
- To bring your torso closer to the floor, hinge your hips back.
- Keep your shoulders down and your arms straight as you bring the barbell forward.
- Maintain a neutral spine.
- Maintain an external rotation in your shoulders by feeling your posterior delts.
- Breathe in, then out to row. Pull your bar nearer your lower chest and raise your elbows toward the sky.
- At the peak, clench your shoulder blades together.
- Take a breath and gently extend your arms back up until they are completely straight.
- To repeat, release the breath.
- Proceed to achieve the necessary repetitions and sets.
Cobras with bodyweight stability balls
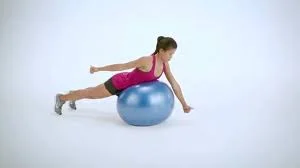
Steps To Follow:
- Place yourself facedown on your stability ball.
- To retain your balance on your toes, extend your legs behind you.
- Face downward and toward the ground.
- Spread your arms wide apart. Hold a dumbbell in each hand if you’re performing this exercise in a hard setting.
- If not, maintain your palms facing down.
- Stretch your arms out to your sides and then behind you, keeping your thumbs pointing upward.
- Give your chest permission to lift in unison with your arms.
- As soon as you achieve the full stretch, your head should be looking forward.
- After a brief period of holding, slowly go back to the beginning position.
- Ten to fifteen times, repeat.
Arnold pushes the dumbbell
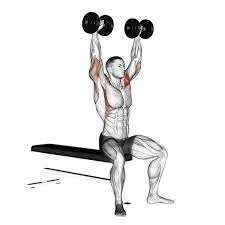
Steps To Follow:
- Step out with a dumbbell in each hand and your feet hip-width apart.
- With your hands facing inside, curl the weights inside until they are forced up against your shoulders.
- Attend to your abdominal muscles by maintaining your back straight.
- Raise the weights and twist your arms until your arms are completely extended overhead and your palms are facing ahead.
- Hold on for a little while.
- Do this eight to twelve times.
Dumbbell Y raised in an incline
Steps To Follow:
- Press your stomach against the bench while you lie there.
- Stretch your feet backward to support your weight on your toes.
- Place your hands palms inside out while you hold your weights beneath your shoulders.
- Elevate the weights and position your arms in a “Y” shape.
- Pull your shoulder blades forward and contract your core as you achieve maximum extension.
- After a brief period of holding, slowly go back to the beginning position.
- Do this twelve to fifteen times.
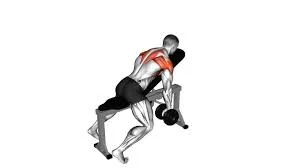
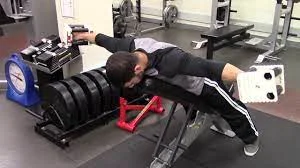
Backdelt dumbbell rows at an incline
Steps To Follow:
- With your head and neck resting over the bench’s back, lie forward on the surface.
- Extend your legs behind you to support your weight on your toes.
- Holding the dumbbells in each hand, place them palms down toward your feet as you rest them on the floor.
- Raise the dumbbells so that the elbows are higher than the shoulders.
- As you achieve your maximum stretch, contract your back and shoulder muscles.
- Take a minute to hold, then slowly come back to the beginning.
- Do this twelve to fifteen times.
Face pulls using ropes or resistance bands
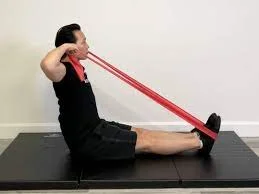
Steps To Follow:
- Lean your cable over and hold it. You should have six inches between your hands.
- Step backward until you experience the cable tightening.
- Maintain a straight back and lifted elbows. Next, bring the band up to your nose.
- Return to the starting position steadily.
- Do this twelve to fifteen times.
Dumbbell lateral raises while seated
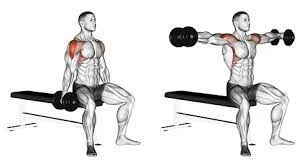
Steps To Follow:
- Put your feet apart while you sit. Drop the weights to your sides.
- Until your chest meets your knees, tilt your torso forward.
- Raise the dumbbells to your sides and outward. With your legs and chest in constant contact, your palms should be facing inward.
- Keep your arms extended as you hold for a little while.
- Return slowly to begin.
- Do this 12 to 15 times.
Dumbbell rises with Y-T-I
Steps To Follow:
- With your hands facing each other, hold a dumbbell in each hand while you lower yourself onto the stability ball.
- Shift your weight onto your toes to maintain balance.
- Lift the dumbbells until your arms form a 45-degree Y while keeping your body in alignment.
- After a brief period of holding, return the weights to the floor.
- Raise the dumbbells once again, extending them to your sides to create a T-shape with your hands pointing downward.
- After a brief period of holding, return the weights to the floor.
- Raise the dumbbells so that your arms form an I in front of you, with your palms facing one another.
- After a brief period of holding, return the weights to the floor.
- Do this twelve to fifteen times.
Rear Delt Training Tips
- The secret to building balanced shoulders in terms of strength, size, and stability is to train your back delts.
- Now that you are aware of the top workouts to select from, here are some essential pointers to help you maximize your efforts and continue improving.
Learn Scapular Control
- As you perform your shoulder rotations, try to establish a mental-muscular link with your rear delt muscles.
- Never pull away from your arms; instead, keep your shoulders down and back.
- Lead with the backs of your shoulders in all movements, including the easier ones like pull-apart and face pulls.
- To prepare your brain and muscles, these are excellent warm-ups before training your back delts.
- While retracting your scapula is the goal of all these exercises, you also want to contract your rear delts to stabilize your shoulders throughout the retractions.
Train Rear Delts First
- It is common for trainers to advise finishing your session with isolation exercises in order to preserve as much energy as possible for compound movements.
- All things considered, this is wise counsel to heed.
- However, you may definitely exercise your back delts first if that’s your main goal.
- It might be beneficial to start with anything you want to devote the most of your attention to, as this is when you are most focused and energized during your session.
- Pull-apart is a good example of a lighter, smaller exercise that can assist in preparing your upper body for larger moves.
Change Your Variables
- Gaining strength requires progressive loading, which involves gradually raising the difficulty of your exercises by adjusting certain variables.
- But because your back delts are little muscles, you may not want to constantly apply weight to them.
- You may continue to test them by removing them from various positions.
- Your rear delts will be worked from various angles by face pulls, lat pulldowns, and inverted rows, which will help you continue to strengthen them.
- Additionally, you may switch up your equipment by utilizing barbells, dumbbells, bands, and cables.
- Adding unilateral motion to your pulldowns and rows is another method to spice up your rear delt workout.
Benefits of Training Your Rear Delts
- The little muscles on the backs of your shoulders, known as your rear delts, are crucial to the strength and health of your shoulders yet are frequently disregarded.
- Your daily mood, joint health, and athletic performance can all be enhanced by training them.
Increases Shoulder Stability
- Your shoulders are stabilized in part by your back delts.
- Teach them to engage while you take various actions to increase your stability.
- This can lessen the risk of damage from other activities, such as Olympic lifting and overhead motions.
- Improved shoulder stability can also benefit day-to-day tasks like putting baggage in an overhead compartment or reaching up to get a drink from a cupboard.
- As individuals age, it becomes more and more crucial to have strong, stable shoulders to assist in preventing injuries in daily life.
May Improve Posture
- Nowadays, people spend a great deal of time slumped over computers and smartphones or sitting.
- Poor posture, forward-jutting heads, and forward-rounded shoulders are the results of this.
- Pain and discomfort can result from maintaining your shoulders in an internally rotated and disengaged position over time.
- Strengthening your rear delt muscles will help you feel better about your posture and experience less pain.
- If you spend most of your time slumped over, even a few hours a week at the gym won’t make much of a difference in your posture.
- To address bad posture, try including brief workouts like band pull-apart to stimulate your rear delts during your daily activities.
Portable, inexpensive, and easy to use
- You may simply add resistance bands into your training program since they are affordable, lightweight, and simple to use. They also permit a great deal of flexibility and customization.
- Exercises with resistance bands can help address muscular imbalances and enhance flexibility and function.
- Additionally, they could aid with shoulder or back pain relief, particularly following surgery or an injury, allowing you to move around more comfortably during the day.
- Be cautious to speak with your healthcare provider before beginning these workouts if you have recently had surgery or an injury.
Builds Balanced Upper Body Strength
- It makes sense that a lot of people who are new to the gym spend a lot of time performing pushing exercises like the bench press that targets their chests and upper shoulders.
- While these workouts are crucial, strengthening your rear delts can help you develop more comprehensive and balanced upper body strength.
- You may develop balanced shoulders in terms of size and strength by including pulling exercises that target your rear delts in your routine.
- When you concentrate on pushing, you run the risk of overusing your anterior and medial delts.
- Strengthening your rear delts protects your shoulder joints throughout all kinds of exercises and strengthens your shoulders overall.
Can be modified to suit individual needs
- Stretching resistance bands increases their resistance.
- As a result, the workouts get harder as the bands stretch and easier as there is greater slack.
- As a result, changing a movement’s intensity is simple.
- The resistance level may be changed to meet your demands.
Safe and low impact: Ideal for shoulders
- Considering complex joints are more prone to injury, such as the shoulders, this low-impact, safe choice is especially suited for them.
- You may apply resistance at any angle without the aid of gravity, allowing you to concentrate on certain regions and a variety of rotational angles.
- Performing mild exercises to enhance your strength, stability, and range of motion will help you keep your shoulders healthy and avoid injuries.
Conclusion
An effective and secure technique to build strength and flexibility in your shoulders and rotator cuffs is through resistance band workouts. Enjoy incorporating them into your exercise regimen, and if you want help or have any medical issues, see a doctor, personal trainer, or physical therapist. If you feel any pain or discomfort, especially if you are recovering from an injury, stop practicing.
A good back and shoulder workout has many positive effects on your general health. The delts in the back play a major role in shoulder flexion. This facilitates routine tasks like picking things up. Enhancing your delt muscles is another effective strategy to prevent injuries. Many exercise regimens neglect to engage the back muscles; avoid making the same error. Maintaining a well-rounded workout regimen will pay off in the long run.
FAQ
Reverse flyes, bent-over lateral raises, and prone inclined lateral raises are a few of the greatest workouts for building your rear delts. Furthermore, you should concentrate on utilizing a weight that enables you to perform all of the recommended reps with the correct technique and maintain a moderate rep range of 8–12 repetitions.
Using a pair of light to medium dumbbells, you would typically perform a classic rear delt raise by bending at the hips into a forward hinge position (shoulders higher than hips), performing a reverse fly with an emphasis on isolating your rear delts, and then briefly pausing at the top of the movement to squeeze your shoulder blades.
Nonetheless, they are an effective method of pre- and post-exhausting a particular muscle, such as the rear deltoid, before or after a strenuous compound lift. Get three sets of eight to ten repetitions at a weight that you feel comfortable with.
Although certain shoulder muscles are used during push-ups, the back delts are not worked. The back delts are the focus of all the workouts below. Rows and pullups are excellent choices if you’re searching for complex exercises that target the back delts.
During chin-ups, bring your elbows back and squeeze your shoulder blades together at the height of the exercise to ensure appropriate engagement of the rear delts. When performing bent-over rows, keep your elbows close to your body, keep your back flat, and draw the weight towards your lower chest.
References
- Stobo, R. (2023, January 24). 11 Best Rear Delt Exercises: Level Up Your Shoulder Game. Greatist. https://greatist.com/fitness/best-rear-delt-exercises#incline-dumbbell-y-raises
- Zucker, J. (2023, August 7). The 8 Best Rear Delt Exercises for Stronger, Well-Rounded Shoulders. BarBend. https://barbend.com/best-rear-delt-exercises/
- Cpt, K. S. (2023, March 10). 6 Exercises to Improve Posterior Deltoid Strength. Healthline. https://www.healthline.com/health/fitness-exercise/rear-delt-exercises#The-bottom-line