12 Best Exercises for Collar Bone
Welcome to a journey of sculpting and defining your collarbone with targeted exercises. Your collarbone plays a crucial role in framing your upper body, and with the right workouts, you can enhance its strength and appearance.
In this guide, we’ll explore a series of exercises designed to specifically target the muscles around the collarbone, helping you achieve a toned and well-defined look. Whether you’re aiming to improve your overall upper body strength or simply want to accentuate your collarbone, these exercises are tailored to elevate your fitness routine.
Table of Contents
What is Collar bone?
The bone (collar bone) is the part of your bone that connects your arm to your body. Ligaments connect this long, thin bone from the sternum to the shoulder. Your collarbone is prone to injuries such as a broken collarbone, dislocated shoulder, and dislocated shoulder. Falls are the most common cause of clavicle injuries.
The clavicle bone is a long, slightly curved bone that connects your arm to your body. You will find one on each side of the lower part of the neck. The bones help keep your shoulders in the correct position as you move.
The word “clavicle” originated from the Latin word “clavicula” the meaning of this word “small key”. The bone is actually somewhat shaped like an old-fashioned key. And it works very much the same. When you turn the key, it moves the lock. Similarly, when you raise your arm, your collarbone turns on its axis, allowing for movement.
Because of their location and role in shoulder movement, the clavicle bones are prone to damage. These injuries are common in contact sports, falls (especially when you raise your arms to catch yourself), and injuries such as car accidents. Sometimes babies can suffer a clavicle injury during birth.
What are clavicles made of?
Your cells are bones, and bones are made up of layers of cells and proteins. They have a hard outer layer or shell and an inner layer of spongy bone tissue (cancellous bone).
Anatomy of the clavicle bone:
Where is the clavicle located?
In an adult, each collarbone is about 6 inches long and crosses the chest at the front of the shoulder. It runs horizontally (side to side). Strong bands of tissue (ligaments) connect the sternum (sternum) in the middle of the thorax to the scapula (scapula).
Muscles:
The clavicle has multiple attachments:
superior surface: The anterior deltoid comes from the front and helps with shoulder flexion, while one of the trapezius attachments is at the back. The trapezius is primarily responsible for stabilizing the scapula.
Inferior surface: The subclavian muscle is located in the subclavian groove of the clavicle and acts to both depress the shoulder and pull the clavicle anteroinferiorly. The coracoacromial ligament lies laterally and supports the underlying coracoid. The medial component of the coracoacromial ligament is the conoid ligament, which attaches to the coniform tubercle, and the lateral component is the trapezius ligament, which inserts into the trapezius line.
Anterior surface: The clavicular part of the pectoralis major originates from the anterior medial clavicle. The humeral head contributes to flexion, horizontal adduction, and internal rotation of the humerus.
Posterior surface: As mentioned, the trapezius lies on the posterosuperior clavicle. The sternocleidomastoid (SCM) has a similar location on the head of the clavicle but is found in the medial third of the clavicle. The SCM, when it self-contracts, causes rotation of the head to the contralateral side and lateral bending on the same side. When both SCMs contract, it causes the head to flex.
In addition to the ligament and the posterior sternoclavicular ligament, the sternohyoid muscle has fibers that originate inferomedially from the posterior surface of the clavicle. Contraction of the sternohyoid causes depression of the hyoid.
Best Exercises for Collor bone
Shoulder roll
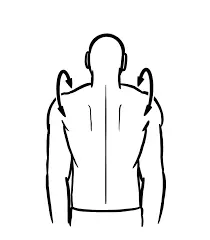
The shoulder roll exercise is a simple movement that helps to improve flexibility and mobility in the shoulders. Here’s how to do it: start with the standing position and your shoulders should be adducted. Start with the sitting position and with your head aligned with your spine.
Inhale deeply, and as you exhale, roll your shoulders slowly and gently in a circular motion, starting from a forward position.
Continue the circular motion by rolling your shoulders back then bringing them up towards your ears, and finally rolling them forward again to complete the circle.
Repeat the shoulder rolls for about 10 to 15 repetitions in one direction.
Then, reverse the direction and perform 10 to 15 repetitions in the opposite direction.
Make sure to perform the exercise in a smooth and controlled manner, without any jerking movements. This exercise can help to reduce stiffness and improve the range of motion in your shoulder joints. It is particularly beneficial if you spend long hours sitting at a desk or engaging in activities that strain the shoulders. Regular practice of shoulder rolls can contribute to better shoulder health and overall upper-body flexibility.
While shoulder roll exercises may not directly target the collarbone, they can help create an environment of improved shoulder and upper body function, which can indirectly benefit the collarbone region. Incorporating these exercises into a regular fitness routine can contribute to better overall upper body health and mobility, potentially leading to reduced discomfort and improved function in the collarbone area.
Shoulder blade squeeze
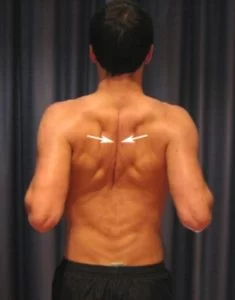
The shoulder blade squeeze exercise is beneficial for improving posture and strengthening the muscles of the upper back, including the muscles around the collarbone. We give the whole procedure on how to perform shoulder blade squeeze exercises. For the shoulder blade squeeze exercise start with the sitting position with both shoulders should be relaxed.
Keep your shoulders adducted or keep your hands on your hips.
Squeeze your shoulder blades together by pulling them backward and downwards direction.
Hold this position for 5-10 seconds while keeping your chest open and your chin parallel to the floor.
Release the squeeze and relax your shoulders.
Repeat the movement for 10-15 repetitions.
Focus on maintaining proper posture and controlled movements throughout the exercise. The shoulder blade squeeze helps strengthen the muscles between your shoulder blades, promoting stability and support for the collarbone and the surrounding area. Additionally, it can aid in relieving tension and stiffness in the upper back and shoulders, leading to improved overall posture and reduced discomfort in the collarbone region. Incorporating this exercise into your regular workout routine can contribute to better upper body strength and posture.
Incorporating shoulder blade squeeze exercises into your regular workout routine can contribute to better upper body strength, improved posture, and reduced discomfort in the collarbone region. However, it’s essential to perform these exercises with proper form and technique to maximize their benefits and minimize the risk of injury.
Chest stretch
For the chest stretch, you can choose the sitting or standing position which relaxes your whole body.
Keep your fingers behind your back, with your palms facing downwards. Keep your shoulders Straight and then gently lift your shoulders away from your body, feeling a stretch around the chest area.
Keep your shoulders relaxed and avoid overarching your back. Hold the stretch for 20-30 seconds while taking deep, slow breaths. Release the stretch gradually and repeat as necessary.
During the stretch:
Focus on maintaining a relaxed breathing pattern to help deepen the stretch
Be mindful of your posture, keeping your shoulders down and back for an optimal stretch.
Avoid any discomfort or pain, and adjust the intensity of the stretch as needed.
Incorporating chest expansion exercises into your regular routine can help counteract the effects of prolonged sitting and slouching, which can lead to tightness and reduced mobility in the chest area.
It’s important to perform these exercises regularly to maintain flexibility and promote better posture. Additionally, combining chest expansion exercises with a comprehensive stretching and strengthening program can provide even more significant benefits for overall flexibility and posture.
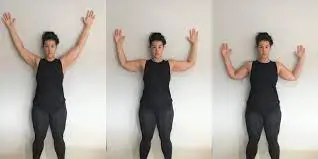
Shoulder flexion

Shoulder flexion exercises are essential for maintaining shoulder mobility and improving overall upper-body flexibility. One effective shoulder flexion exercise is the “Wall Angels” exercise, which targets the shoulders, upper back, and chest. we give the whole procedure of the shoulder flexion exercise:
Stand with your back against a wall, ensuring that your feet are a few inches away from the wall. Position your arms at your sides, making sure your wrists, elbows, and shoulders are in contact with the wall.
Slowly raise your arms, maintaining contact with the wall, until your arms are overhead, resembling a “Y” shape.
Maintained the shoulder flexion position for a second and then back to the normal position.
Repeat the movement for several repetitions, focusing on maintaining proper form and controlled movements.
Key points to remember when performing shoulder flexion exercises:
Keep your back and head in contact with the wall throughout the exercise.
Engage your core muscles to maintain stability and prevent arching of your lower back.
Perform the exercise in a slow and controlled manner, emphasizing the stretch and movement in your shoulders and upper back.
Incorporating shoulder flexion exercises like Wall Angels into your regular workout routine can help improve shoulder mobility and flexibility, leading to better overall upper body function and reduced risk of shoulder injuries. Additionally, combining these exercises with a comprehensive strength and stretching program can provide even more significant benefits for your overall shoulder health and mobility.
Wall angle
The wall angel exercise is a simple yet effective movement that helps improve posture, shoulder mobility, and upper back strength. It is particularly useful for individuals who spend long hours sitting or working at a desk, as it helps counteract the negative effects of poor posture.
We give the whole procedure of the wall angel exercise: Stand with your back against a wall: Ensure that your feet are about six inches away from the wall and that your head, shoulders, and buttocks are all touching the wall.
Bend your elbows to 90 degrees: Position your arms so that your upper arms are parallel to the floor and your elbows are bent at 90-degree angles, resembling a goalpost position.
Slide your arms up the wall: Keeping your elbows and wrists in contact with the wall, slowly slide your arms upward as far as you can without letting your lower back arch or losing contact with the wall. You should feel a stretch across your chest and shoulders as you perform this movement.
Return to the starting position: Slide your arms back down the wall to return to the starting position, maintaining contact with the wall throughout the movement.
Repeat for several repetitions: Aim for 8-12 repetitions to start, gradually increasing the number as your mobility and strength improve.
Key points to keep in mind:
Focus on keeping your entire back, including your head, in contact with the wall throughout the exercise. Engage your core muscles to maintain stability and prevent excessive arching of your lower back.
Perform the movement slowly and with control, emphasizing the stretch across your chest and shoulders.
The wall angel exercise is a great addition to a routine aimed at improving posture and shoulder mobility. It helps strengthen the muscles of the upper back, which can ultimately contribute to better overall posture and reduced risk of upper body discomfort.
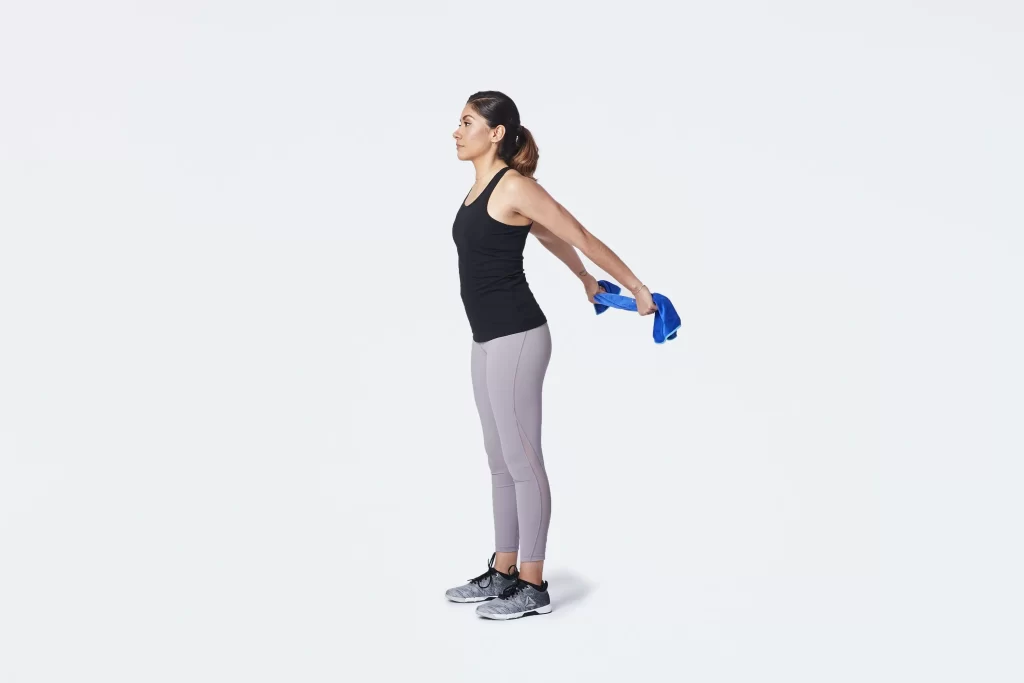
Reverse flyes
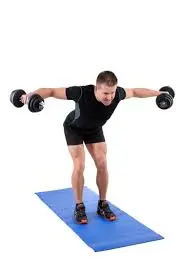
Reverse flies are an effective exercise for targeting the muscles of the upper back and rear shoulders. This exercise helps to improve posture and strengthen the muscles that are crucial for shoulder stability. Here’s how you can perform reverse flyes:
Starting Position: Stand with your feet shoulder-width apart, holding a pair of dumbbells in your hands. for this exercise, you can also use the bench(Sitting position).
Form: Bend your knees slightly and hinge forward at your hips, maintaining a straight back. You should keep your spine neutral during the exercise which is necessary and also include your core muscle during the exercise. Your palms should face each other, and your arms should be hanging down perpendicular to the floor.
Movement: Keeping a slight bend in your elbows, lift the dumbbells out to the sides until your arms are parallel to the floor. you should squeeze your shoulder blade at the same time while moving. Exhale during this phase.
Return: Lower the dumbbells back down in a controlled manner to the starting position while inhaling.
Repetitions: Aim for two to five sets of 10-15 repetitions, depending on your fitness level. Adjust the weight of the dumbbells as needed to ensure that you can maintain proper form throughout the exercise.
Make sure to use a weight that challenges your muscles without compromising your form. It’s crucial to perform the exercise in a slow and controlled manner to fully engage the targeted muscles. Additionally, consult a fitness professional if you have any concerns or if you’re unsure about your form.
It’s important to note that the collarbone itself does not contain muscles, but the surrounding muscles greatly influence its appearance and the overall aesthetics of the upper chest and shoulder area. Incorporating a variety of exercises that target the chest, shoulders, and upper back can help improve the strength, stability, and definition of the muscles surrounding the collarbone, contributing to a more defined and sculpted appearance.
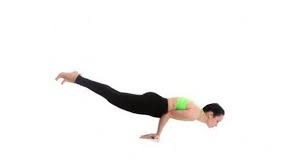
Tringle fly with weight
Triangle fly is a free weight and pilates workout that primarily targets the shoulders. The only tri-back push-up equipment you really need is dumbbells. However, there are many different triangle back variations that you can try, which may require different types of triangle back equipment or even no equipment at all.
Grab one dumbbell with your left hand.
Next, place your left foot on the floor so that it is facing forward.
Slide your right foot to the side so that your right heel is perpendicular to your left foot. Bend from the waist to your right leg and place your hand on the outside of your leg.
Next, raise your left arm so that the dumbbell is slightly bent at the elbow straight up toward the ceiling. This is the starting position. Begin the exercise by slowly pulling your arm back to squeeze your shoulder blade. Raise your hand back up. This ends one line.
Banded pull apart
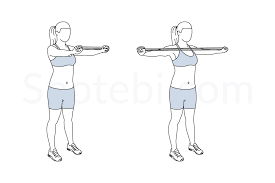
The banded pull-apart is a popular exercise that primarily targets the upper back and shoulders. It’s commonly used to improve posture, strengthen the muscles around the shoulder blades, and promote shoulder stability. This exercise is often done with a resistance band, which provides variable resistance as the band is stretched.
Here’s a step-by-step guide on how to perform the banded pull-apart exercise:
Stand with your feet shoulder-width apart and hold a resistance band in front of you with a grip slightly wider than shoulder-width apart. Keep your arms straight but not locked and maintain a slight bend in your elbows. Starting Position: Hold the band in front of your chest with your palms facing downward. This is your starting position. Keeping your core engaged and your chest up, slowly pull the band apart by moving your arms out to your sides.
Focus on using your back muscles to initiate the movement, squeezing your shoulder blades together as you pull the band apart.
Continue pulling the band until your arms are straight out to your sides and in line with your shoulders. Pause for a moment, then slowly return to the starting position, controlling the band as you bring your hands back together in front of your chest.
Aim for 2-3 sets of 10-15 repetitions, depending on your fitness level and the resistance of the band you’re using. Adjust the number of repetitions and sets based on your specific workout goals and capabilities. Breathing: Inhale as you pull the band apart and exhale as you return to the starting position.
Focus on maintaining proper posture throughout the exercise, avoiding any excessive leaning forward or backward. Keep your movements controlled and deliberate, emphasizing the engagement of your back muscles.
Choose a resistance band that provides an appropriate level of challenge without causing excessive strain or compromising your form.
Incorporating the banded pull-apart into your regular workout routine can help strengthen your upper back, improve shoulder mobility, and enhance overall posture, making it a valuable addition to your exercise regimen.
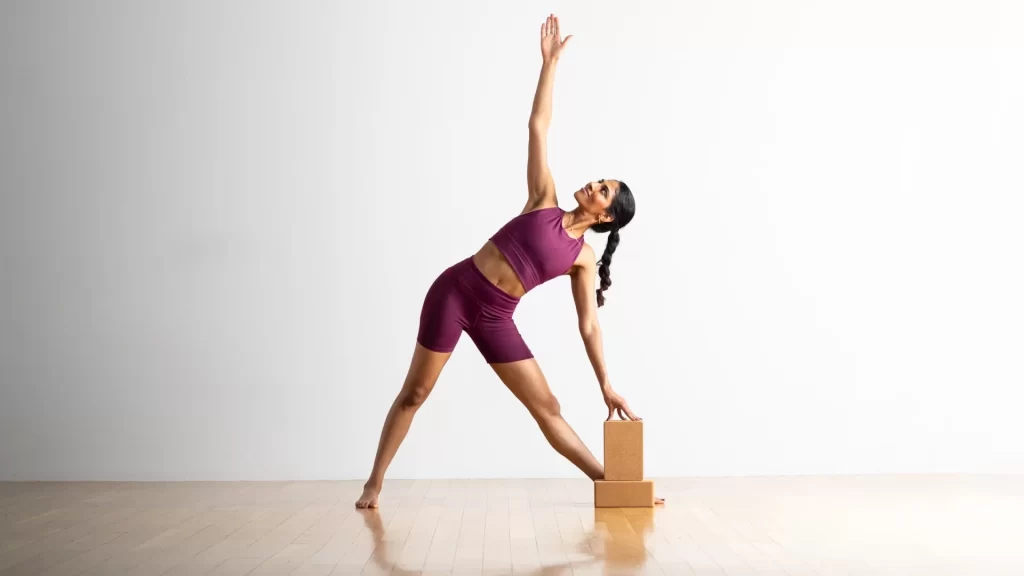
Bridging exercise
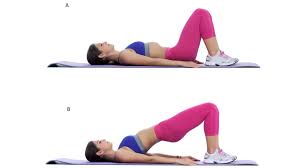
The bridge pose is a beneficial yoga asana that can help improve posture and strengthen the muscles in the back, buttocks, and hamstrings. While it may not directly impact the appearance of your collarbone, it can contribute to overall posture and alignment, which may indirectly enhance the appearance of your collarbone area. Additionally, practicing yoga poses like the bridge pose can promote body awareness and mindfulness, leading to a more confident and graceful demeanor.
Here’s a step-by-step guide on how to perform the bridge pose:
Start with the supine lying position on the floor or yoga mat with both knee flexions.
Press your feet and arms into the floor as you lift your hips up towards the ceiling.
Roll your shoulders underneath you and clasp your hands together, if possible, interlacing your fingers. Keep your thighs and feet parallel, and try to lengthen your tailbone toward the backs of your knees. Maintain a gentle lift in your chest while keeping your chin away from your chest to avoid compressing the back of your neck.
Breathing: Breathe deeply and evenly as you hold the pose, aiming to maintain a steady and controlled breath throughout.
Hold the bridge pose for 30 seconds to a minute, depending on your comfort level and experience. As you progress, you can gradually increase the duration of the hold.
To release the pose, gently unclasp your hands and lower your spine, one vertebra at a time, back to the mat. Regular practice of the bridge pose, along with a well-rounded exercise routine that includes strength training and cardiovascular activities, can contribute to improved overall posture and muscle tone, which can enhance the appearance of the collarbone area over time.
However, it’s important to note that specific structural features, such as the shape of the collarbone, are primarily determined by genetics and may not be significantly altered by exercise alone.
Push up
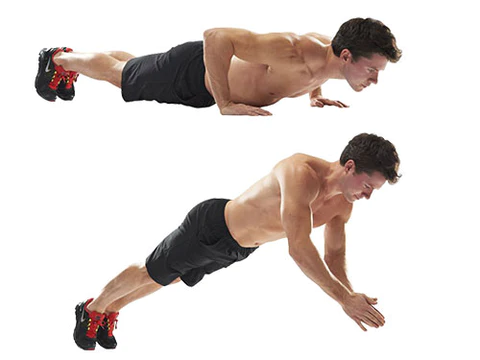
Push-ups are a fantastic bodyweight exercise that primarily targets the muscles in your chest, shoulders, and triceps. They also engage your core for stability. Here’s a step-by-step guide on how to perform a standard push-up:
Starting position: Start by placing your hands on the floor slightly wider than shoulder-width apart. you should maintain the alignment from head to toe which provides a good posture during the whole exercise.
Lower your body to the surface by extension of your elbows. Your chest should almost touch the ground and your elbows should form a 45-degree angle with your body.
Keep your body straight during the movement. Exhale as you lift yourself up.
Repetition: Aim for a certain number of repetitions. Start with a number that challenges you without compromising on form. once you become habitual with this exercise you can increase the number of repetation. Here are some important tips for doing push-ups correctly:
You should maintain a good or straight alignment from your head to the whole exercise. Brace your core so your hips don’t sag or lift too high. Concentrate on your breathing. Now do inspiration and then do expiration then again start the exercise. the push-up exercise is not easy exercise so if you are not able to do this whole procedure you can take the help of the physiotherapist. Ensure your hands are positioned directly under your shoulders to prevent unnecessary strain.
If a full push-up is too challenging, you can modify it by performing push-ups on your knees or against a stable elevated surface, such as a bench or countertop.
Push-ups can be integrated into your workout routine to help build upper body strength, muscle endurance, and overall fitness. Variations like wide-grip push-ups, diamond push-ups, and decline push-ups can target different muscle groups to add variety and challenge to your workout routine.
Prayer reach exercise
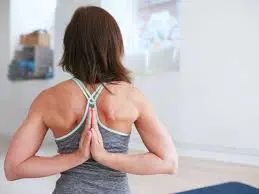
Kneel on a yoga mat or padded surface with your knees slightly apart. Allow your hips to rest on your heels, or as close to your heels as you feel comfortable. This is your starting point. Top tip –Add a pillow or extra support between your calves and thighs to reduce pressure on your knees. Extend your arms straight, hands on the floor as you lower your body to the ground.
Tuck your head in and walk your hands up the yoga mat until you feel a stretch in your lower back. Hold the stretch for about 10-20 seconds, making sure to breathe the entire time before slowly returning to the starting position. Remember that a good stretch should be fairly comfortable and definitely painless. If you feel pain, stop immediately.
Prayer Stretch Variations
Side Stretch
By simply extending both arms to the side of your body instead of reaching straight overhead, you’ll experience a deeper stretch in your lats as you perform lumbar motions.
Elevated stretching
To deepen the stretch and engage the triceps, perform the above movements, but this time extend your arms upwards from the starting position on an elevated surface such as a bench or even a sofa. This is a great modification to help improve upper arm position, which is key to many other exercises like pull-ups.
Foam roller
By resting your hands on the foam as you lower your body to the ground, you will likely be able to stretch more and feel the length of your back muscles. Be extra careful when choosing a foam roller and make sure the stretching is slow and controlled so you don’t overstretch your muscles and cause pain.
Swimming
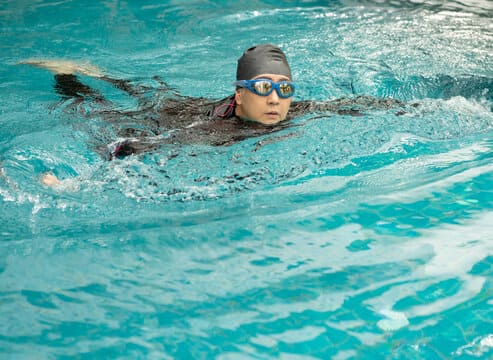
Swimming is a fantastic exercise that engages various muscle groups, including those around the collarbone and upper body. Several swimming strokes can effectively target the muscles in the collarbone area and contribute to improved strength and definition. Here are some swimming exercises that can benefit the collarbone area:
Freestyle Stroke (Front Crawl): The freestyle stroke is excellent for engaging the muscles in the shoulders, chest, and upper back. It can help improve overall upper body strength and promote a more defined collarbone area.
Breaststroke: The breaststroke is another effective swimming stroke that targets the chest, shoulders, and upper back muscles. It can contribute to improved muscle tone and flexibility in the collarbone area.
Butterfly Stroke: The butterfly stroke is a challenging yet effective swimming technique that engages the muscles in the chest, shoulders, and upper back. It can help strengthen the muscles around the collarbone area, leading to better muscle definition and overall upper-body strength.
Swimming regularly, incorporating various strokes, can contribute to improved muscle tone, flexibility, and cardiovascular health. Additionally, swimming is a low-impact exercise that is gentle on the joints, making it suitable for individuals looking to improve their overall fitness without placing excessive strain on the body. Always consult a swimming instructor or coach to ensure proper swimming techniques and safety protocols are followed.
The Benefit of Exercise for Collar Bone
Exercise can provide various benefits for the collarbone area, including strengthening the surrounding muscles, improving posture, and promoting overall upper body health. Here are some key benefits of exercises for the collarbone:
Increased Muscle Strength: Specific exercises targeting the muscles around the collarbone, such as the shoulders, upper back, and chest, can help improve muscle strength and stability, providing better support for the collarbone.
Enhanced Posture: Certain exercises can help strengthen the muscles responsible for maintaining proper posture, which can reduce strain on the collarbone and surrounding structures. Improved posture can also help prevent discomfort and injuries in the collarbone area.
Improved Flexibility: Incorporating stretching exercises into your routine can enhance flexibility in the shoulders and upper back, which can prevent stiffness and promote a better range of motion around the collarbone.
Reduced Risk of Injury: Strengthening the muscles around the collarbone through targeted exercises can improve their ability to absorb impact and support the bones in the area, reducing the risk of injury during physical activities or accidents.
Enhanced Circulation: Engaging in exercises can promote better blood flow to the collarbone and surrounding tissues, contributing to improved nutrient delivery and waste removal, which is vital for maintaining the health of the collarbone.
Pain Relief: Performing certain exercises can help alleviate discomfort or pain associated with poor posture, muscle tension, or minor injuries in the collarbone area.
Regular exercise, when combined with proper form and technique, can play a crucial role in maintaining the health and function of the collarbone. It’s essential to consult a healthcare professional or a certified trainer before starting any new exercise regimen, especially if you have pre-existing conditions or concerns related to the collarbone or surrounding areas. They can provide guidance on the most suitable exercises based on your individual needs and goals.
Precaution while exercise
While exercise is generally beneficial for overall health and well-being, it’s essential to take certain precautions to ensure safety and prevent injuries. Here are some key precautions to keep in mind when engaging in physical activities:
Consult with a Healthcare Professional: Before starting any new exercise program, especially if you have pre-existing health conditions or concerns, consult with a healthcare professional or a certified fitness trainer. They can provide guidance on the types of exercises that are safe and suitable for your specific health needs.
Warm-Up and Cool Down: Always begin your exercise routine with a proper warm-up to prepare your muscles and gradually increase your heart rate. Similarly, incorporate a cool-down session at the end of your workout to help your body return to its resting state. It provides the prevention of muscle strain or muscle injury.
Use Proper Technique: Ensure you are using the correct form and technique for each exercise to avoid unnecessary strain on your muscles and joints. Improper form can lead to injuries and long-term complications.
Stay Hydrated: Drink an adequate amount of water before, during, and after your workout to prevent dehydration, especially if you’re engaging in strenuous physical activities.
Listen to Your Body: you should also take care of any discomfort or pain while the exercise avoids this scenario. If you experience any unusual pain, dizziness, or shortness of breath, stop the activity immediately and consult a healthcare professional.
Wear Appropriate Gear: Use proper workout attire and footwear suitable for the type of exercise you are performing. This can help prevent injuries and provide better support for your body.
Progress Gradually: Avoid pushing yourself too hard, especially if you are just starting an exercise program or trying new activities. Gradually increase the intensity and duration of your workouts to prevent overexertion and muscle strains.
Rest and Recovery: Allow your body to rest and recover between workout sessions. excessive exercise becomes the reason for muscle fatigue and also increases the risk of injury.
By following these precautions and incorporating them into your exercise routine, you can ensure a safe and effective workout experience, minimizing the risk of injuries and maximizing the health benefits of physical activity.
Tip for how you can make your collar bone more prominent
While the prominence of the collarbone varies from person to person based on factors like genetics and body composition, there are ways to enhance the appearance of your collarbone. Here are some tips to make your collarbones more prominent:
Maintain a Healthy Body Weight: Losing excess body fat can help make your collarbones more visible. Engage in regular exercise and follow a balanced diet to achieve and maintain a healthy body weight.
Build Shoulder and Chest Muscles: Strengthening the muscles around your shoulders and chest can help define the area around your collarbones. Include exercises like push-ups, chest presses, and shoulder presses to build muscle mass in these areas.
Improve Posture: Correcting your posture can naturally make your collarbones more prominent. Stand and sit up straight, keeping your shoulders back and your chest open. This helps showcase your collarbones and enhances their visibility.
Targeted Exercises: Perform exercises that specifically target the collarbone area, such as shoulder blade squeezes, shoulder rolls, and chest flies. These exercises can help strengthen the muscles around the collarbones, making them more defined.
Highlighting Techniques: Use makeup techniques such as highlighting with bronzer or highlighter to accentuate the appearance of your collarbones. Applying a shimmery product along the collarbone can create the illusion of more prominent and defined bones.
Wear Appropriate Clothing: Opt for clothing that emphasizes the collarbone area, such as off-shoulder tops, V-neck shirts, or dresses with a scoop neckline. These clothing choices can draw attention to your collarbones and enhance their visibility.
It’s important to approach these suggestions in a healthy and balanced manner. Always consult a healthcare professional or a certified trainer before starting any new exercise regimen, especially if you have any underlying health concerns. Additionally, embrace your body as it is and remember that beauty comes in all shapes and sizes.
Boost Visible Collarbone Workouts With Complete Nutrition
Do clavicle exercises really work? Remember that everyone’s body is different. your collarbone does not look good if you have a healthy weight. Lack of muscle tension can prevent the clavicle from appearing. However, many people benefit from these exercises.
How long does it take for the collarbone to become visible? Do this regularly with clavicle exercises and these exercises should help you. Remember that exercise is only one part of achieving a better body. You can improve your results with a healthy diet.
A Note From Mobility Physiotherapy Clinic
Exercises for the collarbone area primarily involve targeting the muscles around the chest, shoulders, and upper back to improve overall muscle tone and definition. While the collarbone itself is not a muscle, strengthening the muscles around it can contribute to a more sculpted appearance.
Some exercises that can be beneficial include push-ups, dumbbell pullovers, dumbbell bench presses, shoulder presses, upright rows, and reverse flies. These exercises can help enhance posture, muscle definition, and stability in the upper body, indirectly contributing to a more defined collarbone area.
Remember to consult a fitness professional before starting any new exercise routine, and always prioritize proper form and technique to prevent injury and maximize results. Regularly incorporating these exercises into your workout regimen, along with a balanced diet and overall fitness routine, can lead to noticeable improvements in the appearance and strength of the collarbone area over time.
FAQ
Begin this exercise with your back against the wall and your hands above your head. Keeping your hands against the wall, bend your elbows and slowly lower your hands, squeezing your glutes. Repeat eight to ten times.
Everything you need to know about Beauty Bone |
There are some effective exercises that are easy to do and will help make your cheekbones even more prominent! Shoulder raises: If you do this exercise 15-20 times a day, you can highlight the collarbone. Pull both shoulders around the neck, hold for a few seconds, and repeat.
Ten Amazing Exercises To Get That Perfect Collar Bone – Samrpan Physiotherapy Clinic
Your clavicle bone is associated with various muscles including the deltoids, trapezius, pectoralis major (chest), and rhomboids. So, when you do collar exercises that consider these areas, you will end up toning them which makes your collarbone more visible and defined and also beautiful.
Here are the top ten dry fruits that have too much calcium that can make stronger bones and a healthier you.
Almonds: Almonds are the very best source of calcium, containing approximately 76 mg of calcium per 28 grams. …
Figs: …
Dates: …
Prunes: …
Sesame Seeds: …
Chia Seeds: …
Sunflower Seeds: …
Pistachios:
Similar to clavicle shortening, clavicle lengthening surgery is performed under general anesthesia and results in minimal scarring. During the procedure, the bone is cut diagonally (read: diagonally) and both ends slide over each other, resulting in a length of approximately 15-18 centimeters.
If your collarbone doesn’t seem horizontal or nearly parallel to the ground, you probably have some kind of strain pulling your collarbone out of alignment. The more one or more clavicles are angled, the more aligned they are.
Collarbone Exercises: Do you want collarbones like a B-Town diva… Shoulders can also be very effective in improving the shape of your collarbone. Do this exercise 15-20 times a day to make your collarbone look better. Simply pull both shoulders around your neck and hold them there for a few seconds.
References
- Mash, M. (2020, February 20). A Better Way to Do the Band Pull Apart. Barbell Rehab. https://barbellrehab.com/better-band-pull-apart/
- Clavicle. (n.d.). Physiopedia. https://www.physio-pedia.com/Clavicle
- Drum, F. (2021, December 31). Prayer Stretch | How to Perform, Benefits & Muscles Worked. Fitness Drum. https://fitnessdrum.com/prayer-stretch/
- Triangle Back Pulse. (n.d.). Exercise.com. https://www.exercise.com/exercises/triangle-back-pulse/
- O. (2023, April 24). 7 Collarbone Workouts for a Defined Collarbone. Satia – Health, Wellness, Nutrition. https://satia.com/blog/7-collarbone-workouts-for-a-defined-collarbone