How to Relieve Muscle Pain Quickly?
Muscle pain is a common discomfort felt by individuals of all ages and during stressful activity. Whether it stems from strenuous exercise, poor posture, or everyday activities, finding quick and effective relief is essential to maintaining an active and pain-free lifestyle.
In this article, we will explore various strategies and remedies to alleviate muscle pain rapidly, enabling you to get back to your routine with minimal disruption. From home remedies to professional treatments, understanding the options available can help you choose the best approach for your specific needs and circumstances.
Table of Contents
What is Delayed Onset Muscle Pain?
- Most people have probably had DOMS at some point in their lives. DOMS is when you don’t feel sore right away after working out but start to feel that way about two days later. The symptoms usually peak 24-48 hours after activity and might range from mild soreness to crippling pain and tightness.
- DOMS can also affect well-trained athlete performance. It can show up as decreased peak torque, restricted joint range of motion, and stress on other muscles as the body makes up for sore spots. The precise physiological process by which DOMS is caused remains unclear, despite the fact that it has been proved that EECs are the primary cause of the pain. There are ideas that link this discomfort to inflammation, muscle spasms, tissue or muscle injury, and lactic acid buildup; nevertheless,
- You can have intermittent sharp aches or a constant, profound discomfort. Some people only feel discomfort in certain places of their muscles, while others have it all over. Muscle discomfort affects people in different ways.
- Even though DOMS may frequently be resolved on its own with rest, many people—especially athletes—want to hasten the healing process. And they strive to stop inflammation in order to do that. However, the body needs acute inflammation from exercise in order to heal and grow muscles; therefore, preventing or postponing this process can prevent the body from healing and growing muscles.
What is the relationship between healing and inflammation?
- The body’s natural defense mechanism against disease or injury is inflammation. Intense exercise damages muscle cells and fibres, which accelerates the inflammatory process. This inflammation facilitates the body’s ability to repair the injured muscle by boosting local blood flow, removing waste products or cellular debris, resupplying oxygen, and giving the muscles fuel. At the site of the damage, this process frequently results in heat, redness, swelling, and discomfort.
- Although it hurts, muscles must experience this severe inflammation in order to heal and get stronger. The objective should be to get the inflammation under control as quickly as reduction, rather than to completely block it.
Causes of Muscle Pain
- Muscle soreness can affect people of all ages and genders. A change in exercise habits or attempting a new physical activity may cause delayed-onset muscle soreness (DOMS). After working out, muscle aches may start six to twelve hours later and continue up to 48 hours. As the muscles grow stronger and repair, you experience discomfort.
The causes of muscle soreness, such as:
illnesses triggered by antibodies.
- When the immune system of the body unintentionally targets itself, autoimmune disorders result. An effective immune system fights against pathogens and diseases.
Among the autoimmune conditions that result in muscle pain are:
- Polymyositis
- Inflammatory myopathies.
- Lupine disease.
- multiple sclerosis (MS).
Infections
- Infections caused by bacteria and viruses may lead to pain all over. You may also have nausea, fever, and swollen lymph nodes, depending on the underlying cause.
- Infections of the following kinds can result in muscle aches:
- Flu and colds
- Rocky Mountain spotted fever and Lyme disease are illnesses that are contracted by tick bites.
- Malaria
- The foodborne sickness trichinosis.
Accidents
- You run the risk of developing sore muscles from overuse when you exercise or utilise the same muscles at work frequently.
Other Exercise related
- exercising more frequently than normal
- exercising more intensely
- putting in lengthier training sessions
- adding fresh workouts to a regimen
Types of Muscle Soreness
- Acute muscle soreness, also known as delayed onset muscle soreness (DOMS) or immediate muscle discomfort
- Acute muscular discomfort occurs during or right after physical activity. People frequently describe this as a cramping pain. It results from metabolite accumulation in the muscle during high-intensity exercise. This kind of muscle discomfort goes away fast.
Your symptoms of delayed onset muscle soreness peak 24 to 72 hours after activity.
The stiffness and ache you experience the day after working out is this kind of soreness. It is caused by small tears that occur during activity in your surrounding connective tissues and muscle fibres. This typically occurs after engaging in new or more intensive exercise that causes your muscles to be used in ways they are used to. There is some validity to the muscle “no pain, no gain.” Reduce the amount of stiffness in your muscles by gradually increasing the intensity of your workouts.
Despite how unpleasant it could be, try not to allow the pain to get to you! You’re taking care of yourself; it will get easier the longer you stick with it.
Why Do Our Muscles Initially Become Sore?
- The American College of Sports Medicine (ACSM) states that muscular discomfort following exercise, often known as delayed-onset muscle soreness, or DOMS, indicates that you have injured your muscle tissue.
- Fluid buildup in the muscles puts additional strain on the injured areas, resulting in that well-known tightness and pain that usually starts to manifest 12 to 24 hours following your workout.
- Every exercise session causes some damage, but some activities are known to cause more damage and, consequently, more pain than others. Exercises that are novel to you, more higher than normal, or incorporate a lot of eccentric movements in particular are likely to cause more damage and pain to your muscles than other workout styles.
- The discomfort is coming from the eccentric, or extending, muscle contractions, Imagine walking or running down a hill, or the lowering phase of a chest press or biceps curl. Generally speaking, these kinds of exercises cause more harm to your muscles than concentric exercises (the kind where your muscle works as it shortens). While muscles are under a great deal of stress during both kinds of exercise, eccentric contractions (such as curling a dumbbell or pushing weight above) need the recruitment of fewer muscle fibres than concentric ones.
While some degree of soreness in the muscles is normal, it shouldn’t last too long.
- It sounds horrible to have tears and swollen muscles, and we definitely want to reduce inflammation in our day-to-day activities because studies have indicated that chronic inflammation is a major risk factor for a number of chronic illnesses. However, some degree of inflammation can be a crucial signal for muscle growth and regeneration. Your muscles will probably regrow larger and stronger if you aid in their healing.
- It’s likely that you want the soreness to go gone so you may resume your pain-free movement and daily activities. Remember that a great workout does not require you to be hurting after it. ‘’t have to cause soreness-inducing damage every time you work out. Soreness is a sign of damage, and harm is okay in moderation. “You shouldn’t aim for that,”
Does Warming Up Help Reduce Muscle Soreness After Exercise?
- You may have heard that aching can aid in the avoidance of pain and injury. However, it is generally not a good idea to stretch your muscles in a static manner before working out. Stretching before you start exercising is something you should avoid.
- Stretching after exercise had no discernible impact on recovery—either positive or negative—when compared to passive recovery, or rest.
- Although the amount of soreness observed in studies has been little, some data points to the possibility that a vigorous warm-up performed right before an exercise session could lessen pain in the muscles up to two days later.
After how much time do you feel your muscles are sore?
After exercise, delayed onset muscle soreness usually starts 12 to 24 hours later and peaks 1 to 3 days later.
How long does discomfort in the muscles generally last?
The worst of the DOMS usually sets in 48 to 72 hours after your workout, starting 12 to 24 hours after you work out. It goes beyond sore muscles. DOMS can also result in stiffness, soreness, and edema of the muscles. Fortunately, it normally ends in five to seven days.
When is hurting enough?
- Sore feel incredibly sore sometimes. Like, too damned sore to work out.
- Actually, mild activity will increase your blood flow and lessen your symptoms.”
- However, what happens if a sore seems too sore?
- However, persistent discomfort in the muscles may also indicate an injury.” Your soreness may be more than just muscle soreness and should be evaluated by a sports medicine physician if it lasts more than three days and is accompanied by acute pain that restricts your range of motion or interferes with your gait.
Should you exercise if your muscles are sore?
- Your symptoms will mostly determine whether or not you should exercise while experiencing muscular soreness. In most cases, DOMS is not the reason for alarm. If you experience small aches and pains, you probably don’t need to forgo exercising.
- Try cross-training as an alternative while your muscles get back to their original state. This approach combines multiple training modalities, such as strength training, flexibility, and aerobics, into a single fitness regimen. It enables you to continue training even when you’re hurt or sore. For instance, you can cross-train with a lower-body session if your arms hurt after a recent upper-body weight training session. Alternatively, you can choose to engage in softer, less strenuous exercises like yoga or tai chi until the pains go away. It is advised by experts to hold off on targeting the same muscle area for two to three days.
- Severe symptoms, such as excruciating muscle discomfort, may require medical intervention.
Treatment to get relief from the sore muscle
- What You Can Do to Reduce Muscle Soreness Both During and After Your Workout is as follows, There are several techniques you can employ to lessen muscle discomfort and speed up recovery after an exercise, even if there aren’t any quick fixes—your muscles just need time to repair.
1. Drink water both time before and after your workout.
2. Use a massage gun or foam roller (self-myofascial release) right away after your workout.
3. Consume Food Within 30 Minutes after a Vigorous Exercise.
4. Subsequently Rest between exercise sessions.
5. Perform Light Exercise the Day After a Hard Workout.
6. You Might Want to Avoid NSAIDs.
7. Apply the right methodology.
8. If you believe you have a sprain or strain, apply the RICE method.
9. Put on compression bandages.
10. Utilise kinesiology tape.
11. Use essential oils.
12. Increase your intake of anti-inflammatory foods.
13. Progress slowly to the next session of exercises.
14. Take a bath with salt water.
15. Use of antioxidant supplements.
16. Consume milk protein.
17. Topical Arnica.
18. Heat therapy.
19. Increased exercise can really aid in reducing soreness.
20. Increase the intensity of eccentric exercises gradually.
21. Supplements containing collagen fibers.
22. Taking a Coffee to drink
1. Drink water both time before and after your workout.
- Although it may seem minor case, maintaining proper hydration is important for muscle healing. According to a study, drinking water helps your body’s fluids flow, which reduces inflammation, eliminates waste, and feeds your muscles with nutrition.
- The problem is, according to a study, it might be difficult to determine when and if you’re dehydrated because you’ll likely become dehydrated before you feel thirsty.
- Another reliable indicator of your level of hydration is the colour of your urine: pale yellow indicates you’re well hydrated, while medium or dark yellow indicates dehydration. Just be advised that taking vitamin supplements could result in darker-than-normal urine. What kinds of vitamin supplements will have an impact on who? It’s difficult to say that. Everyone is unique, according to the study.
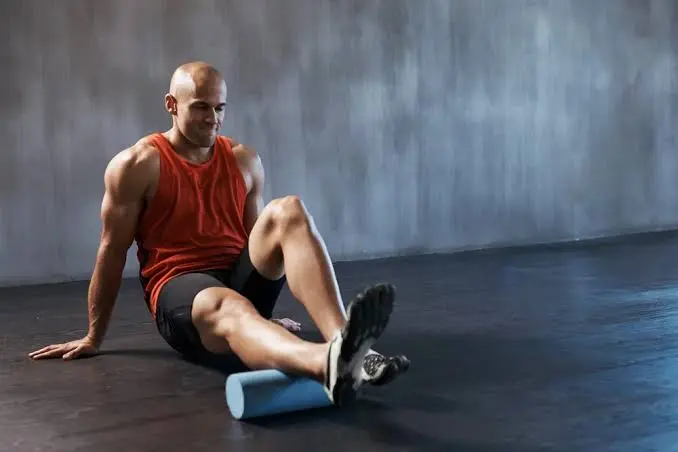
2. Use a massage gun or foam roller (self-myofascial release) right away after your workout.
Self-myofascial release (SMR)
- Self-myofascial release (SMR) is a technique that helps transfer the fluids that build up in muscles after exercise by releasing tension in the muscles and connective tissues. Common SMR equipment includes foam rollers, lacrosse balls, and massage sticks. Foam rolling could aid in lowering DOMS and improving range of motion. According to a study, foam rolling and other massage techniques improve circulation, which brings more nutrients and oxygen to the injured area and lessens soreness and swelling.
Foam roller
- Start with a softer foam roller if you’re interested in giving it a try. Applying additional pressure with firmer foam rollers is possible, but if you’re not used to them, they can be quite strong. According to a study, tennis balls are particularly useful to have on hand since they work wonders at reaching areas that are difficult to work, such as the iliotibia (IT) bands, glutes, lats, and calves. Just be careful not to use a roller directly on bones or joints—only on soft tissue.
For Quads
- This practice is posture yourself in a plank posture on your forearms, with the roller beneath your quadriceps.
- Start by carefully rolling down the roller until it reaches above your knee joint while bracing yourself with your upper body and core. After that, roll in the other direction until you get to your hip flexors.
- Try this for thirty seconds.
- In the course of the exercise Once you find a sensitive area, maintain the posture for a few breaths.
- Do three sessions a day, repeating one session three times.
Flexors of the hips
- This practice is First, lie on the foam roller in a supine posture, facing the floor, and then again in a plank position for your forearms.
- Verify that the foam roller is located underneath. beneath the injured hip flexor, while the other leg is obligingly bent to the side.
- As you are With your weight on your forearms, steadily roll on the foam roller up, down, and side to side to work on your hip flexors and pay special attention to any trigger points.
- Try this for thirty seconds.
For calf muscle
- To exercise the hip flexor on the opposite side, switch and repeat.
- Calves, you Start this workout by putting the foam roller under your calves while sitting on the floor with your legs fully stretched.
- Raise your body until your weight is supported by the foam roller.
- For added pressure, cross the left leg over the right.
- Next start slowly, move the body around the foam roller by rolling the right calf back and forth.
For hamstrings
- Starting this exercise also entails sitting on the floor with your legs outstretched.
- Position the foam roller beneath the hamstring muscle this time.
- Raise your body until your weight is supported by the foam roller, then gradually roll from the back of your knee joint to your glutes.
- Roll for at least 30 seconds while concentrating on any sore areas.
- To perform this exercise in a different way, cross your legs and concentrate on working one hamstring at a time.
- Do three sessions a day, repeating one session three times.
IT band
- To begin, lie on your right side with the foam roller below your right IT band and on the side of your thigh.
- Place your weight on your right forearm.
- Next, extend your right leg straight while bending your left leg at the knee and placing your foot comfortably in front of your right leg.
- Using your left leg and upper body as support, begin softly rolling the foam roller over the right IT band, between the knee joint and the glute muscle, pausing at any sore regions.
- After 30 seconds of this exercise, turn to roll your left IT band.
- Do three sessions a day, repeating one session three times.
For upper back
- To begin this workout, lie on your back in a supine posture with the foam roller below your upper back.
- The arms can be crossed in front of the chest or down to the sides, but the knee joint must be bent with the feet level on the ground.
- Lift the body into a shallow bridge position by bracing the core muscle.
- Next Roll slowly up and down between the mid-back and lower neck.
- Spend 30 seconds performing this workout.
- Do three sessions a day, repeating one session three times.
For Latticimus dorsi
- To begin this exercise, lie on your back at a 45-degree angle and lay the foam roller on your right lat.
- Has to Bend the left leg into a comfortable posture while maintaining the straight right leg.
- Roll slowly, concentrating on the sore spots, from the right armpit down to the mid-back region.
- Do this drill again for thirty seconds.
- To roll out your left lat, switch.
For Shoulders
- The foam roller lies beneath the patient’s right shoulder while they lie on their side.
- With the left arm extended in front to facilitate mobility, the lower body is comfortably supported by the ground.
- Next Roll gently over the deltoid muscle, up and down.
- If necessary, turn the trunk slightly so that it also touches the upper back.
- Do this drill again for thirty seconds.
- Repeat this exercise on your left shoulder after switching sides.
“Vibration therapy” or “percussive massage treatment.”
- Another well-liked equipment to aid in post-workout muscle recovery is a massage gun, often known as “vibration therapy” or “percussive massage treatment.”
- According to a study, “self-massage percussion devices function similarly to massage in general.” When applied to your muscles, these portable devices’ quick vibrations can aid in enhancing blood flow to that region. In order to more effectively target varied-sized muscle regions, many massage guns come with attachments of different shapes and sizes.
Massage guns
Effectiveness of massage guns in particular, but massage guns may incorporate vibration treatment and traditional massage, two practices that have scientific support. For instance, studies have shown that both approaches work just as well to avoid DOMS.
3. Consume Food Within 30 Minutes after a Vigorous Exercise
- According to a study, you might be able to expedite your recuperation by giving your muscles the nourishment they require to heal and become stronger again.
- He recommends that you consume 20 to 40 grams (g) of protein and 20 to 40 g of carbohydrates into your system within 30 minutes of finishing a vigorous or prolonged workout (one that lasts 60 minutes or more) in order to speed up your recuperation. (A Greek yogurt dish topped with a few berries and a tablespoon of honey makes a great snack.)
- Carbs are essential for refueling the fuel stores your muscles depleted, while protein is necessary for the amino acids needed to rebuild your muscles. However, the study advises not stopping at the post-workout snack; if you go without eating or eat less nutrient-densely throughout the day, you won’t aid in your muscles’ recovery. In order to ensure that your tissues receive a constant supply of amino acids throughout the day, make meals a priority and make sure to maintain a reasonably consistent daily protein consumption. The ACSM suggests 0.8 g of protein per kilogram (kg) of body weight per day, though specific recommendations may differ. That means you should eat 60 grams of protein on average each day if you weigh 75 kg, which is equivalent to 165 pounds.
- Consuming fruits, vegetables, and legumes is also essential for providing your body with vitamins and minerals that aid in healing, such as zinc and vitamin C.
4. Subsequentl: Rest between exercises session
- In addition to being essential for numerous reasons, sleep is also one of the most crucial elements of exercise recovery, according to a study. He continues, “It might not seem like it has an instant impact on [muscle soreness], but it can be helpful for sure.”
- According to one review, no rapid eye movement (NREM) sleep, for instance, promotes protein synthesis—the synthesis of new proteins—which is necessary to repair injured muscles. So, it’s important to get enough sleep after working exercise. Try to get seven hours or more of sleep each night.
5. Perform Light Exercise the Day After a Hard Workout
- Although sore muscles require rest, continuing on the couch all day is not the ideal solution. Make an effort to obtain some soft exercise by doing things like lightweight training, simple walks, swims, cycles, or even restorative yoga.
- The trick is to avoid working out too hard on the same muscle groups on different days. Aim for an effort level of three, according to Schroeder, on a scale of 0 to 10, with 10 representing the greatest intensity. In order to supply the oxygen and nutrients required for repair to the aching muscles, you want to get blood flowing to them without endangering the integrity of the muscle tissues.
Stretching
- You can perform 12-second stretches at home.
- Stretching sore muscles will increase blood flow and aid in the breakdown of lactic acid accumulation. The most important thing is to stretch extremely gently so as not to further harm the muscle groups. These five easy stretching techniques might speed up the healing process if you have painful muscles. Hold each one for a count of twelve, varying the pressure so that it relieves rather than increases soreness. Stop and rest if any stretching produces severe pain!
- some of the stretching is below
- Stretching your hamstrings
- Stretch your calf
- Leg extension stretch
- Stretching the inner thighs
- The buttocks stretch
- Hip flexor lunge stretch
- Stretching the piriformis
- Cat-Cow Stretch
- Stretching the triceps
- Stretching your biceps while standing
Stretching your hamstrings
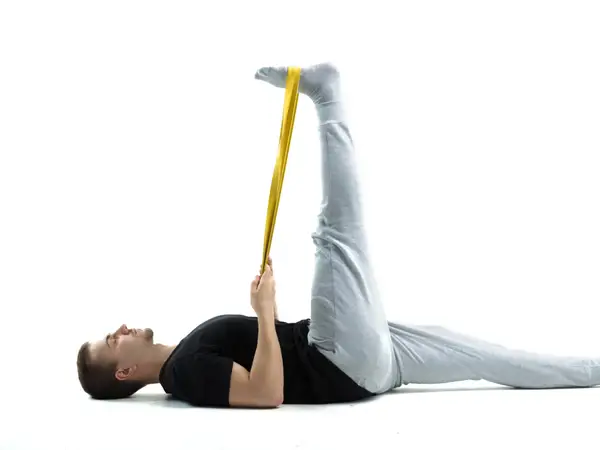
- Raise your right leg while lying on your back, trying to keep it as straight as possible.
- Using both hands, pinch the hamstring of your right leg.
- With your foot planted firmly on the ground and your left leg bowed, slowly bring your straighten your right leg as much as possible as it approaches.
- Hold for approximately twelve seconds.
- Continue using the other leg.
Stretch your calf
- Step forward with your right leg bent, keeping your feet parallel. Lean a little forward.
- Hold for 12 seconds while keeping your left leg straight and attempting to progressively drop your left heel to the ground.
- Continue using the other leg.
Leg extension
- Assume a prone position.
- Stretching the front of your leg, grasp the top of your left foot and carefully bring your heel towards your left buttock.
- Keep your knees in contact and hold the stretch for a full minute.
- Continue on the opposite side.
Stretching the inner thighs
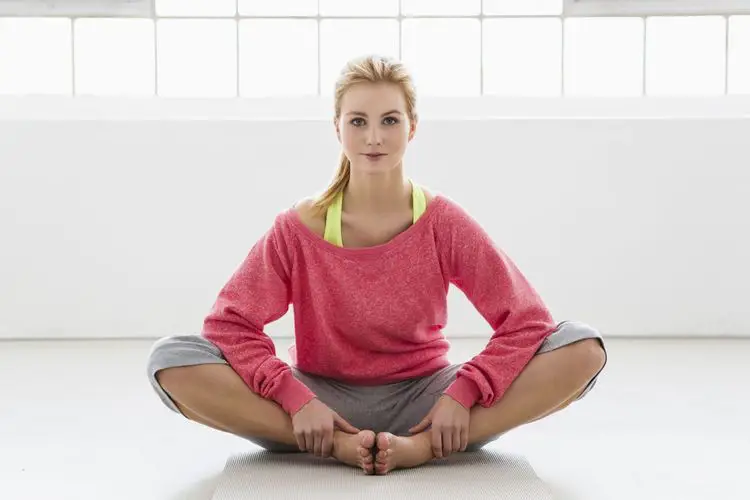
- Take a seat on a mat or the floor. Maintaining a straight back, Stretch out your legs to the side. Place your foot soles together.
- Gently bring your knees down to the floor while holding onto your feet or ankles. Hold for a full minute.
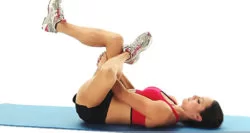
The buttocks stretch
- Assume a prone position and elevate your legs to your chest.
- Put your left thigh over your right leg.
- Using both hands, grab the back of your left leg.
- Bring your left leg up to your chest gently.
- Hold for a full minute, then gradually release
- Continue using the other leg.
Hip flexor lunge stretch

- The patient’s left knee is in a kneeling position.
- You must maintain a bent right knee and a flat right foot on the ground in front of you.
- Stretch your left hip out towards the floor as you lean forward.
- Next, repeat with the other leg.
- This stretching is done three times in a single session and three times daily.
Stretching the piriformis
- Stretching the piriformis involves having the patient sit on the floor with their legs out in front of you.
- Lift your left leg and place your left ankle on your right knee joint while maintaining your right leg flat on the floor.
- Then, bend forward and slightly arch your back until your buttocks feel stretched.
- Keep this stretching going.
Cat-Cow Stretch
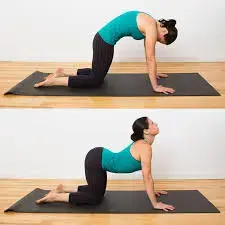
- Start this exercise on your hands and knees, with your spine in a neutral or relaxed position.
- Breathe in while pushing the chest forward and allowing the belly to drop towards the floor.
- Raise your head, loosen your shoulders, and start to exhale.
- Next, curve the spine upward, bringing the pubic bone forward and tucking in the tailbone.
- Next, let your head drop to the floor and repeat.
- This stretching is done three times in a single session and three times daily.
Stretching the triceps above
- Patient To relieve any tension, stand with your feet hip-width apart and roll your shoulders back and down.
- Raise your right arm to the sky and bring your right palm down with a bent elbow.
- palm down in the direction of the back’s center.
- Raise your left hand to gently draw your right elbow down.
- Next, repeat with the other leg.
- This stretching is done three times in a single session and three times daily.
Stretching your biceps while standing
- The patient is erect in a standing position.
- Extend your arms straight and rotate your hands such that the palms are facing downward.
- Stretching and patient should next elevate their arms as high as they can until their shoulders and biceps start to stretch.
- Next, repeat with the other leg.
- Three applications of this stretching are made.
The secret to these stretches is to go slowly, gently, and with just enough force to feel the muscle groups contracting. Instead of creating more suffering, the goal is to speed up the healing process from muscle soreness!
Exercises
A therapist may suggest doing simple exercises to relieve muscular discomfort after a workout. This workout varies based on the sore spot.
Neck pain
Perform the following exercise if you get soreness in your neck:
Head tilts
- Head tilts equal back and forward:
- Head Tilt = lateral to vertical
Head twists
- Head tilts equal back and forward
- The patient is alternately sitting and standing.
- Try to touch the chin to the chest and gently blow into the skull.
- then take a step back to the beginning.
- Do this three times a day and ten times in a single session.
- The patient is alternately sitting and standing.
- Next, tilt your head to the side and make an effort to get your ear close to your shoulder joint.
Head turns
- The patient is both seated and standing.
- Next, rotate the head to view the shoulder joint.
- Next, tuck your chin down and attempt to make contact with your shoulder joint.
- Never elevate your shoulder joint near your ear without caution.
- then take a step back to the beginning.
- Do this three times a day and ten times in a single session.
Shoulder pain
Perform the following exercise if you have discomfort in the shoulder joint:
- Squeeze your shoulder blades
- Arm motions
- Exercise using a pendulum:
- Wand practice
Squeezing the patient’s shoulder blades
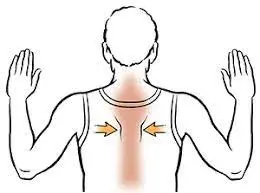
- The patient is standing straight.
- Bring the elbows back and inward by pulling the shoulder blades down and back.
- Return to the starting position after holding the position for ten seconds.
- In one session, this exercise is performed ten times.
Arm circles
- The patient stands with their arms at their sides and their feet shoulder-width apart.
- Has to be Maintain a straight arm position and make large forward circles with your arms.
- After completing the 15 clockwise repetitions, perform the exercise anticlockwise.
Exercise with a pendulum
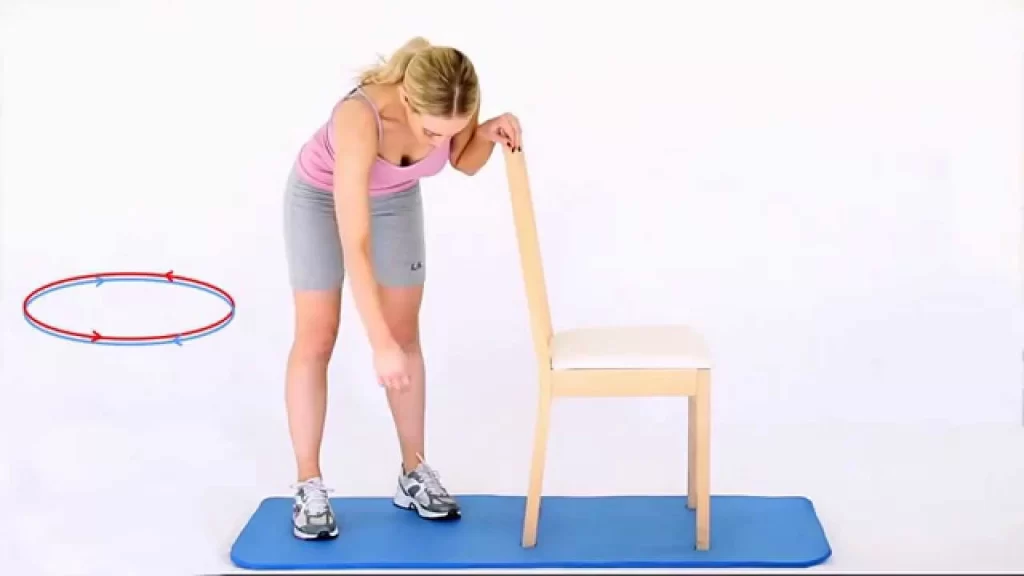
- The patient stands next to a table, feet somewhat wider than shoulder-width apart, and the hand of the unaffected shoulder resting on the table.
- Next, Allow the afflicted arm to dangle down towards the floor and bend the hip joint to a degree between 75 and 90 degrees.
- Allow the arms to swing freely as you shift the weight from side to side.
- Allow the arms to swing freely from front to back while shifting the weight forward and backward.
- When they are at ease with these motions, Has to Make sure the circle is no larger than eight inches.
- For thirty seconds, keep going.
- Increase the duration to three to five minutes each day.
- Do ten repetitions of this workout each day.
Workout with a wand

- With the assistance of both hands, the patient is holding the wand.
- Next, move your elbow and shoulder joints.
- Using the wand, do the following movements: elbow flexion, extension, external & internal rotation, shoulder flexion, abduction, and adduction.
Elbow ache
- Bend your elbow When elbow joint pain arises, perform the following exercise:
- The patient is alternately sitting and standing.
- Next, extend the elbow joint while pointing the palm forward.
- Try putting your fingertips on the shoulder joint.
- then take a step back to the beginning.
- Do ten things in a row.
Wrist and arm pain:
When you get arm and wrist pain, perform the following exercise:
- Bending of the wrists
- Rotation of the wrist
- both hands up and down
Bending of the wrists
- The patient is sitting with their wrists bent.
- Next With the fingers pointed upward, return the hand’s bend towards the wrist joint.
- With the fingers pointed towards the ground, flex the hand downward.
- Do this three times a day and ten times in a single session.
Rotating their wrists
- The patient is seated.
- Slide the hand back and forth.
- Rotate the hand in a clockwise manner.
- Rotate your hand in an anticlockwise circle.
- Do this three times a day and ten times in a single session.
Both hands up and down
- The patient is seated with their palms facing upward and downward.
- Make the hand gesture. Make sure the palm is pointing downward.
- Do this three times a day and ten times in a single session.
Hand and finger pain
When discomfort arises in the Finger and hand follow the exercise:
- Bending of the fingers
- Spreading fingers:
- Finger-thumb contact:
- Extended thumb-palm range:
Finger bends
- Both sitting and standing are positions for the patient.
- Next, clench your fist.
- Spread and ease the hand.
- Do this three times a day and ten times in a single session.
Spreading fingers
- The patient is both sitting and standing.
- Spread the fingers and open the hand.
- Next, bring your fingers back together.
- Do this three times a day and ten times in a single session.
Touches with the fingers and thumb
- The patient is both sitting and standing.
- Touch the thumb pad with each fingertip once.
- Do this three times a day and ten times in a single session.
Stretching from the thumb to the palm
- The patient is both sitting and standing.
- The thumb should be moved and rested over the palm.
- Again, extend the palm to the side.
- Do this three times a day and ten times in a single session.
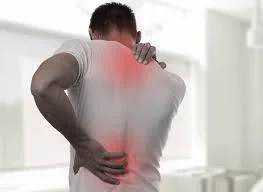
Back pain
- Perform the following exercise when you feel sore in your back:
- Superman Kegel Bridge
- Exercise with your knees to your chest
- Check your posture
Kegel
- This exercise works by halting the urine’s flow midway.
- The first five seconds of this workout are spent releasing the muscles after ten seconds of muscular tightness.
- You perform this exercise ten times
Superman
- The patient extends both of their arms and legs simultaneously as if they are flying while resting on their stomach on a level surface.
- After ten seconds of holding this exercise, go back to the beginning position.
- Ten reps in one session and three sessions a day are dedicated to this workout.
Bridge
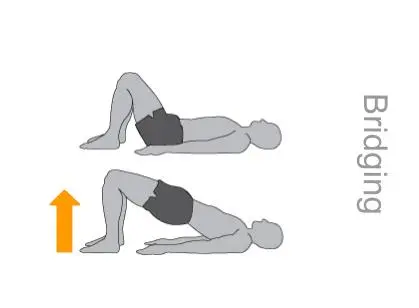
- The patient lies on their or her back on the floor or a bed, with their arms at their sides, their knees bent, and their feet flat.
- Tighten the muscles in your stomach and butt, then raise your pelvis so that your body forms a straight line from your shoulder to your knee.
- After holding this exercise for 15 seconds, carefully take a step back to the beginning.
- Ten times in one session and three times in each session is this workout.
Knee to chest
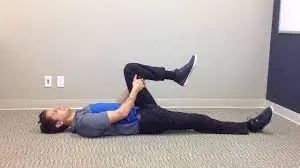
- The patient should lie on the floor on their back, elevate one leg, and pull their knee towards their chest.
- Keep your spine down to the floor and your abdominal muscles taut for ten seconds while performing this exercise.
- Next, let go and repeat on the opposite side.
- Ten reps in one session and three sessions a day are dedicated to this workout.
Check your posture:
- Positioning their back, buttocks, and heels on the wall, the patient stands.
- The patient has to work on correcting their posture if they are unable to achieve this position and can only maintain it with their chin up.
- After positioning a few towels behind the head, push the head and back up against the wall.
- Next, Assume a patient is attempting to bring their abdomen toward the ground.
Hip pain
Perform the following exercise if you have discomfort in your hip joint:
- Clam-shell
- Extension of the hips
- Hip abduction when standing
Clam-shell
- The patient is lying on his or her side with their legs stacked or their knee bent 45 degrees.
- Has to Maintain contact between the heels and, without moving the hips, lift the upper knee as high as the patient is able to without creating a clamshell opening.
- Return to the starting position after holding the position for ten seconds.
- Ten reps in one session and three sessions a day are dedicated to this workout.
Hip extension
- Place a cushion beneath your hip joint while lying on your stomach.
- Next, get out of the cushion with one leg extended.
- Return to the starting position after holding the position for ten seconds.
Standing hip abduction
- While the patient is upright, flex their abdominal muscles and slowly extend one leg out to the side.
- must use the opposing leg to keep balance.
- Return to the starting position after holding the position for ten seconds.
- Ten reps in one session and three sessions a day are dedicated to this workout.
Knee pain
Perform the following exercise if you have discomfort in your knee joint:
- Leg lifts that are straight
- a half-squat
- Extension of the knee
- Leg lifts that are straight
SLR, straight leg raise
- The patient is lying on the ground with their elbow joint just behind their shoulders.
- To keep the foot flat on the floor, do one leg straight and the other bent.
- Next, Raise the leg and tighten the straight leg’s thigh muscle. Next, Take ten seconds to hold this posture, then move back to the beginning.
- Ten reps in one session and three sessions a day are dedicated to this workout.
Half-squat
- The patient is in a half-squat. Place your hands in front of your body and your feet shoulder-width apart as you stand.
- Next As in a chair, lower the hip joint by approximately 10 inches, keeping your weight on your heels.
- After ten seconds, maintain this posture, then stand back up.
- Ten reps in one session and three sessions a day are dedicated to this workout.
Knee extension
- The patient is sitting with their back to a chair.
- With your abs contracted and your tummy button in towards your spine, sit up straight in the chair.
- Next, Straighten one slowly. extending that leg to its maximum height while pointing the toes skyward.
- Return to the starting position slowly after holding this position for a few seconds.
- Ten reps in one session and three sessions a day are dedicated to this workout.
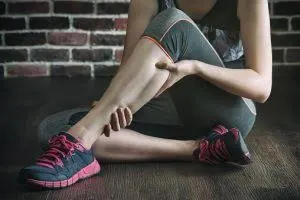
Pain in the ankles and feet
Perform the following exercise if you have discomfort in these areas:
- Bends of the ankles
- Rotate your ankles
- bend in the toes
- Spreads of toes
Ankle bends
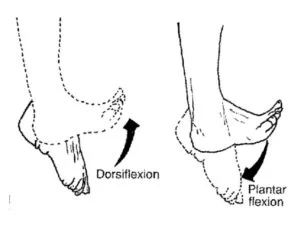
- The patient has both feet flat on the ground while seated in a chair.
- Elevate the heel while keeping the toes on the ground.
- Next, bring the heel down.
- The toes must be raised and the heel must remain on the ground.
- Do this three times a day and ten times in a single session.
Ankle rotation
- The patient has both feet flat on the ground while seated in a chair. Next, Lift the foot just a little bit off the ground.
- Clockwise rotate the ankle joint.
- Next, rotate the ankle joint anticlockwise in circles.
- Do this three times a day and ten times in a single session.
Toe bends
- The patient sits with both feet flat on the ground in a chair.
- Curl your toes downward towards your foot’s sole, or bottom.
- Next, Set your toes straight.
- Curl your toes upward and towards the sky.
- Next, reposition the toes.
- Do this three times a day and ten times in a single session.
Toe spreads
- The patient has both feet flat on the ground while seated in a chair.
- Disperse your toes. Reunite them.
- Do this three times a day and ten times in a single session.
Yoga
yoga is as follows,
- The Forward Folded Standing Pose (Uttanasana):
- Adho Mukha Svanasana (Downward Dog) to Anjaneyasana (Lunge)
- Bend your head to your knees
- Seated Forward Fold (Pascimottanasana)
- Janu Sirsasana, or the single-leg hamstring stretch,
- Seated Twist (Ardha Matsyendrasana)
- Stretching the groin
- Sputa Agnistambhasana, Ankle to Knee
The Forward Folded Standing Pose (Uttanasana):
- Taking a Forward Position
- The individual receiving care is to Place your feet about hip-width apart as you stand.
- Has to be As you bend from the waist and delicately brush your fingertips to the earth, maintain your forward look.
- Next, as they reach their hands around the outsides of the calves, softly lower the head between their knees and let it hang.
- Put your palms on the ankles’ backs.
Adho Mukha Svanasana (Downward Dog) to Anjaneyasana (Lunge):
- The individual receiving care is to Place your feet about hip-width apart as you stand.
- Next, walk your hands forward while bending at the waist.
- Shoulders must be kept away from the ears and the butt up in the air.
- Raise your right leg such that it makes a straight line with the ceiling. After that, fold the right leg into the chest and push your body forward until your shoulders are above your wrists. Has to be Maintain your right knee behind your right toes.
- Next, slowly lower the left knee joint to the floor. For the best stretch, squat the hip joint.
- After holding for a while, switch to the other side and repeat this yoga pose. Bend your head to your knees
Bend your head to your knees
- Head-to-leg Pose (Parsvottanasana Variation): The patient begins in a low lunge, placing their hands on the floor just behind their shoulder joints and their right leg in front.
- The right thigh should be parallel to the ground and the right knee joint should be stacked over the right ankle joint.
- Do not raise your hands; instead, push up through the right heel to make the right leg straight.
- Allow the head to dangle and land on the right knee.
- Next, put both palms on the floor and square your hips.
- After holding for a while, switch to the other side and repeat this yoga pose.
Seated Forward Fold (Pascimottanasana)
The patient is seated on the floor with both arms raised straight over their heads, their legs extended in front of them, and their feet contracted. then let the head hang down while bending forward from the waist and bringing the forearms to the outside of the legs.
Janu Sirsasana, or the single-leg hamstring stretch,
- Janu Sirsasana, or the single-leg hamstring stretch involves the patient sitting on the floor with their hands resting on their laps and their legs extended in front of them.
- Bend and then release the left knee joint. As they pull their left heel into their upper thigh, they turn to the left.
- As they let the head hang down, bend forward from the waist and bring the forearms to the outside of the outstretched leg.
- After holding for a while, switch to the other side and repeat this yoga pose.
Seated Twist (Ardha Matsyendrasana)
- The patient is seated on the floor with their hands resting on their laps and their legs out in front of them.
- When they pull the left heel into the upper thigh, they bend and release the left knee joint.
- Lift the foot off the ground and place it on the floor outside of the left thigh while bending the right knee joint.
- Put your right hand on the background floor. As you rotate to the right, raise your left elbow over your right knee and press it on it.
- Reach up towards the ceiling with your left fingertips and open your shoulder joint.
- After holding for a while, switch to the other side and repeat this yoga pose.
Stretching the groin
- The patient sits on the floor with their knees bent and their toes touching, causing their knees to drop out to the sides.
- Next, As they walk with their hands straight out in front of them, slowly bend forward from the waist and allow the head to fall towards the ground.
- After holding for a while, switch to the other side and repeat this yoga pose.
Sputa Agnistambhasana, Ankle to Knee
- The patient is lying on the floor on their back with their feet flat on the ground and their knees bent.
- Raise your right foot off the ground, bend your knee to the right, and rest your right ankle outside on top of your left thigh.
- Place both hands behind the left leg while maintaining the lower back on the floor.
- Using your right forearm, press against the right thigh while drawing your left thigh in towards your chest.
- After holding for a while, switch to the other side and repeat this yoga pose.
6. You Might Want to Avoid NSAIDs
Even though you might be tempted to take a painkiller and call it quits, the study cautions against doing so since you might miss important steps in the process of growing muscle. Nonsteroidal anti-inflammatory medications (NSAIDs), such as naproxen (Aleve) and ibuprofen (Advil), may lessen the discomfort brought on by aching muscles, but they may also stop your muscles from growing larger and stronger.
A short study discovered that taking the maximum amount of over-the-counter ibuprofen during an eight-week resistance training programme intended to help young adults gain strength and muscle stopped participants’ growth.
7. Apply the right methodology
- Exercising correctly can help prevent injuries or strains to your muscles. Seek assistance from a trainer or instructor if you are a member of a gym or health club. They can demonstrate to you how to operate the machinery and equipment and lift weights properly.
- Remain inside your bounds. Even if you might be inclined to push yourself, exercise should always be progressed cautiously. You can gradually increase the weight you lift or the distance you run. You risk hurting yourself if you attempt to increase too quickly.
8. If you believe you have a sprain or strain, apply the RICE method.
- You might have to take a complete or partial break from the injury. Depending on how severe it is, yes.
- Apply ice packs, massages with ice, or ice slush baths. These can lessen your bruises, soreness, swelling, and spasms in your muscles. After the injury, you can apply ice for up to three days.
- To lessen bruising and swelling, bandage the injury. After the injury, keep it bandaged for a maximum of one week.
- Lift your wound up to the level of your heart. This lessens bruises and helps stop swelling. Try to keep it up for two or three hours every day.
9. Put on compression bandages
- Compression clothing can hasten blood circulation and muscle recovery following exercise. Compression socks were used by endurance runners in a small-scale study in between 5K runs. In the second 5K, the athletes could run just as fast and reported far less stiffness.
- Compression gear, however, is not limited to sportsmen. Adults who were not physically active wore compression socks during their exercise sessions. After 24 and 48 hours, their level of muscle discomfort had dramatically decreased.
10. Utilise kinesiology tape
Kinesiology tape is a go-to product for many athletes seeking to reduce muscle soreness, avoid injuries, and enhance performance. There is conflicting evidence regarding its ability to improve athletic performance. However, research indicates that the flexible adhesive may lessen soreness in the muscles following intense activity.
11. Use essential oils.
- Essential oils are used by people to treat a variety of illnesses and ailments, such as joint and muscular discomfort. Essential oils for painful muscles come in a variety of forms, including lavender and rosemary oil. Make sure to hunt for high-quality goods.
- Because of their high concentration, essential oils may irritate your skin. Thus, before putting them straight to your skin, always dilute them with a carrier oil. For aching muscles, you can use tiny amounts of diluted oil after doing a patch test.
12. Increase your intake of anti-inflammatory foods
- Current studies indicate that some diets, such as those rich in nutrients that reduce inflammation, may be beneficial for those with DOMS. They have additional nutrients and antioxidants that could help with pain relief and muscle restoration. In one modest study, for instance, runners drank sour cherry juice for seven days leading up to a marathon. After the race, their muscle soreness was less than that of the non-participants.
- However, you’re not limited to just one food. To help reduce DOMS, try to eat a balanced diet rich in different anti-inflammatory foods. Beetroot or watermelon juice, fatty seafood, and caffeinated beverages are a few examples.
13. Progress slowly to the next session of exercises
Take it gently while starting a new fitness regimen. It’s not good for your muscles to go from 0 to 60. By giving them time to adjust, you can lessen the intensity of your pain. Just make sure you increase the intensity or begin a new exercise regimen gradually over a few days or weeks.
14. Take a bath in salt water
You can help reduce discomfort and relax your muscles by soaking in warm water with Epsom salts.
15. Use of antioxidant supplements
Consuming fish oil and curcumin, two antioxidant supplements, may also be beneficial.
Turmeric contains a substance called curcumin. It’s not surprising that it has been demonstrated to lessen the discomfort of delayed onset muscle soreness and hasten recovery from exercise because of its high antioxidant content and potent anti-inflammatory properties. Other omega-3 fatty acids, such as fish oil, might provide comparable advantages.
16. Consume milk protein.
Your greatest option if you want to stay natural would be milk protein. Supplementing with milk protein can aid with muscle soreness and strength in cases of exercise-induced muscle injuries, according to a 2017 study. A concentrated milk product with 40–90% milk protein is called milk protein concentrate. It can be purchased in powdered form, but it’s primarily utilized in foods and drinks that are fortified with protein.
17. Topical Arnica
For many years, arnica has been utilized as a natural treatment for aching muscles. It comes from the Arnica Montana flower, which grows in the European and Siberian highlands. One 2013 study found that topical lotions and ointments containing arnica effectively reduced pain and inflammation caused by vigorous eccentric activity, while further research is needed in this area.
18. Heat therapy
Immediate application of heat following physical activity helps mitigate delayed onset muscular soreness. While both dry and moist heat were proven to help with pain, a 2013 study demonstrated that moist heat provided even greater pain relief.
The following are great ways to benefit from moist heat therapy after exercise:
- warm, wet towels
- Warm bath packs with moist heating
19. Increased exercise can really aid in reducing soreness.
Don’t let painful muscles prevent you from working out. Your body naturally experiences muscle discomfort as a means of adapting to the workout. Unless you up the intensity, after you’ve caused this soreness, it won’t occur again.
Reduce your workout intensity or move your focus to a different muscle group for a day or two if the pain is severe.
20. Increase the intensity of eccentric exercises gradually.
Muscle aches are more likely to occur when your muscles are contracting eccentrically. The “down motion” of a bicep curl is an example of an eccentric contraction, which happens when your muscles extend under stress. Eccentric exercise also includes running or walking on a slope. Gradually up the tension.
21. Supplements containing collagen fibers.
One kind of protein that helps connective tissues, such as tendons and ligaments, is collagen. Athletes’ joint pain appears to be lessened by collagen supplements, which are frequently offered as powders, both during and after physical activity.
It is possible to considerably increase measurements of collagen by following supplementation regimens of 5g of collagen peptides daily for 12 weeks or 10g of collagen hydrolysate daily for 24 weeks.
22. Taking a Coffee to drink
The scientific Caffeine intake prior to exercise has been shown in several trials to lessen fatigue and soreness in the muscles afterward. In one study, exercisers who used the method saw a 48 percent decrease in DOMS, which was reported in the Journal of Pain. Caffeine has analgesic (pain-killing) qualities in addition to generally making everything better, which is why over-the-counter pain relievers frequently include it.
Give it a shot: Have two cups of coffee (the amount of caffeine used in the Journal of Pain study) one hour before an especially hard workout. Bonus: Research published in 2014 in PLOS ONE indicates that coffee and water both hydrate well, so bear that in mind when attempting to relieve muscle soreness. According to the Journal, dehydration during exercise can greatly worsen DOMS symptoms.
Things to avoid to relieve muscle pain quickly
Alcohol
Drinking alcohol is bad for your health in numerous ways. Drinking alcohol after cycling reduces the amount of glycogen your muscles can reabsorb after an endurance workout. Alcohol also affects your muscles’ ability to synthesize proteins.
Cigarette
Tobacco use has an adverse effect on your musculoskeletal system.
There is some evidence linking smoking to an increased risk of muscular injury, notwithstanding the paucity of research on the effects of tobacco on muscle rehabilitation. In addition to raising the risk of bone fractures, smoking tobacco also raises the risk of joint illness.
Complications if one does not rest in recovery time
- You run the danger of getting hurt if you don’t give your muscles time to rest in between sessions. Micro tears, which are tiny tears caused by repetitive tension from exercise, make muscles feel achy and irritated. You run the danger of having pulled or torn muscles if you have a build-up of tears in your muscles. Muscle strains can range in severity from minor soreness to full ruptures that might require surgery to fix. Over time, you’ll probably notice a drop in your athletic performance if you’re not healing completely.
- You run the danger of suffering an injury if you don’t give your muscles enough time to heal after working out. Damage to muscles can vary from minor rips to total tears.
- Your muscles may require more time to heal after workouts if you’re not seeing gains in your level of fitness or if they’re always swollen and painful. A balanced diet and restful sleep are the greatest ways to optimize muscle recovery, regardless of whether you’re an athlete competing or just exercising for fitness. Bad habits in these two areas cannot be made up for with any other rehabilitation method.
Speak with your physician or get help if:
- You have had persistent muscle aches for over a week.
- You are unable to move due to your excruciating discomfort.
- Exercise makes your ache worse.
- Breathing becomes difficult or dizzy due to your pain.
- You observe warmth, edoema, or redness in the aching muscles.
- The RICE protocol is ineffective.
- You have discomfort in the tendons, over the bones, or in the joint.
Summary
- After a novel or strenuous exercise, delayed-onset muscle soreness may indicate muscular growth and healing. However, it can be rather painful and interfere with your exercise regimen. Natural solutions, like compression socks or essential oils, may help you bid adieu to aching muscles in no time.
- Acute inflammation brought on by exercise is necessary for muscle growth and recuperation. While NSAIDs, such as ibuprofen, are okay to take some time for pain treatment, regular use is detrimental to muscle building and athletic performance. Immersions in cold and ice water are useful for temporary rehabilitation but not as a prophylactic therapy for preventing muscular soreness. Foam rolling and other active recovery and self-massaging exercises improve blood flow to worn-out muscles, which can help reduce DOMS symptoms. Supplements containing collagen, fish oil, and curcumin seem to help athletes with their pain. Sometimes engaging in physical activity causes DOMS. After physical activity, DOMS symptoms typically start to show up a few hours later and can linger for up to 72 hours.
- Even though DOMS can be unpleasant, medical intervention is not necessary. There isn’t much scientific data to back up the home treatments that people occasionally suggest to relieve the symptoms. It might be essential to test a few different therapies before deciding on one that works.
- Sharp pains might strike people during or right after physical activity. This feeling could be an indication of a more serious injury, like a sprain or strain. Should the discomfort continue or get worse, they should visit a doctor.
References
- Bedosky, L. (2023, October 31). How to fix sore muscles: quick relief tips. EverydayHealth.com. https://www.everydayhealth.com/fitness/quick-fixes-for-sore-muscles.aspx
- GoodRX – error. (n.d.-b). https://www.goodrx.com/well-being/movement-exercise/get-rid-of-sore-muscles
- Can muscle soreness after a workout be prevented? (n.d.). https://www.houstonmethodist.org/blog/articles/2021/sep/muscle-soreness-after-a-workout-can-it-be-prevented/
- Santos-Longhurst, A. (2023b, July 13). 23 Things to know about acute and delayed onset muscle soreness. Healthline. https://www.healthline.com/health/fitness-exercise/sore-muscles#2.-
- Acute-muscle-soreness-is-felt-during-or-immediately-after-exercise
- Cheong, T. (n.d.). How to relieve sore muscles and muscle pain after exercise – HealthXchange. https://www.healthxchange.sg/fitness-exercise/sports-injuries/how-relieve-sore-muscles-pain
- Managing sore muscles and aches and pains. (n.d.). WebMD. https://www.webmd.com/fitness-exercise/features/art-sore-muscles-joint-pain
- Shiffer, E. J., & Benton, E. (2023, December 13). Top Expert-Backed Ways to Treat Sore Muscles. Men’s Health. https://www.menshealth.com/health/g22638706/sore-muscle-recovery/
- Professional, C. C. M. (n.d.-n). Muscle pain. Cleveland Clinic. https://my.clevelandclinic.org/health/symptoms/17669-muscle-pain
- Sore Muscles from Exercise? Here’s What Helps—And What Doesn’t. (n.d.). https://blog.insidetracker.com/sore-muscles-exercise
- Sore from your workout? Here are 5 scientifically proven ways to reduce the pain. (2018, February 15). NBC News. https://www.google.com/amp/s/www.nbcnews.com/better/amp/ncna848001
- Kandola, A. (2019, November 27). What to know about muscle soreness. https://www.medicalnewstoday.com/articles/327138#summary
- Scott, J. (2022, December 14). 5 Quick & easy stretche7777777s to help relieve sore muscles! – Carl Todd Clinic. Carl Todd Clinic. https://thecarltoddclinic.com/insights/stretches-to-help-relieve-sore-muscles/
- Yetman, D. (2023, March 10). 15 Proven tips to maximize muscle Recovery. Healthline. https://www.healthline.com/health/muscle-recovery#takeaway