Plank Exercise
Table of Contents
What’s a Plank?
Plank is a core-strengthening exercise that engages the abdominal muscles, back, and shoulders. It improves stability, posture, and endurance by holding a straight-body position on forearms or hands.
Adjusting on toes and lower arms while keeping the rest of your body off the ground is part of a plank. In addition to adjusting your head, midsection, and legs, your spine is maintained in an unbiased posture. Planking is an isometric exercise because it maintains the contraction of your core muscles in a single posture.
How Do You Perform a Plank?
The process of planking itself isn’t particularly challenging, but maintaining the posture is a completely different matter.
The high plank
- Enter the beat or start a push-up pose. Hold onto maintaining a straight back, keeping your palms and toes firmly planted on the ground, and a strong core.
- A foot on the floor or a sagging back might cause lower back pain. Make sure you don’t compromise your body later on.
- Keep your head from drooping.
Low plank:
Lower yourself to your lower arms while maintaining the same position and posture as the tall plank.
Plank Exercise
The Top 10 Planks for Your Workout Routine
You must join the plank for your normal administration, right?
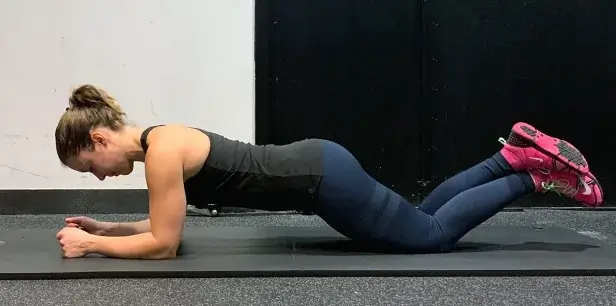
- The Knee plank:
If you haven’t done a plank in a while or are unfamiliar with it, you might need to start with a modified version of the lower arm plank.
In addition to providing you with a great core workout, this eases the stress on your lower back. With patience, you can go to the standard lower arm plank.
With your lower arms resting on the ground, lie on your stomach. Your elbows are definitely behind your shoulders.
While maintaining contact between your knees, toes, and elbows, lift your midsection off the ground and press your lower arms into the ground. Apart from preventing your hips from rising, maintain a stable core and a neutral neck position (avoid looking up or down too much). Another option is to tuck them into your pelvis to lower them.
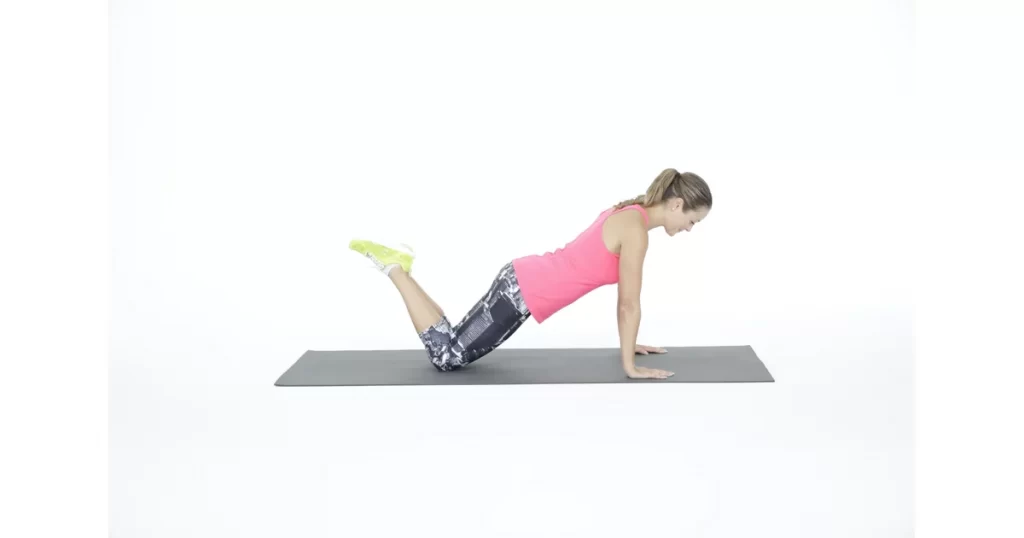
- Knee plank with Straight Arms (For Beginners)
Direct-arm knee planks are a step up from traditional planks. They are easier to finish than traditional planks, but they do require a little more arm and core strength.
Position yourself on your stomach with your hands, preferably beneath your shoulders, palms level on the floor, and your arms bent at your sides.
Lift your core and fix your arms by pressing your hands into the ground. Maintain a mostly bent position with your knees contacting the ground. Point to your neck while keeping your shoulders squeezed and your wrists aligned, without looking up or down.
For 30 seconds, or as long as you can maintain proper form, hold this.
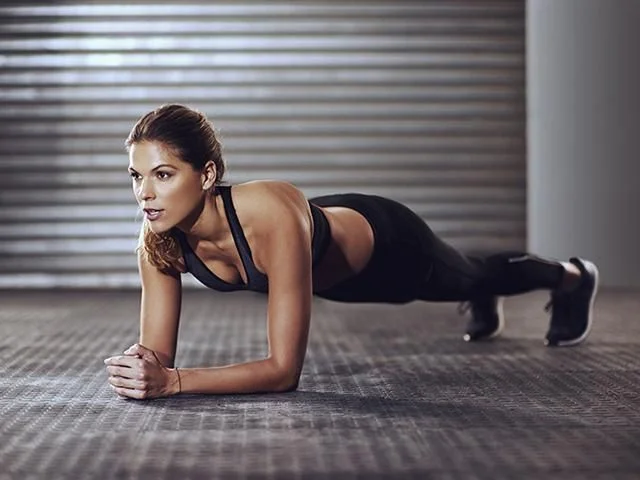
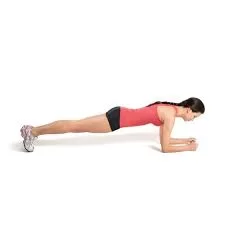
- Lower Arm Plank
If you’re ready to plank without any modifications, the lower arm plank is an appropriate way to experience the burn firsthand.
Your lower arms should be just beneath your shoulders when you lie on the floor.
Squeeze your knees and lower arms to slowly raise your core off the ground. Keep your neck and spine neutral as you stand up and make contact with your core.
Lift your knees and tuck your toes under so that your body forms a straight line.
Hold this for 20 to 30 seconds, then increase it to one minute or more. Guinness World Records states that the longest lower arm plank lasted for nine and a half hours.
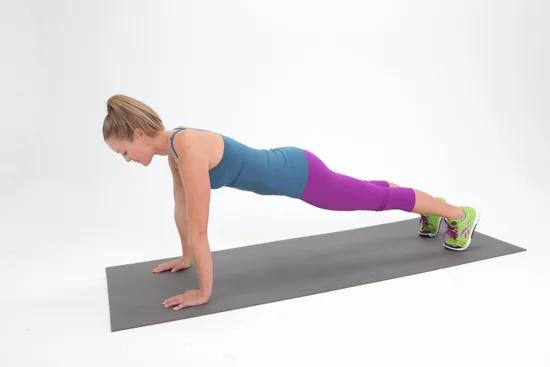
- Complete Straight-Arm Plank
As you improve, try to increase the difficulty by switching to a full plank, sometimes referred to as a straight-arm plank.
Begin on all fours with your knees slightly behind your hips and your hands precisely behind your shoulders.
Press your hands into the floor to raise each knee off the ground one at a time. To go from your heels to your head in a straight line, straighten both legs. Your body should appear as though you are performing a pushup in an upward posture. Make sure your legs are strong, your feet hip-width apart, your hands and shoulders in the proper positions, and your core is engaged.
Maintain this posture for at least 30 seconds, or as long as you can maintain the proper form.
- The Lower Arm to the Whole Plank
Even if you are already skilled at the standard plank, alternating between the lower arm and full plank is a great method to improve your training.
Assume the lower arm plank position to begin.
Raise yourself to the complete plank posture by straightening one arm at a time. Try this gently at first to perfect the manoeuvre. In a tall plank, position your hands where your elbows are to place them exactly behind your shoulders.
Bow one arm gently, then the other, to assume the lower arm plank position again.
For one set, repeat this for 30 seconds, adding up to two or three sets. Along the way, choose an approach that is comfortable for you.
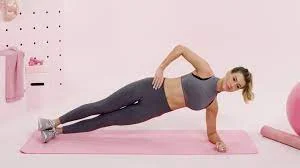
- The forearm sideplank
The side plank is another appropriate exercise that usually works your hip abductors and obliques, which are the muscles on the sides of your midsection.
Stack your hips, knees, and feet while lying on one side with your legs almost straight. Make sure your elbow and lower arm are at the same level, just beneath your breast. If it’s still tough, keep your other arm at your side.
To raise your midsection, push your lower arm and hand into the ground. Maintain a tight core while keeping your hips up and your legs fully fixed. Your body should be shaped like a straight line.
After 20 to 30 seconds of trying to maintain this posture, switch sides.
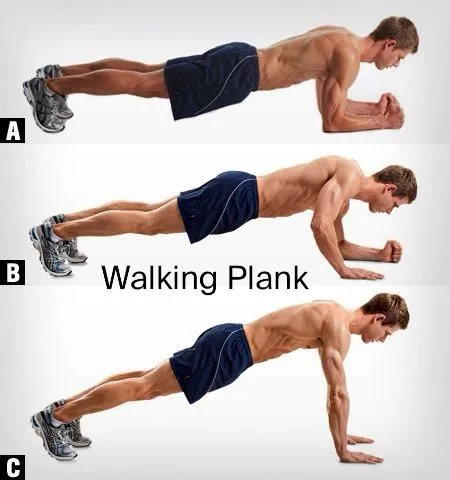
- Walking Plank
Your core and the muscles in your upper and lower body will be strengthened as you walk sideways with your plank. The deltoids, glutes, quadriceps, hamstrings, and even calves are included in these.
Specifically, place your hands behind your shoulders to begin in a complete plank stance. Use your core and glutes to maximise your benefit.
By simultaneously shifting your right foot and hand to the right, you may start to move sideways.
Bring your other foot and hand together in the middle and go back to the plank position.
After completing five steps to the right, proceed to the fifth step for one set. Try to do as many sets as you can safely do in one minute, or three to five sets in total.
- Bear-Taped Plank:
A few muscular groups are worked by planks with bear taps, including your back, glutes, hamstrings, quadriceps, hip flexors, and abs.
This method adds another level of difficulty to the traditional straight-arm plank.
Put yourself in the traditional straight-arm plank position to begin. If necessary, extend your legs for greater stability.
Touch your opposite bear with your right hand raised off the floor while maintaining a tight core. Put your right hand back on the ground at that moment.
Raise your left hand and place it on your right shoulder.
For another twenty to thirty seconds, keep switching hands.
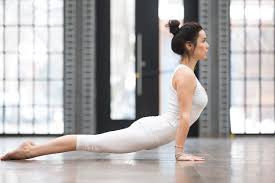
- The Inverted Plank
This full-body workout works a number of muscle groups, such as your shoulders, triceps, obliques, abs, hamstrings, and glutes. Your stomach should be positioned towards the ceiling when you perform this variation of plank.
Place your legs out in front of you and sit upright on the floor. Place your hands on the floor behind you, pointing your fingers towards your feet.
To raise your hips and form a straight line from your heels to your shoulders, contract your glutes, core, and arms. Ascertain that your shoulders are down and away from your ears. By tucking your pelvis slightly, you may keep your hips from falling.
Hold this for 20 to 30 seconds, or as long as you can maintain proper form.

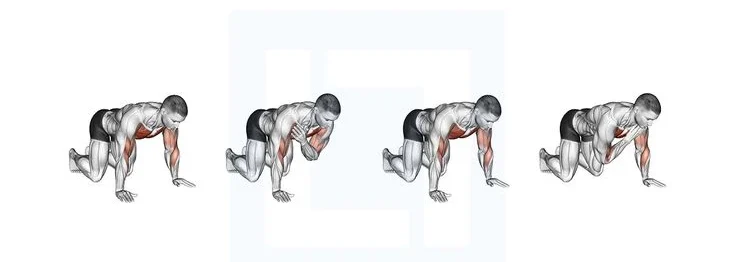
- Spider-Man plank (Elbow to Knee)
Try these “Spider-Man” planks to experience the burn in your lower body, abs, and obliques.
Assume a full plank role at first.
Pull your right knee to the outside of your right elbow, then push it back to go back into a plank position. Ensure that your knee is fully extended to the side so that when you move your leg, your inner thigh slides over the floor.
Breathe out as you push your knee forward and in as you push it back.
Do 8–12 repetitions on each side to begin.As you become more focused, point for up to 20 repetitions on each side.

Benefits of Planks
Planks use additional muscles:
- One cause is that back workouts like crunches and situps can be very difficult. Lower back pain might develop as a result of pressing your spine on the ground. Plus, planks train your whole body, not just your core.
- Planks engage your arms, legs, and whole abdomen, giving them a more complete workout and a more efficient form of training.
- This workout helps you maintain your shoulders back and lower back in a neutral position by strengthening your back, chest, shoulders, neck, and abdomen. Sitting and standing are also essential elements of good posture.
- By helping you develop isometric quality in your core muscles, planks also help you keep your balance to prevent slouching when standing or sitting for extended periods of time.
- With the use of planks, you may improve your flexibility.
- Despite the fact that it might not seem like it, planks are a great method to strengthen your lower body.
- The hold position stretches your hamstrings and the curve of your feet, making it a double-quality, longer exercise.
- If the individual needs to stretch their sides, elevating one arm on a side plank can target that portion of the body.
Making changes to planks is easy
The traditional plank is a great go-to exercise, but it can also be altered and combined in many ways to suit your body’s needs.
One modification you may make is to lower yourself to your lower arms in the plank position. To get the most out of your workout, you may also extend the amount of time you maintain the position. Start by holding for 15 to 30 seconds, then increase the duration.
Your most severe time restriction should be two minutes.
Summary
A wonderful approach to get stronger is to incorporate planks into your workout routine.
No matter how fit you are, you may try any of the several plank variations.
You may keep pushing yourself and improve your strength and stability by utilising these exercises, which will help you avoid injuries and improve your overall health.
FAQ’s
Even while using an inactive plank will burn some calories, it won’t help burn stomach fat because you can’t see the reduction where you lose weight.
It goes without saying that doing a plank has a lot of great benefits. Using this exercise to strengthen your stomach muscles and realign your back’s vertebrae can improve your everyday posture. If you keep going, you might be able to help relieve any back discomfort you may be experiencing or stop it from happening again.
In terms of increasing strength, endurance, calorie burning, muscle growth, and cardiovascular health, push-ups are proven to be more effective than planks. When it comes to strengthening the arms, shoulders, and chest, push-ups are superior to planks.
References:
- Ms E. Q. (2024, May 13). How to do a plank: proper form, variations, and common mistakes. Verywell Fit. https://www.verywellfit.com/the-plank-exercise-3120068
- Kelly, E. (2020, May 29). The worthwhile benefits of plank exercises. Healthline. https://www.healthline.com/health/fitness-exercise/plank-exercise-benefits


5 Comments