Best Exercise for Frozen Shoulder
Exercise is a great option to recover from Frozen Shoulder naturally that helps to improve full range of motion of Shoulder joint and also improve strength and flexibility of related shoulder muscles.
Table of Contents
Introduction of Frozen Shoulder:
- Frozen shoulder is also refereed as adhesive capsulitis or periarthritis.
- There is a formation of dense adhesions, capsular thickening, and restriction in the shoulder joint capsule.
- It is characterized by stiffness, pain, and restricted movement in the shoulder joint.
- It is mostly seen in people between the ages of 40 and 60.
- This condition mainly occurs in people with diabetes and in people who kept their shoulders immobilized for an extended period of time.
- Physical therapy is most important to treat frozen shoulder by exercise.
Anatomy of Frozen Shoulder:
- The shoulder joint is a ball-and-socket joint. It is made up of three bones: humerus, scapula, and clavicle. There is strong connective tissue, called the shoulder capsule, surrounds the joint.
- The shoulder capsule is surrounded by the glenohumeral joint and is also an important passive stabilizer of the shoulder joint. ligaments that connect bones to bones, tendons that connect muscles to bones, and synovial fluid-filled sacs called bursae that cushion tendons and bones during motion.
- It helps to move the arm more smoothly, synovial fluid lubricates the shoulder capsule and the joint.
- The glenohumeral joint helps move the shoulder in all directions and allows the arm to rotate and extend.
- The group of muscles and tendons in the shoulder that control shoulder movements with provide stability is called the rotator cuff muscle.
- Generally, the head of the humerus moves easily in the glenoid cavity.
- When the capsule protecting the glenohumeral joint stiffens and connective tissue enclosing the joint thickens and tightens, it is called a shoulder “frozen”.
- Adhesions form in the joint capsule, it’s called adhesive capsulitis.
Causes of Frozen Shoulder:
- The shoulder joint is made of a capsule of connective tissue. When this capsule thickens and tightens all over the shoulder joint, it cause a frozen shoulder and restricts its movement.
- The reason for the frozen shoulder is unclear. But it’s more likely to occur after keeping a shoulder immobilized for a long period, like after surgery or an arm fracture.
Symptoms of Frozen Shoulder:
- Frozen shoulder symptoms may start gradually and resolve within one or two years, it develops slowly in three stages.
- Stages: 1. Freezing stage 2. Frozen stage 3. Thawing stage
- Gradual onset: <3 months
- Freezing stage: Any movement of the shoulder causes pain, and the shoulder’s ability to move becomes limited. This stage lasts from 3 to 9 months.
- Frozen stage: Pain might lessen during this stage. However, the shoulder becomes stiffer. Using it becomes more difficult. This stage lasts from 9 to 15 months.
- Thawing stage: The shoulder’s ability to move begins to improve. This stage lasts from 15 to 24 months. The pain worsens at night, and sometimes it disrupts sleep.
Common activity limitations and Participation restrictions in frozen shoulder:
- Inability to perform overhead, behind the head, out to the side, and behind back activities.
- Having difficulty in clothing (putting on a jacket or coat or in the case of women, fastening undergarments behind their back), reaching a hand into the back pocket of pants, reaching out a car window (to use an ATM machine), self-grooming (combing hair, brushing teeth, washing face), and bringing eating utensils to the mouth.
- Difficulty lifting weighted objects, such as putting boxes into a cupboard
- Limited ability to sustain repetitive activities.
Risk factors:
- Age and sex:
- People 40 and older, specifically women, are more likely to have frozen shoulders.
- Immobility or reduced mobility:
- People who kept a shoulder immobilized for a long time are at higher risk of developing a frozen shoulder.
- Restricted movement due to many factors, including:
- Rotator cuff injury
- Broken arm
- Stroke
- Recovery from surgery
- Systemic diseases:
- People who have certain diseases seem more likely to develop frozen shoulders. Diseases that might increase risk include:
- Diabetes
- hyperthyroidism
- hypothyroidism
- Cardiovascular disease
- Parkinson’s disease
Importance of exercise in the frozen shoulder:
- Exercise is the most preferred treatment of choice to restore the normal function of the shoulder joint naturally, It helps to improve the range of motion (ROM), strengthen weak muscles of the shoulder, and also improve flexibility and mobility.
- A frozen shoulder is a condition where the shoulder becomes stiff and unable to move it. The shoulder may have been injured or have been damaged by any trauma. A frozen shoulder is caused by the narrowing of the glenohumeral space and adhesion forms in the capsule. Frozen shoulder Exercise is very important to regain the normal range of the shoulder.
- Frozen Shoulder Exercise is designed to restore, maintain and enhance the mobility and flexibility of the shoulder. A frozen shoulder is a condition that can occur when the ligaments, muscles, tendons, and joint capsules become stiff and inflamed. The result is often painful and restricted movement in the affected shoulder.
- Before the exercise, first, do a warm-up of your shoulder. Keep your shoulder relaxed. You can also use a moist hot pack.
- The following frozen shoulder exercises are helpful to improve shoulder function and relieve pain and stiffness, stretching exercise is performed gradually and must be in a pain-free manner (to the point of tension but not pain).
Exercises for frozen shoulder:
Relaxed Passive Exercise:

- Patient position: supine position with the affected shoulder in maximum possible abduction, neutral rotation, and elbow in 90 degrees of flexion.
- Procedure: The therapist grasping the arm below the shoulder joint carries out relaxed passive gliding movements of the head of the humerus on the glenoid (Fig. )
- Axial traction and approximation are carried out along with anteroposterior glide and abduction–adduction glide. To induce relaxation, always begin with slow rhythmic movements.
Pendulum stretch:
- Stand straight and relax your shoulders.
- Lean forward and allow the affected arm to hang down.
- Start swinging the arm in a small circle, about 10-15 times in a clockwise direction.
- Follow that by swinging the arm counter-clockwise 10-15 times.
- Do this exercise once daily in the beginning, gradually increasing the number of reps as you are able.
- It is the best exercise for frozen shoulder.
Active assisted exercise for frozen shoulder:
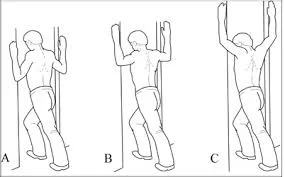
Finger walk:
- It can be performed in a home exercise programme.
- Stand in front of a wall, keeping an arm’s length distance from it.
- Using one arm, slowly reach out and touch the wall with your fingertips.
- Raise your arm and slowly walk your fingers up the wall, moving your arm upward as high as you can reach comfortably.
- Then walk your fingers back down to the starting position.
- Repeat 10-20 times.
- Finally, repeat with the other arm 10-20 times.
Wand exercise:
It can be done in a supine and also in a sitting position. Also, perform it daily in-home exercises.
Flexion of the shoulder:
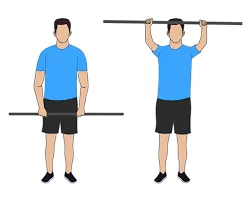
- In the standing position, you are holding a wand with both hands. The palms should face downward as you keep the wand.
- Keep the elbows straight and slowly raise them up over your head until you feel a stretch in your arms, allowing your unaffected arm to push up your affected arm.
- Hold for 5 to 10 seconds.
- Repeat 5 to 10 times.
- Perform 2 to 3 Times a Day.
Abduction:
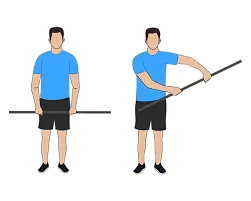
- In the standing position, you are holding a wand with both hands. The palm should face upward on the injured side and the palm face down on the uninjured side, Rest the stick against the front of your thighs and keep the elbow straight, and slowly raise it up your injured arm to the side.
- Now move wand away from your body, use one arm to push your other arm out to the side and up as high as possible.
- Hold for 5 to 10 seconds.
- Repeat 5 to 10 times.
- Perform 2 to 3 Times a Day.
Extension:
- In the standing position, hold a wand in both hands behind your back. Keep the elbow straight and Move the wand away from your back, use one arm to push your other arm out.
- Hold the end position for 5-10 seconds.
- Relax and return to the first position.
- Repeat 5 to 10 times.
- Perform 2 to 3 Times a Day.
Shoulder internal and external rotation:
- In the standing position, hold a wand with both hands. Place the elbows at your sides & bent to 90°. Move your arms and wand side-to-side. Using one arm, push your other arm out away from the body while keeping the elbow being pushed at your side.
- Hold for 5 to 10 seconds.
- Repeat 5 to 10 times.
- Perform 2 to 3 Times a Day.
Rope and pulley exercise:
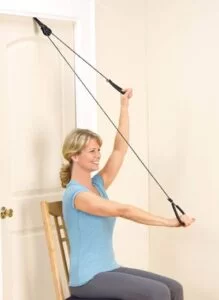
- Sitting on a chair with back support tie a rope with the help of a pully. It is the best exercise in restricted ROM patients of frozen shoulder.
- Hold the end of the rope with both hands and start moving both hands in upward & downward in front (like a sea saw motion)
- Repeat 7 to 10 times.
- Sitting on a chair with back support tie a rope with the help of a pully.
- Hold the end of the rope with both hands and start moving your hands in upward & downward on the lateral side (like a sea saw motion)
- Do 7 to 10 reps.
Table slide exercise:
- Sit on the chair or stool. Put your hands on top of a towel on the table.
- Slide your hands away from your body by extending your elbow in both directions and moving it back. so that you stretch forward and lengthen your trunk.
- Return to the starting position.
- Shoulder abduction also can perform by sitting at the side of the table and slide your affected hand away from the body.
- Do 10 to 15 reps.
“Gear Shift” Exercises:
- Patient position and procedure: The patient is in a sitting position with the affected arm at the side, holding a cane or wand with the tip of the cane resting on the floor to support the weight of the patient’s arm. Instruct the patient to move the cane, Flexion, extension, diagonally, or laterally and medially in a movement similar to shifting gears in a car with a floor.
Mobilization for frozen shoulder:
1. Glenohumeral Inferior Glide:
Inferior glenohumeral glides facilitate shoulder abduction.
- Patient Position: Supine with the shoulder in a resting position with the elbow fully extended and forearm supported.
- Therapist position: The therapist has to stand closer to the patient and the patient is brought closer to the edge of the table.
- Hand placement: The stabilizing patient’s hand with one hand and placed in the patient’s axilla for distraction. The webspace on the other hand is placed just distal to the acromion process at the humeral head.
- The direction of force: Give inferior force with the superiorly placed hand, and glide the humerus in an inferior direction.
2. Glenohumeral Posterior Glide:
Indications: To increase flexion and internal rotation
- Patient Position: Supine, with the shoulder in a resting position.
- Therapist Position and Hand Placement: Stand with your back to the patient, between the patient’s trunk and arm. the arm is supported against your trunk, grasping the distal
- humerus with your one hand. This position provides a distraction to the joint. Keep of your hand just distal to the anterior margin of the joint, with your fingers towards superiorly. This hand gives the mobilizing force.
- Mobilizing Force: Give posterior force and glide the humerus by moving the entire arm as you bend your knee
3. Glenohumeral anterior glide:
Indications: To increase extension and external rotation.
- Patient Position: Prone, with the shoulder in resting position over the edge of the table, arm supported on therapist’s thigh. Anteriorly stabilize with padding.
- Therapist Position and Hand Placement: Stand facing the top of the table with the leg near the table in a stride position. Stabilize the patient’s arm against the thigh with the therapist’s outside hand; this arm provides a distraction. Place the lateral border of another hand at the posterior margin of the humeral head, with your fingers pointing upward side; Give the mobilizing force with this hand.
- Mobilizing Force: Give anterior force and glide the humerus slightly medial direction by moving the entire arm as you bend your knee.
Self-mobilization techniques:
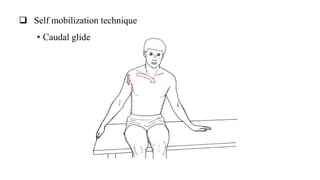
- Caudal glide:
- Patient position and procedure: Sitting on a soft surface and grasping the fingers under the table edge. The patient then leans the trunk away as possible from the fixed side.
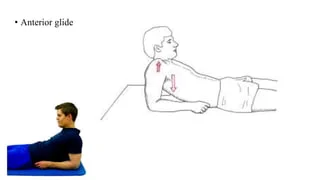
- Anterior glide:
- Patient position and procedure: Sitting with both arms behind the body or lying supine supported on a solid surface. Anterior glide occurs when the patient then leans the body weight between the fixed arms.
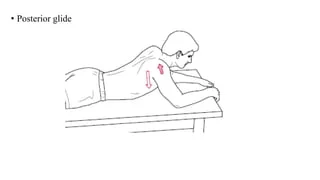
- Posterior glide:
- Patient position and procedure: The patient is in a Prone position, propped up on both elbows. The posterior glide of the humerus occurs as the patient shifts his body weight downward between the fixed arms.
Stretching exercises for frozen shoulder:
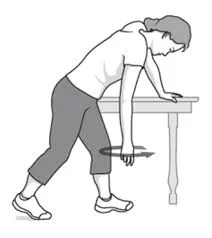
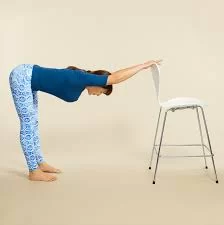
Armpit stretch:
- This exercise helps loosen the shoulder lining and restore your normal range of motion.
- Stand in front of a table that is breast-high.
- Place your arm on the table.
- Slightly bent from your knees and stretch the armpit as comfortably as you can.
- Then Straighten and relax the armpit.
- Try bending more deeper each time, up to 15 to 20 times daily.
Cross-body arm reach:
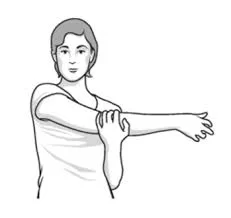
- Sit or stand in a comfortable position.
- Use your unaffected arm to lift your affected arm at the elbow
- Gently bring it up and across your body as far as you can without causing pain, exerting gentle pressure to stretch the shoulder.
- Hold it for 10 to 15 seconds.
- Relax and repeat it 10 to 20 times.
Pectoralis stretch:
- Stand in a corner of the room with arms sideways and take a few steps forward to the wall side until a stretch is felt in the shoulder region.
- Hold the stretch for 5-10 seconds then relax, and repeat it 3 times.
Posterior capsule stretch:
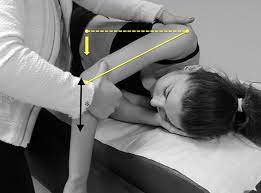
- Patient position: side lying
- Position of therapist: Stand beside the patient
- Procedure: Hang the affected arm at the edge of the treatment table and the unaffected arm behind the ear with elbow full flexion.
- The therapist’s one hand over the back of the shoulder joint at scapula level, and another hand on the elbow joint
- gently apply stretch with the hand placed on the elbow.
- hold for 5 seconds and repeat 3 to 5 times.
Sleeper stretch:
- Roll on the affected shoulder. Place the elbow parallel to the shoulder. With the unaffected side, push the forearm down towards the floor.
- Hold for 20-30 seconds, and repeat 3 times.
Upper thoracic stretch:
- Stand concerned an arm’s length far from a staircase handrail or kitchen sink.
- Hold onto the handrail and lean your body forward until a stretch is felt in the shoulders and back.
Towel stretch:
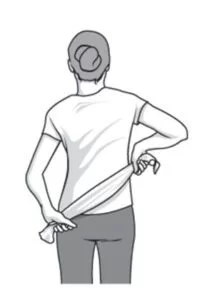
- Use a towel and stand straight.
- Hold one end of a three-foot-long towel with your hand.
- Bring it behind your back and grab one end with your hand and another end with another end.
- Hold the towel in a horizontal position.
- To stretch your shoulder, use your good arm to pull the affected arm upward.
- Hold the bottom of the towel with the affected arm and pull it upward and another hand downward.
- Do this 10 to 15 times a day.
Patient can perform stretching exercise in home exercise programme. This exercise is important in frozen shoulder.
Back clasp:
- It helps to improve the flexibility of shoulder muscles and ligaments. It also helps reestablish the full range of motion of the affected shoulder.
- Stand straight with your legs wide apart.
- Lift your hands slowly and bring them behind your head.
- Clasp your hands behind your back.
- Keeping your arms stable, slowly raise them over your head.
- Stop at the point of maximum resistance and hold this position for 30 seconds.
- Repeat it 10 to 15 times.
- Do it 2 to 4 times a day.
Active Outward Rotation exercise in Side Lying :
- It helps to improve External rotation movement and also improves the strength of shoulder muscles mainly external rotators.
- Procedure: Patient in a side-lying position, Bend your arm from elbow to 90° and Hold 1kg weight dumbells firmly.
- Rotate your arm outward and inwards with keep your elbow tucked into your side.
- To start with do 1 set of 10 repetitions and as you become stronger do 2 sets of 10 repetitions.
- Once the patient can do this then slowly increase the weight you are using.
Mobilization with Movement Techniques: for frozen shoulder
- To improve joint tracking.
- Mobilization with movement (MWM) techniques may assist with reeducating muscle function for proper tracking of the humeral head.
MWM for shoulder external rotation.
- Patient position: Supine lying position with a folded towel under the scapula; the elbow is near the side and flexed to 90°. A cane is held in both hands.
- Therapist position and procedure: Stand on the opposite side of the bed facing the patient and reach across the patient’s body to the anteromedial aspect of the humeral head with reinforced hands. Apply posterolateral glide of the humeral head on the glenoid.
- Ask the patient to use the cane to push the affected arm into the above-restricted range of external rotation.
- Perform the movement for 10 seconds and repeat it for 5 to 10 times.
- It is important to maintain the elbow near the side of the trunk and make sure that no pain is experienced during the procedure.
- Adjust the grade and direction of the glide as needed to achieve pain-free function.
Shoulder MWM for painful restriction of internal rotation and inability to reach the hand behind the back:
- Patient position: Standing position with a towel draped with an unaffected hand behind the neck and the affected hand at the maximum pain-free position behind the back and grasping the towel behind the back.
- Therapist position and procedure: Stand on the patient’s affected side. Place one hand near the patient’s back, uppermost in the axilla with the hand overlaying outward to stabilize the scapula.
- The other hand which place close to the patient’s abdomen, fastening the thumb in the cubital fossa and grasping the distal part of the humerus to provide an inferior glide.
- The therapist’s abdomen is in contact with the patient’s elbow to provide a medial force to the arm. Have the patient hold the towel with one hand to initiate the affected hand up the back while the mobilization force is being applied in an inferior direction.
- Make sure that no pain is experienced during the procedure. Adjust the grade and direction of glide as required to achieve pain-free function. Maximal glide should be applied to reach the end range.
Passive ROM Exercises:
- It is used for increasing the ROM of the shoulder.
- Position of the patient: This exercise is performed in the supine position.
- Therapist position and procedure: The therapist has to perform all the shoulder movements without any assistance given by the patient.
- All the shoulder movements flexion, abduction, adduction, extension, and internal or external rotation can perform in this position.
- End of all the movement therapist applies a gentle stretch to every movement.
- Do the exercise 5-10 times with 10 repetitions.
Shoulder Active ROM Exercises:
- It is used for increasing the ROM of the shoulder & maintains the ROM.
- Exercise is performed on the patient by herself.
- This exercise is performed in supine, sitting, and also in standing positions.
- Perform all the movements of the shoulder flexion, abduction, adduction, extension, and internal or external rotation in the available range.
- Do the exercise 5-10 times with 10 repetitions.
Isometric Shoulder Exercises: for frozen shoulder
Flexion exercise:
- Stand with facing a wall.
- The elbow is extended make a fist on the side of the shoulder you want to exercise.
- Place a folded towel between your fist and the wall, and gently press your hand into the wall.
- Hold for five seconds, and then slowly release.Just press gently into the wall to activate your shoulder muscles.
- If it causes pain, take a break.
- Do 10 to 15 repetitions.
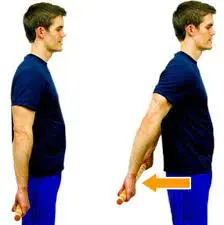
Shoulder extension:
- To perform isometric shoulder extension:
- Stand about seven inches away from a wall with the patient’s back facing it.
- Keep the elbow extended so the hand is down near your hip.
- Make a fist at the affected side, and gently press the back of the arm into the wall as a rotating arm outwards.
- Hold for 5 seconds, and slowly release pressure on the wall.
- Do 10 to 15 repetitions.
Shoulder abduction:
- To perform isometric shoulder abduction exercises:
- Stand about seven inches from a wall, but turn the body so it is perpendicular to the wall.
- The affected side shoulder should be close to the wall.
- Make a fist at the affected side and press it into the wall, use a folded towel between the wall and hand for a little extra comfort.
- Gently press into the wall and hold it for 5 seconds.
- Slowly release pressure on the wall.
- Perform 10 to 15 repetitions.
Isometric Shoulder External Rotation:
- This exercise can help strengthen rotator cuff muscles, specifically teres minor, and infraspinatus.
- To perform the shoulder external rotation exercise:
- Stand perpendicular to a wall about seven inches from it.
- The affected side shoulder should be closest to the wall.
- Flex the elbow at 90°, make a fist at the affected side, and press the back of the hand into the wall as a rotating arm outwards.
- Gently press into the wall and hold it for about 5 seconds.
- Slowly release pressure on the wall.
- Do 10 to 15 repetitions.
Isometric Shoulder Internal Rotation:
- To perform isometric shoulder internal rotation: Stand with the face a door frame at the outside corner of a wall and the body parallel to the wall.
- The shoulder of the affected side should be close to the door opening.
- Flex the elbow 90°, make a fist at the affected side, and gently press it into the wall as you were trying to rotate your hand inward towards your abdomen.
- Use a folded towel for more comfort.
- hold it for 5 seconds.
- Perform 10 to 15 repetitions.
Yoga for frozen shoulder:
- Yoga helps to improve the mobility and flexibility of the shoulder. In a later stage, where the patient gets a normal range of motion, yoga can perform for improving the flexibility of the shoulder muscles.
- The following yoga poses can perform at a later stage of frozen shoulder:
- Paschim Namaskar asana
- Ardha Matsyendrasana
- Bhujangasana
- Hal asana
- Dhanurasana
- Garudasana
- Ustrasan
- Purvottanasana
Paschim Namaskar asana (Reverse Prayer Pose):–
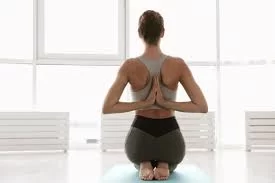
- Start with the Tad asana pose. keep hands straight and hang on two sides. Relax the shoulders and bent the knees a slightly. stretch the arms behind your back and fasten the palm together like in a prayer pose.
- When you inhale press the palm at the inner surface towards the spine and hold for a few seconds.
- Now slowly exhale & move the palms downward side & come back to the starting pose.
- Repeat the exercise 4 to 5 times.
Ardha Matsyendrasana (Sitting Half Spinal Twist):–

- Straight Sit with the cross legs on the mat.
- Bent the right leg and place the heel of the right foot at the side of the left hip.
- Grab the left leg over the right knee.
- Put the right hand on the left foot & the left hand on the back of yourself.
- Twist from the base of your spine to the shoulders and neck to the left & look over to the left side shoulder.
- Make sure you are not lifting your body away from the mat. Also, while stretching, not to hurt your lower back
- Hold this position & continue to inhale and exhale slowly.
- Come back slowly to the starting position.
Bhujangasana (Cobra Pose):–
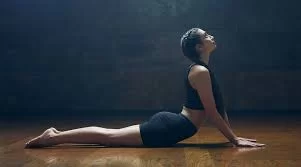
- Lie on the stomach and toes flat on the floor, and place the head on the ground.
- Keep both hands and palms touching the ground under the shoulders.
- Take a deep breath and slowly put pressure on the palm & lift your body while stretching the belly muscles.
- Straight your arms by arching your back and keep the shoulder pressed against your back.
- Maintain the position for 15-30 seconds.
- Then exhale and come back to the normal starting position.
Halasana (Plow Pose):
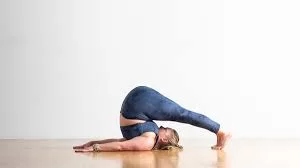
- Lie on your back with your arms beside your body.
- Take a breath in and raise both legs above to stomach and lift your feet
- Bend the body & try to extend the legs above the head and touch the ground with the toes.
- Hold the position for 5 to 10 seconds, then relax for a minute, and repeat this exercise.
Dhanurasana (Bow Pose):
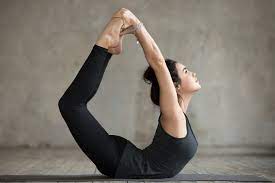
- Lie flat on your stomach with feet apart and raise both legs and torso back side.
- Take a breath and extend the arms backward and grasp both feet with the hands.
- Hold the pose for 5 to 10 seconds.
- Return to starting position & repeat this exercise 5-6 times.
Garudasana:
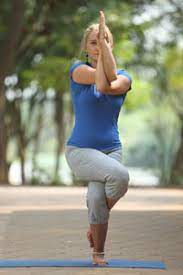
- Cross the right arm over the left arm and bend the elbow; the arm should be perpendicular to the floor.
- Press the palms together and stretch the fingers, shoulders & upper back.
- Stay in this position for a second and take a breath in and out.
- Slowly release the position.
Ustrasan(camel pose):-
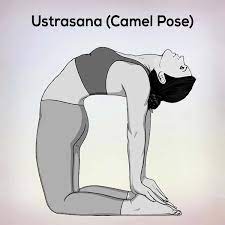
- Take a kneeling position on the mat.
- Knees should be in line with the arms.
- Extend your back and touch the palms at both feet with an inhale.
- The stretch of the front of the body.
- Stay in this position for 5 seconds, then relieve the body.
Purvottanasana:-
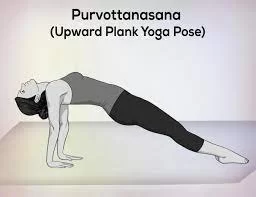
- Sit and keep the arms on their sides.
- Inhale and raise both shoulders upward with palms facing together.
- Avoid elbow flexion, keep it straight, and give a stretch to the shoulder, chest, and wrist
- Hold for 5 and 10 seconds and release.
Strengthening exercises for frozen shoulder:
- There are various exercises that strengthen the shoulder joint strengthening exercise perform in the progression stage of frozen shoulder.
- Equipment used to strengthen the shoulder joint:
- dumbbell
- theraband
- weight cuff
Dumbbell exercises for frozen shoulder:
Dumbbell shoulder press:
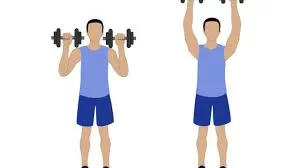
- Procedure: a seat on the chair
- Start with lightweight( then progress to more weight )dumbbells.
- start position: move the dumbbells upward in front of the shoulder
- and lift the dumbbells straight upward in a balanced and controlled movement.
- end position: extend the shoulder
- Hold the position for 3 seconds.
- Return to the start position.
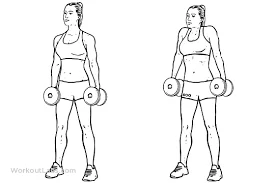
Side raises with dumbbell:
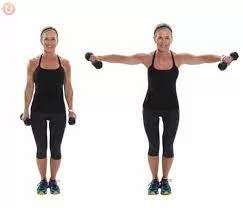
- start with a standing position.
- hold the dumbbells to the side & palm face each other
- lift the dumbbell straight out laterally until arms are parallel to the ground
- Hold the position for 3 second
- Return to starting position.
Dumbbell front raise:
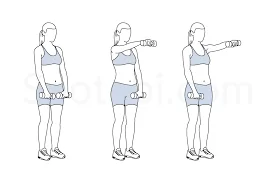
- start with a standing position
- hold the dumbbells like palms and face the body
- lift the dumbbells straight out to the front until the arms are parallel to the floor
- hold the position for 3 second
- Return to normal position.
Bent over dumbbell side raise:
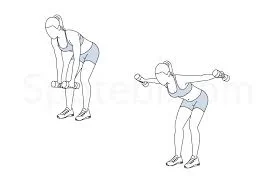
- start with standing, then bent the body to the waist as the upper body is parallel to the floor.
- keep back straight
- hold the dumbbell straight and downward side
- lift the dumbbell straight out to sides in a reverse fly movement
- hold up the position for 3 second
- return to starting position.
Dumbbell upright row:
- grasp the dumbbells and stand up straight with the weight resting on the front of the thigh & palm face downwards.
- Draw the shoulder and lift the hands and elbow in an upward direction.
- keep the palm face to the floor at the top of the movement when the shoulder muscles are completely contracted. Face forwards and the weight on the hand should be in line with the shoulder.
- Bent the elbow 90°
- hold the position for 3 seconds
- and return to starting position
Dumbbell shoulder shrug:
- Grab a dumbbell in each hand and hold the weight outside the hips (side to the thigh)
- elbow fully extended.
- Shrug the shoulder upward towards the ears.
- hold for 3 to 5 seconds before lower down shrugging your shoulder.
Theraband exercises for frozen shoulder:
This exercise improves the mobility of the shoulder joint.
5 colours of theraband use for exercise depending upon the tolerance of the patient with a frozen shoulder.
Start with yellow theraband low resistance and then progress to highest resistance:
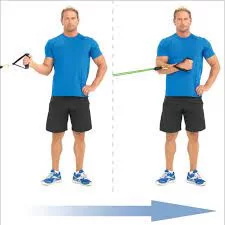
Outward rotation:
- Hold the theraband between the hands with the elbows at an angle of 90° close to the sides.
- moves the lower part of the affected arm outward to three or four inches, and hold for 5 seconds.
- Repeat outward rotation 7 to 10 times, two times a day.
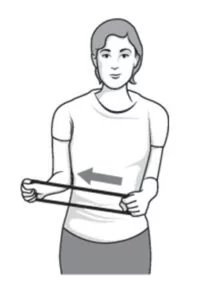
Inward rotation:
- Stand close to the door and fasten one end of the rubber exercise band around the doorknob.
- Hold the other end with the involved arm, and hold the elbow at an angle of 90°
- Pull the theraband toward the body three or four inches and hold for 5 seconds.
- Repeat this exercise 7 to 10 times, two times a day
Shoulder flexion with theraband:
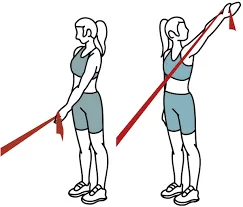
- grasp one end of the theraband with the affected arm and another end of theraband fasten on the doorknob
- Take the theraband upward towards the ceiling and come back downward
- Repeat this exercise 7 to 10 times, two times a day
Shoulder abduction:
- grasp one end of the theraband by the patient and another end of theraband placed under the sole of the foot
- ask the patient to take the theraband away from the body
- back to the starting position
- Repeat this exercise 7 to 10 times, two times a day
Adduction with theraband:
- grasp one end of the theraband by the therapist and another end of the theraband by the patient
- ask the patient to take the theraband outside away from the body
- back to the starting position
- Repeat this exercise 7 to 10 times, two times a day
Weight cuff exercise for frozen shoulder:
The weight used for exercise depends on the patient’s tolerance.
- Shoulder flexion, extension, abduction, adduction, and rotation can be performed the same as dumbell exercise but here use a weight cuff for the exercise.
- patient position: supine, sitting on a chair, or standing
- Place the weight cuff on the wrist joint.
- start with a low kg weight
- and gradually increase weight when the patient starts to achieve progress
- Gradually, do all the movements
- perform the exercise 2 to 3 times daily, and repeat 7 to 10 times.
FAQs
Yes, Exercise is most important for frozen shoulders to restore the normal function of the shoulder joint naturally, It helps to improve the range of motion (ROM), strengthen weak muscles of the shoulder, and also improve flexibility and mobility.
There are active assisted exercises like, Finger walks, Wand exercises, and Table slides. Stretching exercises like towel stretch and Self-mobilization also can perform at home.
A stretching, active assisted exercises, mobilization, and strengthening exercises is best for a frozen shoulder.
Apply a heat pack and ice pack to the shoulder, which can help to reduce the pain and swelling. Physical therapy includes gentle stretching and ROM exercises.
The shoulder capsule thickens and tightens all over the shoulder joint, it cause a frozen shoulder and restricting the range of motion.
The reason for the frozen shoulder is unclear. But it’s more likely to occur after keeping a shoulder immobilized for a long period, like after surgery or an arm fracture and it’s more likely to happen in patients with diabetes.