Plantar Plate Tear
Table of Contents
What is a Plantar Plate Tear?
A Plantar plate tear, also known as a plantar plate injury, is a condition that affects the plantar plate, a thick ligamentous structure located on the bottom of the foot, connecting the metatarsal bones to the base of the toes. The plantar plate plays an important role in maintaining the stability of the metatarsophalangeal (MTP) joints, which are the joints between the metatarsal bones and the proximal phalanges of the toes.
For proper foot mechanics, the plantar plate complex is crucial. It consists of the first metatarsophalangeal joint’s (MTPJ) plantar aspect. It protects the articular surfaces of the joint while providing dynamic and static joint stability. Additionally supplying joint stability and articular surface defense are the smaller toe plantar plates. Clinicians need to be aware of two groups of injuries when talking about plantar plate pathologies: MTPJ (great toe) and second through fifth (lesser toe) injuries.
Within the intricate architecture of the human foot, a vital yet often overlooked structure plays a crucial role in maintaining stability and facilitating movement: the plantar plate. This resilient ligamentous tissue, nestled beneath the metatarsal bones and connecting to the base of the toes, is a linchpin of the foot’s biomechanics. However, the relentless demands of modern lifestyles, characterized by high-impact activities and ill-fitting footwear, can subject the plantar plate to undue stress, leading to a condition known as a plantar plate tear. This injury, characterized by pain, instability, and potential deformities, not only affects mobility but also highlights the delicate balance between form and function in the human body
Plantar plate tears often occur due to repetitive stress, trauma, or overuse, especially in individuals who engage in activities that involve a lot of running, jumping, or other activities that place strain on the forefoot. High-heeled shoes can also contribute to the development of plantar plate tears by putting excess pressure on the front of the foot.
Clinically Relevant Anatomy:
The proximal phalanges of the foot serve as a thick, distal attachment for the plantar plate complex. The intersesamoid ligament or the metatarsal head-neck junction is reached through the narrow proximal attachment. It is inextricably linked to the ligaments, musculotendinous tissues, and plantar capsules.
The metatarsal heads are given a cushioning system, which keeps them from falling. The plantar plates of the lesser toes stretch from the metatarsal head to the proximal phalanx base at each joint and are composed of a single prominent fibrocartilaginous capsular thickening.
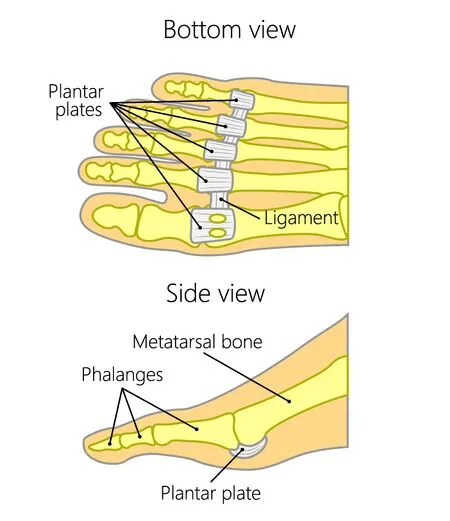
Location and Composition:
- The plantar plate is situated beneath the heads of the metatarsal bones, which are the long bones in the foot that connect to the base of the toes.
- It is composed of dense fibrous tissue and hyaline cartilage, giving it both strength and flexibility.
- The plantar plate is responsible for maintaining proper alignment and preventing excessive movement (dorsiflexion) of the toes at the MTP joints.
Attachment Sites:
- Proximal Attachment: The plantar plate attaches proximally to the metatarsal head. The term “proximal” refers to the end of the bone closest to the body.
- Distal Attachment: It attaches distally to the base of the proximal phalanx, the bone at the base of the toe. The term “distal” refers to the end of the bone farthest from the body.
- The attachment points of the plantar plate help to secure the metatarsal head to the proximal phalanx and prevent excessive upward bending (hyperextension) of the toe.
Function:
- The plantar plate serves multiple functions, including:
- Stabilization: It plays a crucial role in stabilizing the MTP joint and preventing excessive movement in various directions.
- Load Distribution: The plantar plate helps distribute the forces generated during weight-bearing activities across the joint, reducing the risk of joint degeneration.
- Protection: It protects the joint from excessive friction and pressure during movement.
A fibrocartilaginous pad with three distinct components—bony, ligamentous, and musculotendinous—the plantar plate complex is made up of these components.
The bony area consists of:
lateral and medial sesamoids
Primitive phalanx
The metatarsal head’s articular surfaces
The ligamentous component consists of:
The thickest ligaments of the first metatarsophalangeal joint (MTPJ) are called sesamoid phalangeal ligaments (SPLs). They guard against proximal sesamoid subluxation during walking or running with hyperextension.
The intersesamoid ligament (ISL) is a transverse collagen fiber bundle that connects two sesamoids.
Suspensory ligaments (MTSLs) are paired metatarsosesamoid ligaments. Their function is to help stabilize the sesamoid.
The following constitutes the musculotendinous portion:
the flexor hallucis brevis medial and lateral heads, which are proximally attached to the medial and lateral sesamoids’ proximal and plantar surfaces. The long flexor hallucis inserts at the base of the distal phalanx. The major attachment point of the adductor hallucis is at the sesamoids. The sesamoid-inserting abductor hallucis.
Complex supporting structures for the plantar plate:
The plantar plate complex does not include the medial and lateral metatarsophalangeal ligaments, sometimes known as the collateral ligaments.
When valgus or varus forces are applied, they function as static stabilizers.
Dynamic stabilisers for plantar flexion are the extensor hallucis longus (EHL) and extensor hallucis brevis (EHB).
The plantar fascia
The plantar plate may be viewed as a distant extension of the plantar fascia since it is connected to the main structure of the plantar aponeurosis.
The vascular network of the nearby soft tissue supplies the plantar plate with blood, however, the middle section of the plantar plate is insufficiently vascularized.
Mechanism of Injury / Pathological Process:
Injuries to the first MTPJ plantar plate complex can occur as a consequence of either acute trauma or a long-term degenerative process.
Acute injury
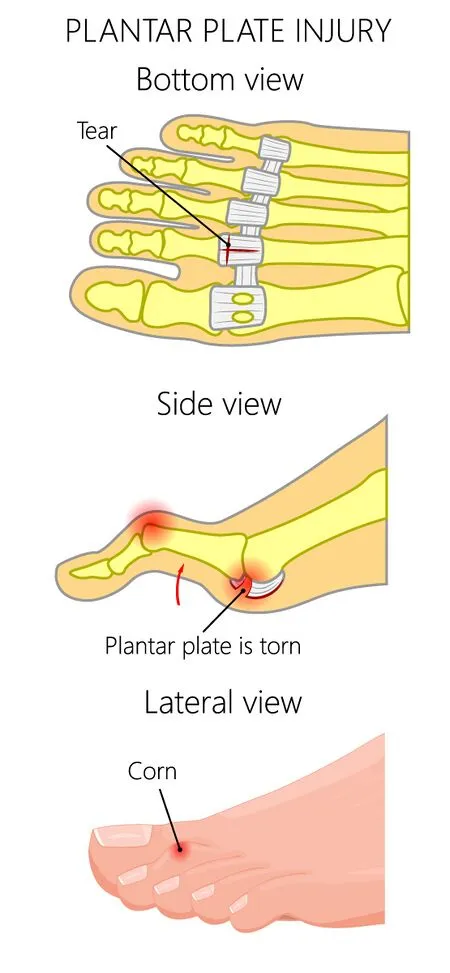
Sesamoids’ osteochondral injuries:
Sesamoiditis is an inflammatory illness that causes acute discomfort and progresses to chronic sclerosis.
Broken sesamoid bones
Bipartite sesamoid osteonecrosis diastasis
Osteochondral fragments that are loose after chondral injuries
Sesamoid phalangeal ligaments are harmed by joint hyperextension:
An injury to the first metatarsophalangeal (MTP) articulation is known as turf toe.
It happens with fixed equinus at the ankle and MTP joint hyperextension. It can develop into a crippling disorder with ongoing pain, increasing deformity, and joint degradation if left untreated. More information about turf toe may be found here.
Injury to the proximal phalanx and metatarsal head’s articular surfaces: Due to the metatarsal heads’ greater stress when the metatarsophalangeal joint is stretched.
Tumbling down after a jump
Dancers or sprinters who put a lot of strain on their forefoot may suffer from injuries.
Degenerative process:
Osteoarthritis
Hallux valgus deformities: significant toe lateral deviation.
Injuries to the plantar plate are also caused by other foot conditions that overload the MTPJ, such as:
An excessive amount of pronation
The first metatarsal is short.
Second metatarsal long
The second and third MTPJ plantar plates are the smaller toes’ plantar plates that sustain the majority of the damage. Pathologies include:
Degeneration (plate thickening)
Tear in the partial thickness
Totally torn (defect at the insertion of the plate)
The tear can occur due to various factors and actions, including:
- Repetitive Overloading: Engaging in activities that repeatedly stress the MTP joints, such as running, jumping, or high-impact sports, can lead to cumulative damage to the plantar plate over time.
- Improper Foot Mechanics
- High Heel Use: Wearing high-heeled shoes frequently can shift the weight distribution in the forefoot, causing increased pressure on the ball of the foot and the plantar plate.
- Toe Deformities
- Age and Degeneration
- Trauma: Acute trauma, such as stubbing the toe forcefully or dropping a heavy object on the foot, can cause a sudden tear in the plantar plate.
- Incorrect Footwear
- Excessive Weight
Symptoms of Plantar Plate Tear
Symptoms of a plantar plate tear can vary in severity and presentation, but they generally involve pain, discomfort, and changes in foot function. Here are some common symptoms associated with a plantar plate tear:
- Pain in the Ball of the Foot: The most prominent symptom of a plantar plate tear is pain in the area beneath the affected toes, specifically in the ball of the foot. The medial plantar foot is numb, and the heel and medial plantar arch are both uncomfortable. This pain may be described as sharp, throbbing, or aching. It often increases with weight-bearing activities like walking, running, or standing for extended periods.
- Swelling and Inflammation: The affected area around the metatarsophalangeal (MTP) joint may become swollen, tender to touch, and visibly inflamed. Swelling can contribute to discomfort and limit the foot’s range of motion.
- Instability and Discomfort: A plantar plate tear can lead to instability of the MTP joint, causing a sensation that the toe is “popping out” or that the joint lacks proper support. This instability can affect balance and walking patterns. the beginning of chronic discomfort and soreness above the metatarsal head (football) that is brought on by exercise.
- Altered Walking (Gait): Due to pain and instability, individuals with a plantar plate tear might change their gait to minimize pressure on the affected area. This altered gait can lead to compensation by shifting weight to other parts of the foot, potentially causing secondary issues.
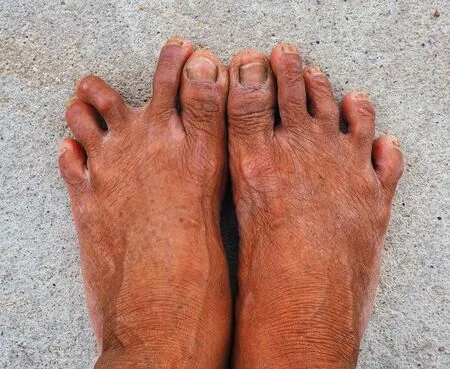
- Deformities: In some cases, a plantar plate tear can result in toe deformities, such as hammertoes or claw toes. These deformities can develop due to the destabilization of the MTP joint, altering the natural alignment of the toe. minor toe abnormalities, such as pronation, supination, crossing toes, or dorsal elevation.
- Pain with Toe Movement: Attempting to move the affected toe(s) might elicit pain or discomfort, especially when trying to bend or extend the toe.
- Painful Footwear: Certain shoes, particularly those with narrow-toe boxes or high heels, can exacerbate the pain associated with a plantar plate tear by putting additional pressure on the affected area.
- Reduced Physical Activity: Individuals with a plantar plate tear often experience limitations in their ability to engage in physical activities that involve the feet. This can lead to decreased participation in sports, exercise, or even everyday activities.
- expansion of the digital interspace The second and third toes are stretched farther apart, which is referred to as the toe gapping sign (Churchill sign).
- Difficulty Bearing Weight: Walking or putting weight on the affected foot can be challenging due to the pain and instability caused by the tear. Loss of ground contact: The toes are unable to naturally touch the ground.
Symptoms resembling plantar digital nerve compression syndromes brought on by microtrauma or a space-occupying lesion.
Causes of Plantar Plate Tear
A plantar plate tear can occur due to a combination of factors, often related to repetitive stress, overuse, and biomechanical issues affecting the foot. Here are some common causes of plantar plate tears:
- Repetitive Stress and Overuse: Engaging in activities that place repetitive stress on the forefoot, such as running, jumping, dancing, or participating in high-impact sports, can gradually weaken the plantar plate over time. The cumulative stress on the ligament can lead to small tears or gradual degeneration.
- Biomechanical Factors: Abnormal foot mechanics, such as excessive pronation (inward rolling of the foot) or a high arch, can contribute to increased strain on the plantar plate. These biomechanical issues can alter the distribution of forces across the foot during walking and other activities, potentially leading to the development of tears.
- Improper Footwear: Wearing shoes with narrow-toe boxes or high heels can increase pressure on the front of the foot, including the plantar plate. High-heeled shoes, in particular, shift weight onto the forefoot, which can stress the ligament and lead to tears.
- Trauma or Acute Injury: A sudden impact or trauma to the forefoot, such as stubbing the toe or dropping a heavy object on the foot, can cause an acute tear in the plantar plate.
- Aging and Degeneration: As people age, their connective tissues, including the plantar plate, may become less elastic and more prone to degeneration. This can make the ligament more susceptible to tears, even with less intense activities.
- Inadequate Warm-Up: Failing to properly warm up before engaging in physical activities can increase the risk of injury, including plantar plate tears. Cold muscles and ligaments are more susceptible to damage.
- Genetic Predisposition: Some individuals may have a genetic predisposition to certain foot conditions, including weaker connective tissues. This genetic factor can make them more susceptible to plantar plate tears.
- Overloading the Forefoot: Carrying excess body weight or sudden weight gain can put additional stress on the forefoot, potentially leading to plantar plate tears.
- Footwear Choices: Wearing shoes that don’t provide proper support or cushioning can increase the risk of foot injuries, including plantar plate tears.
- High-Impact Activities: Engaging in high-impact activities without proper conditioning or training can strain the plantar plate and other foot structures.
Risk factors:
Several risk factors can contribute to the development of a plantar plate tear. These factors increase the likelihood of experiencing this injury due to the additional stress and strain they place on the plantar plate and the surrounding structures of the foot. Here are some common risk factors associated with plantar plate tears:
- High-Impact Activities: Participating in sports or activities that involve repetitive high-impact movements, such as running, jumping, dancing, and aerobics, can increase the risk of plantar plate tears. These activities place significant stress on the forefoot.
- Improper Footwear: Wearing shoes with narrow toe boxes, high heels, or inadequate arch support can alter foot mechanics and increase pressure on the plantar plate, making it more susceptible to injury.
- Biomechanical Issues: Having foot biomechanical problems, such as excessive pronation (inward rolling of the foot) or a high arch, can contribute to uneven distribution of forces during walking and activities, increasing the strain on the plantar plate.
- Age: As individuals age, the ligaments and connective tissues in the body can become less elastic and more prone to degeneration, making the plantar plate more susceptible to tears.
- Genetics: Some people may have a genetic predisposition to weaker connective tissues or certain foot conditions, increasing their vulnerability to plantar plate tears.
- Obesity: Carrying excess body weight places additional stress on the feet, increasing the risk of various foot injuries, including plantar plate tears.
- Previous Foot Injuries: Individuals who have had previous foot injuries, such as sprains, fractures, or other ligamentous injuries, might be at an increased risk of developing plantar plate tears due to the altered biomechanics of the foot.
- Sudden Increase in Activity: Rapidly increasing the intensity, duration, or frequency of physical activities without proper conditioning and training can overload the foot structures, including the plantar plate.
- Occupational Factors: Certain occupations that involve prolonged periods of standing or walking on hard surfaces can increase the risk of foot injuries, including plantar plate tears.
- Inadequate Warm-Up: Skipping proper warm-up routines before physical activities can leave the foot muscles and ligaments unprepared for the stresses of exercise, potentially leading to injuries.
- Female Gender: Women are generally more prone to developing foot problems due to the effects of hormones and the types of footwear they commonly wear.
- Bone Abnormalities: Structural abnormalities in the bones of the foot can affect foot mechanics and increase the risk of plantar plate tears.
- Medical Conditions: Certain medical conditions, such as rheumatoid arthritis, gout, or conditions that affect foot alignment, can contribute to the development of plantar plate tears.
Differential diagnosis:
Differential diagnosis involves considering a range of potential conditions or injuries that could cause similar symptoms to the one in question. In the case of plantar plate tears, several conditions with overlapping symptoms in the foot could be considered during the diagnostic process. Here are some conditions that might be included in the differential diagnosis for plantar plate tears:
- Morton’s Neuroma: This is a condition involving thickening of the tissue around a nerve leading to the toes. It often causes pain in the ball of the foot, similar to a plantar plate tear.
- Metatarsalgia: Metatarsalgia refers to pain and inflammation in the ball of the foot, which can be caused by various factors, including overuse, stress fractures, or improper footwear.
- Sesamoiditis: Sesamoid bones, which are little bones under the big toe joint, are a condition. Inflammation or injury to these bones can cause pain and discomfort in the forefoot.
- Capsulitis: Capsulitis is inflammation of the joint capsule, often affecting the metatarsophalangeal (MTP) joints. It can cause pain, swelling, and instability similar to plantar plate tears.
- Freiberg’s Infraction: This condition involves a loss of blood supply to the metatarsal head, leading to pain, swelling, and possible joint collapse.
- Stress Fractures: Stress fractures in the metatarsal bones can cause localized pain and swelling in the forefoot, resembling plantar plate tear symptoms.
- Turf Toe: The turf toe is a sprain of the ligaments around the base of the big toe. It can cause pain, swelling, and instability in the MTP joint.
- Rheumatoid Arthritis: This autoimmune condition can affect the joints in the feet, causing pain, swelling, and deformities that might mimic plantar plate tear symptoms.
- Gout: Gout is a kind of arthritis marked by the buildup of uric acid crystals in the joints. It can cause sudden and severe pain in the joints, including those in the foot.
- A bunion (Hallux Valgus): A bunion is a bony bump that forms at the base of the big toe. It can cause pain, swelling, and joint deformity.
- Hammertoes: Hammertoes result from an imbalance in the muscles and ligaments that control toe movement. They can cause pain and deformity in the toe joints.
- Peripheral Neuropathy: Nerve damage in the feet can lead to pain, tingling, and loss of sensation, which might be mistaken for other foot conditions.
- Plantar Fasciitis: While plantar fasciitis primarily affects the heel, it can also cause pain in the arch and forefoot due to its impact on foot mechanics.
Diagnostic Procedures:
When diagnosing a potential plantar plate tear or related foot conditions, healthcare professionals may use a combination of clinical evaluation, physical examination, and imaging studies to arrive at an accurate diagnosis. Here are some diagnostic procedures commonly used:
Patient History and Physical Examination:
- The healthcare provider will start by gathering a comprehensive medical history, including information about the onset, duration, and nature of the symptoms.
- A physical examination will involve assessing the affected foot, including checking for pain, swelling, tenderness, range of motion, and joint stability.
- Specific tests, such as the “Churchill sign” (hyperextension test) and other provocative maneuvers, may be performed to elicit pain or instability characteristic of a plantar plate tear.
Imaging Studies:
The following diagnostic methods are advised to confirm plantar plate injuries:
X-ray is taken while standing to see metatarsal heads that have fallen off.
Ultrasound: A first-line method for swiftly and precisely locating and identifying forefoot disorders is ultrasound. For evaluating plantar plate pathology, static and dynamic ultrasound methods are frequently used, with dynamic evaluation providing superior sensitivity. The most typical manifestation of a plantar plate tear that may be quickly identified on ultrasonography is a partial- or full-thickness plantar plate abnormality.
CT Scan: When surgery is necessary to repair plantar plate damage, computerized tomography (CT) can be employed. When soft tissue damage signs and symptoms are present, this is the preferred diagnostic method.
MRI: Plantar plate injuries can be accurately diagnosed using magnetic resonance imaging (MRI). Differentiating between Morton’s neuroma and plantar plate damage is the preferable method.
Diagnostic Injections:
- Diagnostic injections, such as local anesthetic injections into the affected joint, can be used to temporarily alleviate pain. If the pain is significantly reduced after the injection, it might indicate that the plantar plate is the source of the pain.
Clinical Correlation:
- The doctor will consider the patient’s symptoms, physical examination findings, and imaging results in the context of the clinical presentation to arrive at a diagnosis.
Differential Diagnosis:
- As mentioned earlier, ruling out other conditions with similar symptoms is important. Healthcare providers will consider other possible causes of foot pain and instability.
Consultation with Specialists:
- If necessary, a patient might be referred to a podiatrist, orthopedic surgeon, or other specialists with expertise in foot and ankle conditions.
Assessment:
Interview:
The patient’s medical history is a valuable source of information.
Predisposing elements, such as donning high heels
Activities and routines linked to the disease (professional dancers, trauma from sports)
history of orthotics use.
Observation/Palpation:
To assess the direction of weight shift, the existence of minor toe abnormalities or deviations, or an increase in space between the toes, observation should be carried out while the patient is standing. The doctor should next watch while the patient assumes a single-leg position. The patient may further report:
Intense discomfort in the smaller toes’ MTPJs in the past
A sense of localized edema
Tests:
A positive modified Lachman test (anterior-posterior draw test) result. The doctor applies a drawer test to the phalanges while stabilizing the patient’s toe at the metatarsal. The joint subluxated in the plantar direction with a faint clunk audible. It is regarded as the most trustworthy and accurate method for grading and classifying a plantar plate lesion. A categorization system based on the degree of proximal phalanx subluxation was suggested by Thompson and Hamilton:
G0: stable joint. Joint deformity is absent, yet there is pain.
G1: Modest instability (subluxation 50%) defined by medial displacement and a widening of the space between the toes. inflammation and joint discomfort.
G2: significant instability (subluxation > 50%), toe hyperextension, and medial, lateral, dorsal, or dorsomedial deformity. joint discomfort without much edema.
G3: Significant instability (joint dislocation potential): dorsal or dorsomedial deformity with second toe overlapping on hallux. A flexible toe clawing is possible. Pain in the joints and feet, with little or no edema.
G4: displaced joint, resulting in severe deformity and fixed toe clawing. Pain in the joints and feet, with little or no edema.
Plantar Plate Stress Test:
- This test involves applying pressure to the affected toe while stabilizing the metatarsal head. The examiner assesses for pain, instability, or excessive movement at the metatarsophalangeal (MTP) joint, which could indicate a plantar plate tear.
Hammertoe Test:
- This test evaluates the flexibility of the toes and any associated deformities. The examiner gently manipulates the toe to assess for flexibility, pain, and alignment.
The negative plantar grip test, sometimes known as the “paper-pulling” test, is performed using an 8cm × 1cm piece of paper put beneath the standing patient’s second toe. The sufferer cannot ‘grasp’ the paper.
A positive Reverse Windlass Test: The patient is standing on the small box, with his or her metatarsals supported at the box’s edge. There is no pathology: the windlass mechanism plantarflexes the proximal phalanx over the box’s edge. Pathology: A lack of plantar flexion in the toes.
Test the intrinsic muscles and the flexor digitorum longus (toe plantar flexion) manually.
Treatment of Plantar Plate Tear
A plantar plate tear is a common injury that affects the ball of the foot, specifically, the area where the toes attach to the foot. The plantar plate is a thick ligamentous structure that helps stabilize the metatarsophalangeal joints (the joints between the metatarsal bones and the phalanges or toe bones). A tear in the plantar plate can cause pain, and instability, and potentially lead to other foot problems if left untreated.
Non-surgical Treatment:
The degree of a plantar plate injury often determines the best course of therapy. The good news is that a patient will probably react extremely well to conservative therapy and will be able to avoid surgery as long as the injury is identified early and isn’t too serious.
Conservative management for a plantar plate tear focuses on non-surgical approaches to help alleviate pain, promote healing, and restore function.
A doctor could first advise the RICE technique of therapy for an acute (recent) injury.
The RICE protocol (Rest, Ice, Compression, Elevation) can be adapted for managing a plantar fascia tear to help reduce pain and inflammation. However, keep in mind that a plantar fascia tear and a plantar plate tear are different conditions. Plantar fascia tear refers to a tear in the thick band of tissue that runs along the bottom of the foot, while a plantar plate tear involves a ligament tear in the metatarsophalangeal joints. Here’s how you might apply the RICE protocol to a plantar fascia tear:
- Rest: Avoid activities that exacerbate the pain or put a strain on the foot. Rest allows the torn tissue to heal without further irritation.
- Ice: Apply ice to the affected area for about 15-20 minutes every few hours during the initial 48 hours after the injury. Use a thin cloth or towel to prevent direct contact between the ice and your skin.
- Compression: Consider using an elastic bandage or compression sleeve to provide gentle compression to the foot. Avoid wrapping it too tightly to avoid limiting blood flow.
- Elevation: Elevate your foot whenever possible, especially when resting. To aid with swelling reduction, elevate your foot on a pillow or cushion.
Shoes
The direct or indirect pressure and discomfort from plantar plate tears on the ball of the foot and toe joints can be relieved by wearing a larger softer shoe with a more supportive insert and a wide toe box.
The greatest option for long-term therapy, with or without surgical intervention, is unquestionably temporary arch supports or custom-molded orthotics.
Specific foot assistance:
might consist of toe spacers, tape, and bespoke orthotics.
Typically, custom orthotics include a metatarsal pad.
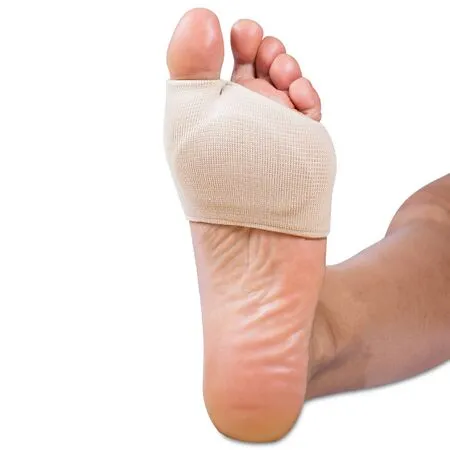
The toes remain apart with toe spacers.
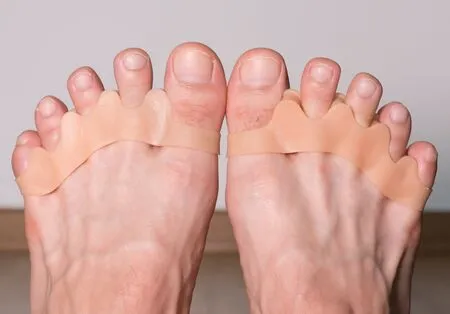
Using tape to release the metatarsal head
Technique for Kinesio taping: The little fork technique
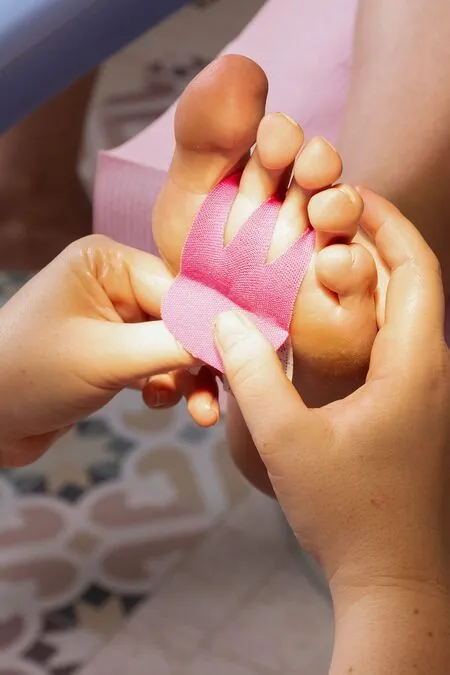
To stop the second MPTJ’s expansion, use “AIDS” ribbon tape on the fabric.
Medication
Anti-inflammatory drugs can ease chronic pain, but they do nothing to relieve the acute discomfort associated with plantar plate rupture.
Splinting
If the tear is partial and not a major ligament rupture, taping the toes in an “interweaving” pattern can either assist in mending or temporarily hold the toe and joint in the proper place.
Personalised Orthotics
Using an orthotic device that shifts pressure away from the ball of the foot and into the arch is one of the best methods to treat plantar plate injuries without surgery. They help relieve strain and tension when standing and walking if they are constructed and molded properly.
Surgical Treatment
Surgery may be advised if the toe is too stiff to be treated non-surgically or is still painful and deformed after non-surgical therapy. A variety of surgical procedures can be used to fix the toe deformity, fix the plantar plate tear, and reduce discomfort therapy be used. They are often same-day operations. Your surgeon will go through your choices with you and suggest a course of action based on the severity of the damage and your objectives.
Surgical procedures are frequently required to address the issue. The hat-trick treatment, which realigns the metatarsal bone, and the entire plantar plate repair method, which utilizes a suture passing approach and anatomic repair to correct the joint, are two surgical techniques that can be performed.
For damage to the plantar plate, there are some surgical approaches:
- Plantar plate repair
An incision under the ball of your foot or one on the top of your toe is used for this. To rectify the alignment, your foot and ankle orthopedic surgeon may require cutting the metatarsal bone. In rare circumstances, they could additionally shorten the metatarsal bone to assist in relieving pressure on the ball of your foot. You may have bandages and/or a detachable pin for a few weeks following surgery to maintain the surgical repair. - Tendon transfer
A tendon transfer may be suggested if the plantar plate tear occurred in the past or if your surgeon believes it cannot be healed. Tendon transfers can be in many different forms. The most typical transfer consists of transferring a tendon that bends the toe to the top of the toe. The toe is held down by this. - Capsulorrhaphy: In some cases, a capsulorrhaphy may be performed along with the plantar plate repair. This involves tightening and reinforcing the surrounding joint capsule to provide additional stability to the toe.
- Joint Realignment: If toe deformities are present along with the tear, surgical realignment of the toe joints might be necessary to correct abnormal positioning and relieve pressure on the plantar plate.
- Osteotomy: In cases where bone alignment contributes to the plantar plate tear, an osteotomy (surgical bone cut) may be performed to reposition the bones properly.
- Minimally Invasive Techniques: Some surgeons may use minimally invasive approaches, such as arthroscopy, to repair the plantar plate tear. These techniques involve smaller incisions and specialized tools, potentially leading to quicker recovery times.
Recovery:
Depending on the type of surgery you have, recovery might take weeks or even months. To safeguard the repair, you might need to avoid bearing any weight for a short while (or keep some weight off the leg). Depending on the injury’s severity and the type of surgery needed, the majority of patients will need to wear a postoperative or protective shoe for a considerable amount of time.
A special taping method that will retain the toe in a proper posture and aid in pain relief may also be demonstrated by your surgeon. Toe splints sold without a prescription can also aid in holding the toe down and easing discomfort. Your surgeon will direct your return to activities, including sports participation, as your condition begins to improve. A successful session of therapy might take weeks or even months.
For certain individuals, physical treatment may be required to restore the toe’s strength and complete functionality. The toe probably won’t feel any better than it did before, even after you’ve fully healed.
A program of rehabilitation following surgery or conservative treatment:
Importance of Rehabilitation program:
The importance of a rehabilitation program is significant both after surgery and after conservative management for conditions like a plantar plate tear.
After Surgery:
- Facilitates Healing: A well-structured rehabilitation program after surgery promotes optimal healing of the surgical site. It helps prevent complications like scar tissue formation, joint stiffness, and muscle atrophy.
- Restores Function: Surgery can temporarily limit mobility and function. Rehabilitation aids in gradually restoring range of motion, strength, and flexibility, enabling you to return to your pre-injury level of activity.
- Reduces Risk of Complications: Following a prescribed rehabilitation plan minimizes the risk of post-surgical complications such as infection, nerve damage, and poor wound healing.
- Prevents Muscle Weakness: Post-surgery, muscles may weaken due to immobility. Rehabilitation focuses on rebuilding muscle strength to support joint stability and proper movement.
- Adapts to Surgical Approach: A rehabilitation program is customized based on the surgical technique used, ensuring that exercises and progressions align with the specifics of the procedure.
- Minimizes Pain: Rehabilitation techniques, such as modalities and targeted exercises, help manage post-operative pain and discomfort.
- Promotes Confidence: Gradual and supervised progression in rehabilitation fosters confidence in using the affected area, reducing fear of re-injury and encouraging engagement in daily activities.
After Conservative Management:
- Optimizes Recovery: Rehabilitation post-conservative management helps maximize the benefits of non-surgical approaches. It ensures that the affected area heals effectively and gains strength for improved function.
- Addresses Underlying Issues: Conservative management might not address underlying biomechanical imbalances or weaknesses. Rehabilitation targets these issues, reducing the risk of future injury.
- Restores Strength and Function: Strengthening exercises and functional activities rebuild weakened muscles and restore proper movement patterns, enhancing overall function.
- Facilitates Long-Term Healing: A structured rehabilitation program prevents recurrence by addressing the root causes of the condition, thereby supporting long-term healing.
- Minimizes Chronic Pain: Incomplete recovery or improper management can lead to chronic pain. Rehabilitation post-conservative management can help prevent persistent discomfort.
- Improves Quality of Life: Effective rehabilitation allows you to return to normal activities sooner and with improved function, enhancing your quality of life.
- Empowers Self-Care: A rehabilitation program educates you on self-care strategies, exercises, and lifestyle modifications that contribute to long-term well-being.
Physical Therapy Treatment of Plantar Plate Tear
Physiotherapy modalities can play a supportive role in the rehabilitation of a plantar plate tear. These modalities are typically used in conjunction with other exercises and interventions to manage pain, reduce inflammation, and promote healing. However, it’s important to note that the choice of modalities should be determined by a licensed physiotherapist based on your individual condition. Here are some common physiotherapy modalities that might be used for plantar plate tear rehabilitation:
Ultrasound Therapy: When using ultrasound, high-frequency sound waves are used to vibrate tissues. It can help the plantar plate recover faster, circulate more blood, and experience less irritation. Your skin is covered with gel while the therapist runs a tiny ultrasonic probe over the troublesome region.
Electrical Stimulation: Electrodes are used to apply electrical currents to the skin during electrical stimulation. This can enhance blood circulation, lessen muscular spasms, and relieve pain. It is possible to target particular muscle groups or trigger points via electrical stimulation.
Ice or cold packs are used in cold treatment, also known as cryotherapy, to treat the afflicted region. It can aid in lowering plantar plate discomfort, edema, and inflammation. The usage of Methods like ice massage or ice packs may be used by the therapist during short-term applications of cold treatment.
Heat Therapy (Thermotherapy): To promote blood flow and relax muscles, heat is applied during heat therapy. It might ease soreness in the muscles, increase tissue suppleness, and get the foot ready for therapeutic activities. Heat may be applied in a variety of ways, including utilizing wet heat packs.
Iontophoresis: Iontophoresis is a technique for applying a little electric current to the skin to administer anti-inflammatory medications. Inflammation in the plantar plate and adjacent tissues can be treated with it.
Laser Therapy: Low-level laser therapy (LLLT) employs low-intensity lasers to stimulate cellular activity and aid in the repair of damaged tissue. It can be used to treat the swelling and discomfort brought about by a plantar plate injury.
Shortwave diathermy: It is a therapeutic method that produces heat deep into tissues using electromagnetic waves. It is occasionally used to treat ailments like torn plantar plate. Blood flow, muscular relaxation, and pain alleviation are all benefits of heat. Although it’s frequently used in conjunction with other therapies, its efficiency differs from person to person.
Exercises:
Exercise is essential for recovery from a plantar plate injury. They support recovery and guard against future problems by enhancing the foot’s and lower leg’s flexibility, strength, and stability. The following exercises may be helpful for those healing from a plantar plate tear:
Stretching exercise:
Calf Stretches:
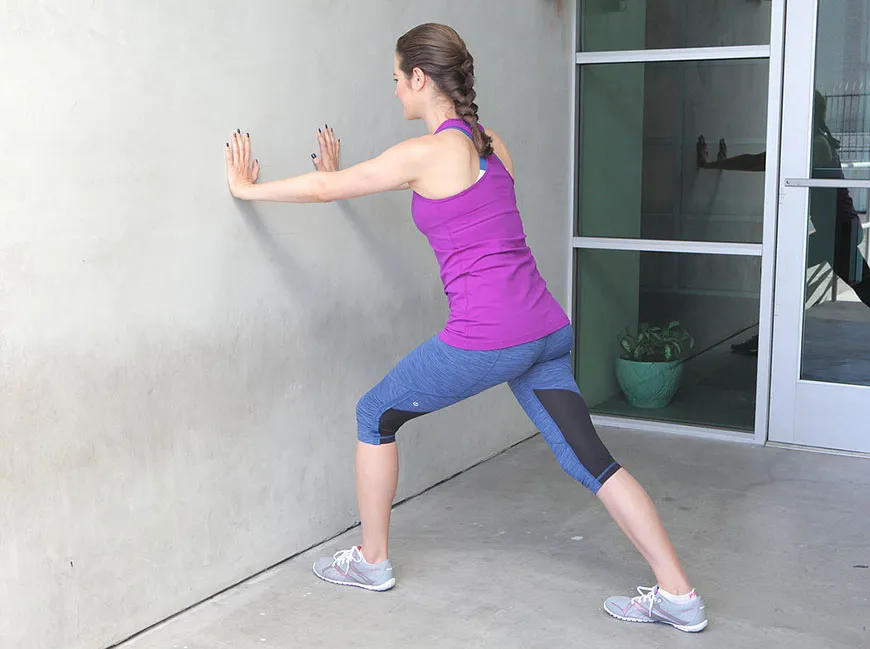
Place yourself in front of a wall at roughly arm’s length.
Arrange your hands at shoulder height on the wall.
Step back with one foot, keeping it straight, heel planted firmly on the ground, toes pointing forward. The front knee should be bent, while the back leg should be straight.
The back leg’s calf needs to extend out.
After holding the stretch for 15 to 30 seconds, swap legs.
On each leg, repeat this stretch a few times.
Plantar Fascia Stretch:
Sit down on a soft area with your legs out in front of you.
Maintain a straight back and relaxed shoulders.
Cross the troublesome leg over the other knee so that the troublesome foot’s ankle rests on it.
Hold the toes of the afflicted foot with your hand while being gentle.
You can wrap a towel or exercise band over the arch of your foot and hang on to the ends if you have trouble getting to your toes.
Pull your toes back towards your shin while gripping them.
You should feel stretching around the bottom of your foot and in the arch.
Avoid pushing yourself until you feel agony; instead, stop when you feel a comfortable stretch. Hold the stretch for 20 to 30 seconds while inhaling deeply and slowly.
Put your attention on unwinding and letting the tension go.
Stretch carefully and gently before releasing it.
For a total of 1-2 repetitions on each side, repeat the stretch.
Achilles Tendon Stretch:
Use a step, a curb, or a stable platform to find a level, stable surface. The edge of a step can also be used, but make sure you have something nearby to hold on to in case you need to maintain your balance.
Stand at the edge of the surface with your heels dangling off the back and your feet shoulder-width apart.
If required, hold on to a nearby object for balance.
Gently bring your heels down until they are below the step and your ankles can move.
Stretch for between 15 and 30 seconds. Your calves and Achilles tendon should feel a small pull or strain.
With caution, raise your heels to the beginning position.
3 to 4 more times, repeat the stretch.
Big toe stretch:
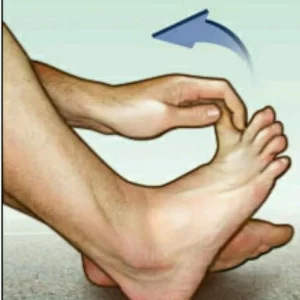
Sit with your back straight.
Put the heel of one foot firmly down on the floor.
Keep the big toe in touch with the floor while raising the other toes on the same foot.
As far as you can comfortably do so, slowly and gradually bend your big toe upward (towards the top of your foot). Your foot should have some extension at the bottom.
Ten seconds should be spent holding the stretch.
Hold the stretch while continuing to breathe normally for 15 seconds.
Return the big toe to the floor after letting go of the stretch.
For both feet, carry out the stretch 10 times.
Finger toe stretch:
This stretch relieves strain from the claw toe and sore toe posture.
Keep your feet level on the ground when you sit down to begin. This stretch has the advantage of enhancing posture. Extensor digitorum brevis and extensor hallucis brevis muscles’ flexibility is improved. then Place your ankle on your left thigh while raising your right leg.
Your right hand’s fingers should be entwined with your toes.
As far as you can, spread your toes apart with your fingers.
There should be three sets every day and 15-20 repetitions per session. On your left foot’s big toe, switch toes and repeat.
Range of Motion Exercises:
Toe Flexion:
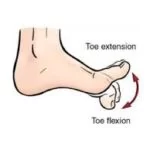
Toe flexion requires you to sit or stand with your feet flat on the ground.
Softly bend your toes downward into the shape of a fist.
To feel the bottom of your foot expand, hold your foot in this position for 5–10 seconds.
Take a deep breath and relax.
Repeat this stretch ten times.
Toe Extension:
Sit down and put your feet firmly on the ground.
Hold onto your heels firmly and lift all of your toes off the floor.
For some seconds, maintain this posture.
Put your feet back on the floor.
Repeat this stretch ten times.
Dorsiflexion:
It involves lifting your foot off the ground or pushing your toes closer to your torso.
The tibialis anterior muscle, which is located in the front of the lower leg, is in charge of controlling this action.
Dorsiflexion is accomplished by maintaining your heels on the ground and pulling your toes up towards your shin. When you walk and are going to place your foot on the ground, you make this action.

Plantar Flexion:
The process of pointing your toes away from your body is known as plantar flexion. Think about balancing on your toes.
The gastrocnemius and soleus muscles of the calf are principally in charge of this motion.
To do plantar flexion, push the balls of your feet.
Toe Towel Scrunches:
Towel scrunches are a quick and efficient foot workout that may help tone your toe and arch muscles. This foot exercise is great for increasing support, stability, and dexterity. Here’s how you scrunch a towel:
A little towel is a need.
Instructions:
Put your foot on the ground while seated at a table or chair.
The little towel has to be set down just in front of your feet.
With your toes, fold the towel in your direction. Think about lifting the towel by gripping it with your toes.
Keep your body bent and squeeze the towel with your toes.
Release the pressure by extending the towel with your feet straight out.
As often as you can, repeat, attempting to complete at least 15 to 20 scrunches each time.
Ankle circles:
Exercises that use simple ankle circles are designed to increase ankle flexibility and mobility. One of them is to circle your ankles, which is good for those with foot and ankle problems. Ankle circles help preserve the flexibility of the ankle joint and lessen stiffness. These steps are taken to carry out this practice:
Sit comfortably on the floor or a chair, and spread your legs in front of you.
Keep your knee straight as you lift one foot off the ground and point your toes forward.
Start rotating your ankle joint clockwise as you move your foot.
10 calm, intentional rotations of your ankle anticlockwise.
Once the clockwise circles are complete, move to the anticlockwise direction and build 10-15 circles there.
Put your foot back on the ground, then use the other to do an ankle-circling motion.
Foot Arch Lifts:
Tones the muscles in your foot’s arch quickly and effectively by lifting your foot. It can aid with balance, foot stability, and the prevention of problems brought on by flat feet. These steps are used to perform foot arch lifts:
Materials needed: None

Instructions:
Put your feet flat on the ground while you sit or stand comfortably.
While keeping your heels and toes planted on the ground, lift your foot arches to create room beneath the arch.
Focus on tightening the muscles in the foot’s arch while maintaining the raised posture for a short period of time.
Remain calm and put your foot back in the flat position.
Ten to fifteen-foot arch lifts should be performed.
Alphabet Toes (Toe Alphabet):
The easy and amusing foot exercise known as “Alphabet Toes,” often referred to as “toe writing” or “the alphabet,” will help increase flexibility and dexterity. During this exercise, you will use your toes to “write” the letters of the alphabet in the air. It’s a great approach to increasing toe muscle strength and enhancing foot mobility and functionality. The alphabet toes exercise has the following instructions:
Stretching your legs out before you while sitting on a chair or the floor.
While maintaining your other foot firmly planted on the ground, lift one foot off the floor.
Starting with your big toe acting as a pen, begin “writing” the letters of the alphabet in the air.
Using only your toes, make each letter as large and distinct as you can.
When you’ve completed the alphabet with one foot, switch to the other and go through it again.
The exercise should be done softly and under control to ensure that the toe muscles are sufficiently activated.
Toe Tapping:
Stepping On It:
Toe-tapping is a quick and efficient foot exercise that may enhance blood flow, improve ankle mobility, and work your lower leg and foot muscles. It is a low-impact exercise that can be performed practically any place and doesn’t call for any special equipment. The proper way to tap your toes is as follows:
Instructions:
Sit on a chair with your feet on the ground.
Lift your toes off the floor while maintaining a strong heel.
As quickly as possible, start tapping your toes on the ground.
Tap your toes for 30 to 60 seconds more.
Repeat the exercise with your toes tapping after a brief break.
Toe Spreading or splay:
Instructions:
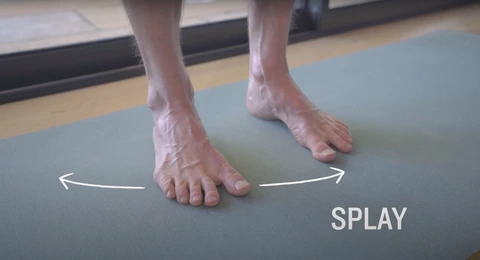
With one foot on the floor, sit or stand.
Relax and let your toes and feet find their normal positions.
Start by deliberately extending your toes apart as though you’re attempting to leave as much space between them as you can.
As you maintain the wide stance, feel the muscles between your toes extend and contract.
Release the spread and put your toes back in their natural position.
Repeat the toe-spreading motion many times.
Toe squeeze:
The “toe squeeze” technique is often recommended for the initial management of a suspected plantar plate tear. Here’s how it typically works:
- Find the Affected Toe: Identify the toe causing the pain. Plantar plate tears most commonly occur at the second metatarsophalangeal joint (connecting the second toe to the second metatarsal bone).
- Gently Squeeze the Toes: Hold the affected toe (and sometimes the adjacent toes as well) with one hand and use the other hand to gently squeeze the toes together. The goal is to bring the toes closer together, which can help stabilize the metatarsophalangeal joint and reduce strain on the torn plantar plate.
- Hold for a Few Seconds: Gently hold the toes in the squeezed position for a few seconds. This can help realign the structures around the joint and provide some relief.
- Release: Slowly release the pressure and let the toes return to their natural position.
Figure Eight rotation:
The figure-eight rotation exercise is similar to the toe movement exercise, except in this exercise, you rotate your toes in a figure-eight pattern rather than a circular one using your big toe. The major benefit of this exercise is the enhanced flexibility of the toes and digits of the foot.
Repeat 10 repetitions for each toe in 2-3 sets. Exercises like the Figure-8 rotation are really simple and uncomplicated.
Foot-screw:
You can squat to do the leg curl exercise. Let the knee extend outward and land on the cushion or ball. then advance to the doorway.
Stabilize the heel with your hand. Now run your right hand along the threshold of the calf and pull the leg apart by a foot’s breadth.
Next, advance your foot a bit before swooping within the resistance of your foot. After a few screw-like rotations, restore the leg to its starting position.
All the muscle groups that support and develop the foot muscles are worked during this exercise, which is based on the “leg screw” exercise. Every day, perform three sets of repetitions, averaging 15-20 times each.
Strengthening exercise:
Toe Abduction and Adduction with Resistance:
Use a tube or resistance band wrapped around the toes.
Adduct the toes back together after slowly spreading them apart against the opposition (abduction).
Several times, repeat the abduction and adduction motions.
Ankle inversion with Resistance Band:
When seated on a chair or a flat surface, your legs should be out in front of you.
The ball of your foot should be wrapped around the end of the resistance band.
Put the other end of the band in your hand and tighten it.
Pointing your toes straight ahead, maintain a comfortable gait.
Move your foot inside (inversion) gently and slowly while battling the band’s resistance.
Keep your stance inward and feel the muscles around your ankle tense up.
Slowly and steadily bring your foot back to the beginning position.
After performing the exercise on one foot for the required number of repetitions (for example, 10-15 reps), switch to the other foot.
Ankle Eversion with Resistance Band:
Your feet should be flat on the floor while you are sitting on a chair.
Holding the other end in your palm, loop one end of the resistance band around the ball of your foot.
You should evert your foot (move your foot outward) against the resistance of the band while keeping your heel firmly planted on the floor.
Before going back to the beginning position, hold the position for 5–10 seconds.
Ten to fifteen times for each foot, repeat the exercises.
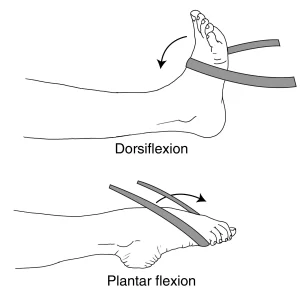
Ankle Plantarflexion (Pointing) Resistance Exercise:
With your foot firmly planted on the ground, sit down on a chair or other sturdy surface.
The resistance band should have one end fastened to a secure anchor point and the other end fastened to the front of your foot.
Maintain a flat-footed stance with your knees straight.
The toes of your foot should be pointed away from your body as you slowly press it down on the resistance band.
After holding the contraction for a full second, carefully resume your starting posture.
Perform 2-3 sets of 15 repetitions on each leg.
Ankle Dorsiflexion (Flexing) Resistance Exercise:
With your foot firmly planted on the ground, sit down on a chair or other sturdy surface.
The resistance band should have one end fastened to a secure anchor point and the other end fastened to the top of your foot.
Keep your toes pointed up and your knee straight.
Flex your ankle as you slowly draw your foot towards your shin while using the resistance band.
After holding the contraction for a full second, carefully resume your starting posture.
Perform 2-3 sets of 15 repetitions on each leg.
Resistance Band Arch Exercise:
Strengthening the muscles in the arch of your foot with resistance bands enhances stability and support. The intrinsic foot muscles, which are important for maintaining proper foot alignment and avoiding conditions like flat feet or overpronation, are the subject of this exercise.
Extend your legs out in front of you while seated on a chair or the floor.
Double-wrap the resistance band around your heel.
Holding the ends of the resistance band firmly in your palms, tension must be maintained.
Extend the resistance band while pointing your toes outside.
Then, stretch your toes back towards you while fastening the band’s pull.
Repeat the flexing and pointing action.
Marble pick up:
The exercise known as “marble pick-up” may be helpful for those who have plantar fasciitis or who have undergone plantar plate repair surgery. It is a quick foot exercise that will improve foot flexibility and muscular strength. This workout might enhance foot functionality.
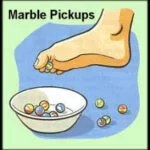
This is how the marble pick-up exercise is done:
Place a small bowl or container full of marbles or other little balls on the floor in front of you while seated in a chair.
Take off your shoes and socks so that you may grasp the marbles with your bare feet.
Collect marbles: Put a different dish or container next to the one holding the marbles, then pick up each marble with your toes one at a time.
Repeat picking up and moving the marbles for 5 to 10 minutes, or whatever long you feel comfortable doing so.
Stretch and give your feet a break after your workout.
The intrinsic foot muscles, which are crucial for preserving healthy foot arches and support, may be strengthened with the use of this exercise. It could also help with coordination and control.
Doming:
A leg of the foot doming exercise can be used to target these anterior foot muscles.
You may do this by making an effort to turn your big toe towards your heel and produce the “dome” seen above beneath your foot.
While keeping your toes on the ground, it is challenging to hold onto the dome. This test is comparable to the previous one in terms of generality. Avoid wiggling your toes and attempt to keep your ankles and feet in a neutral position.
Before advancing to other actions (quads and pull-ups), you may practice this exercise while seated, standing, or standing on one leg, depending on how ambitious you are.
With this stretch, your toes get stronger and your arches lift (or “dome”). Take a seat and put your feet up on the ground. Try to hold onto the ground with your toes. Ensure that you are grasping the item rather than just curling your toes around it.
Maintain the dome position for five to ten seconds. Every day, perform three sets of repetitions, averaging 15-20 times each.
As time goes on, heavy resistance training should be added:
Patients are routinely given a regulated, managed weight that is rather low by medical practitioners. Patients who engage in resistance band training benefit in a number of ways because it builds their foot muscles. Another way to develop the muscles in your feet is to perform this progression exercise.
Eccentric Calf Raise (Heel Drop):
Exercise: Eccentric Calf Raise (Heel Drop)
It is important to use a step or a strong raised platform (like a stair).
Instructions:
Keep your heels off the step’s back while standing, and place the balls of your feet on the step. Your feet should be hip-width apart and directed forward.
If required, cling to a neighboring wall or railing for support.
Leaning onto the balls of your feet, raise both heels.
After that, slowly bring your heels down to the step’s level. It’s important to make a gentle, careful descent.
As far as your heels can fall without hurting or discomforting you, let them. Stretch the muscles in your calves.
With the opposite foot, gently raise your heels back up to the beginning position after dropping them as low as they will go.
Do 10 to 15 eccentric lowering action repetitions slowly and deliberately.
Toe Raises:
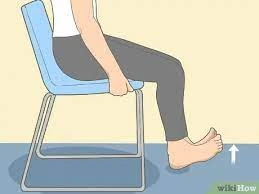
Sit down in a relaxed position with your feet flat on the floor.
Lift your toes from the ground and heel place firmly.
Hold for a brief moment before dropping your toes.
Repeat many times.
Calf raises:
Calf raises are a quick and efficient way to develop the calf muscles. Follow these steps to execute calf lifts:
Position yourself with your feet hip-width apart and a sturdy surface nearby for support. As you rise onto the balls of your feet, lift your heels as high as you can. Slowly retract your heels. Repeated sets have to be performed.
Tip-toe walking:
Create an area that is free for tip-toeing or mark the ground with a straight line. Step on your toes and go straight.
Heels and toes should line up. Choose a spot in front of you, and as you go, focus on keeping your balance. Take a step.
Directly behind the heel of the first foot, place the toe of the opposing foot, twenty times. If this exercise makes you feel uneasy, do it close to a wall or have a buddy to help you. The benefits of walking on these toes include extending the frequently strained extensor muscles and strengthening the calf muscles.
Sand walking:
In addition to providing your calves with a great workout, walking barefoot through the sand helps to stretch and strengthen your toes and feet. Since walking on sand is more difficult than walking on solid surfaces, be careful to turn around before you become tired.
Try looking for sand at a beach, desert, or volleyball court, for example. Before starting the walk, you should take off your shoes and socks. This improves your body’s mobility.
take a five to seven-minute stroll after that. Over time, you may gradually extend the progression period by walking for greater lengths of time.
Soft Tissue Mobilization:
Blood flow may be increased, muscular tension can be decreased, and tissue mobility can be improved in the foot and calf muscles with the use of manual treatments including massage, myofascial release, and trigger point therapy.
Massage:
Ball massage:
Select the ball that feels most at ease for both you and the area you are aiming towards. Use a smaller, denser ball, like a lacrosse ball, for more severe pressure. Use a bigger, softer ball, like a tennis ball, for lesser pressure.
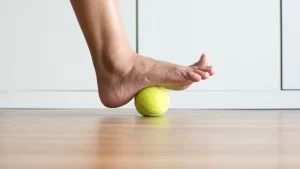
Locate the area: Determine the part of your body that is tense, painful, or stiff. Ball massages are most commonly used on the back, neck, shoulders, hips, glutes, and feet.
Place the ball where you want it and then gently place your weight on it to provide pressure. You may achieve this by reclining on the ground or leaning against a wall.
Once the ball is in position, you can decide to roll it about or hold it in a particular area that feels especially tender or rigid. Spend a few seconds allowing the pressure to reach the muscle.
Take a deep breath and attempt to relax your muscles while you apply pressure. Don’t hold your breath, please.
If the ball is being supported by too much body weight, reduce the pressure. Learn a little more about the ball if you feel like you need a little more pressure.
As you gently move the ball to different locations to massage the full area you wish, give each area between one and two minutes.
Foot rolling with a frozen water bottle:
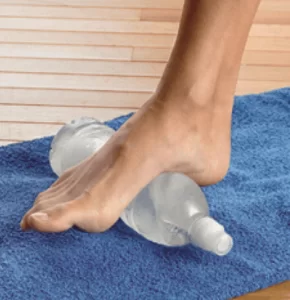
Your feet should be in front of you whether you’re sitting on a chair or the floor.
Place a frozen water bottle or a tennis ball on the ground.
Use your body weight to gently push the object as you move your foot over it. Move the object from side to side and from the ball of your foot to the heel.
Any painful or uncomfortable areas need additional attention, and more time should be spent massaging such areas to reduce stress.
Spend a minute or two rolling each foot.
You might also try to rotate your whole foot, paying attention to the arch and the region next to your toes.
Applying more pressure to a tight or painful area might help, but be careful not to apply excessive pressure or cause discomfort.
To keep your feet healthy and release stress, repeat the foot rolling as often as necessary.
Heel-of-hand massage:
Sit in a chair or on a bed and raise one foot so your hand can reach it.
Put pressure on the bottom of your foot with the opposite hand, from the heel to the toes.
Start with low pressure, longer strokes at first, then progressively prolong and raise the pressure. Leaning in for the massage, use your complete weight to provide greater pressure.
Cover the top of your foot frequently to help the fascia tissue relax.
The fist can also be softly clinched while doing this massage.
Balance and Proprioception Training:
An effective rehabilitation program for controlling plantar plate symptoms and avoiding injuries must include balance and proprioception training. The capacity of the body to perceive its location in space and its motions is referred to as proprioception. Enhancing stability, lowering the chance of falling, and encouraging greater control of movement can all be advantageous for the health of the foot and lower leg.
Included here are a few exercises:
1. Single-Leg Balance:
Stand on one leg with your foot firmly planted and your knee slightly bent.
To keep your balance, contract the muscles in your core.
Continue to hold this position for 20–30 seconds before switching to the other leg.
To further test your balance as you advance, consider shutting your eyes or standing on an unlevel surface, such as a foam pad.
2. Heel-to-Toe Walk:
The front heel of your foot should be precisely in front of the back toes when you walk in a straight line.
This workout tests your balance and proprioception while simulating the tightrope walker’s motion.
3. Wobble Board or Balance Disc:
Place one or both feet on a wobbleboard or balance disc.
Your balance is put to the test by the uneven terrain, which also activates the ankle-stabilizing muscles.
Exercises to try include circling or moving your weight from side to side.
4. Toe Taps:
You should be balancing on one leg, which should be slightly bent.
Maintaining your balance, tap your other foot gently in front, to the side, and behind you.
Proprioception and coordination are both enhanced by this activity.
5. Tandem Stance:
Heel to toe on one foot, stand.
For 20 to 30 seconds, hold this posture, then shift your feet.
Keep your core engaged and use your foot and ankle muscles for stability.
6. Dynamic Balancing Exercises:
To test your balance and proprioception while moving, try activities like leg swings, hip circles, or ankle circles.
7. Eyes-Closed Balance:
Close your eyes when performing any of the balancing drills to rely just on your proprioceptive senses.
Important Tips:
Exercises that are appropriate for your current level of stability and balance should be your first choice.
Perform these exercises next to a strong support (such as a wall or chair) that you can grip onto if necessary and on a safe surface.
As your balance gets better, gradually increase the intensity and duration of the workouts.
The key is consistency.
Several times a week, incorporate balance and proprioception exercises into your regimen.
Before beginning any new workout program, visit a doctor if you have an injury or a medical condition.
Training in balance and proprioception can help manage plantar plate symptoms as well as improve general lower limb function and lessen the risk of further injuries.
Gait training:
For those healing from plantar fascia pain or injuries, gait training is an essential component of therapy. Proper gait mechanics can lessen pressure on the plantar fascia, speed up recovery, and stop problems from recurring. For individualized gait training, working with a physical therapist is advised.
Heel-to-Toe Rocker:
Sometimes it’s suggested that people with ankle sprains or plantar plate problems wear shoes with a heel-to-toe rocker sole. A more fluid and relaxing stride can emerge from this type of shoe construction’s ability to reduce stress and motion on the midfoot area, which also speeds up the healing process.
Stand upright with your feet hip-width apart. Starting with your heels, shift your weight to your toes. As you progressively move into a forward walking motion, concentrate on smoothly rolling from your heel to your foot and then pushing off with your toes.
Step-Ups:
Find a little platform or step. As you climb, bring your injured foot up to meet your healthy foot first. Place your good foot down first, then your afflicted foot. This workout strengthens the muscles and coordination required to climb and descend curbs or steps.
Mini Lunges:
Position yourself in a hip-distance stance. Move forward with the foot that wasn’t injured. Bend both of your knees to stoop. Keep your front knee lifted above your ankle. A portion of the rear knee is visible above the surface. Push off your front foot to stand. then alternate sides once more. Begin by doing a few repetitions on each leg. The best stride length and balance are encouraged by this workout.
Walking in Slow Motion:
You could become more conscious of your gait mechanics if you walk slowly. Make sure you roll through the foot, push off with your toes, and land on your heel. By performing this exercise, you may consciously enhance your walking style.
Marching in Place:
Keep your feet steady and elevate your knees high like you’re marching. Focus on lifting your feet off the ground from the midfoot area rather than dragging them. This exercise increases the foot’s strength and flexibility.
Maintaining One Leg Balanced:
Standing on your good foot, lift the injured foot off the ground. Try to stay in balance for 30 to 60 seconds. This exercise improves proprioception and stability.
Tandem walking:
Place one foot in front of the other and walk in a straight line as if you were on a tightrope. Throughout this exercise, your balance and coordination will be put to the test.
Walking backward:
Rolling from heel to toe while walking backward over short distances. The proper foot mechanics and posture may be reinforced with the help of this practice.
Biofeedback and Neuromuscular Re-education:
Utilizing specialized equipment to offer feedback on muscle activity and movement patterns is a part of these strategies. They can teach you how to correctly activate particular muscles and retrain your movement patterns to lessen stress on the plantar plate.

Taping or Strapping Techniques:
Taping for a plantar plate tear involves applying anchor strips of athletic or kinesiology tape around the midfoot, followed by supportive strips from the midfoot to the base of the affected toe to provide upward support, and diagonal cross strips over the ball of the foot to reinforce stability and compression; the tape should be snug yet comfortable, aiding in stabilizing the area while being cautious not to hinder movement.
Gradual Return to Activities:
Your physical therapist will assist you in gradually reintroducing foot-intensive activities like walking, jogging, and sports as you advance through physical therapy. To avoid re-injury, they’ll make sure you resume these activities gradually and with the right biomechanics.
How to prevent plantar plate injury?
Plantar plate tears often occur in the ball of the foot, near the toes. They can result from repetitive stress, trauma, or biomechanical issues. Here are some steps you might consider to help prevent plantar plate tears:
1. Proper Footwear: Wear shoes that provide good arch support, cushioning, and proper fit. Avoid shoes that are too tight or too loose, as they can contribute to foot strain.
2. Orthotic Inserts: If you have foot arch issues or overpronation (inward rolling of the foot), consider using orthotic inserts or custom orthotics to help support your feet and distribute pressure more evenly.
3. Stretching and Strengthening: Regularly perform exercises that stretch and strengthen the muscles in your feet and toes. This can help improve the overall stability and flexibility of your foot.
4. Gradual Increase in Activity: If you’re starting a new exercise regimen or increasing your physical activity, do so gradually to give your feet time to adapt to the new demands.
5. Avoid Overuse: Give your feet proper rest between high-impact activities to prevent overuse injuries. This is especially important if you’re involved in activities that involve a lot of jumping, running, or sudden changes in direction.
6. Warm-Up and Cool Down: Always warm up before engaging in physical activities and cool down afterward. Incorporate gentle stretching to prepare your muscles and tendons for activity and aid in recovery.
7. Maintain Healthy Body Weight: Excess weight puts additional stress on your feet, which could increase the risk of injuries, including plantar plate tears. Maintaining a healthy body weight can help reduce this risk.
8. Listen to Your Body: Pay attention to any discomfort or pain in your feet, and don’t ignore persistent symptoms. Rest if you’re experiencing pain or discomfort, and seek medical attention if the pain persists.
9. Foot Mechanics: Be mindful of your foot mechanics, such as how you walk and stand. If you notice any abnormalities, consult a podiatrist or physical therapist for guidance.
10. Footwear for Activities: Wear appropriate footwear for the specific activities you’re engaged in. Different activities might require different levels of support and cushioning.
Home remedies:
While home remedies may help alleviate some of the discomfort associated with a plantar plate tear, it’s important to note that these remedies are not a substitute for professional medical care. Here are some home remedies that might offer relief, but always prioritize medical advice:
- Rest and Immobilization: Resting your foot and avoiding activities that aggravate the condition can help prevent further damage. Immobilizing the foot with a brace, splint, or strapping may be recommended by a healthcare provider.
- Ice Therapy: Applying ice to the affected area for 15-20 minutes every few hours can help reduce pain and inflammation. To avoid making direct touch with the skin, be careful to cover the ice pack in a thin fabric.
- Elevation: Elevating your foot when resting can help reduce swelling and promote healing. Prop your foot up on pillows or cushions whenever possible.
- Over-the-Counter Pain Relievers: Non-prescription pain relievers like ibuprofen or naproxen can help manage pain and inflammation. But before taking any drug, talk to your doctor, especially if you have underlying medical issues.
- Gentle Stretching Exercises: Once advised by a healthcare professional, gentle stretching exercises for the toes and feet might be recommended to improve flexibility and promote healing.
- Supportive Footwear: Wearing shoes with good arch support and cushioning can help relieve pressure on the plantar plate and surrounding structures. Avoid wearing shoes with minimal support or high heels.
- Taping: Taping the toes or using adhesive tape to provide support to the affected area can help reduce strain and discomfort. It’s best to learn proper taping techniques from a healthcare provider.
- Massage and Foot Rolling: Gently massaging and rolling a tennis ball or a specialized foot roller under the arch of your foot can help alleviate some discomfort and improve blood circulation.
- Warm Foot Soaks: Soaking your foot in warm water with Epsom salts for about 15-20 minutes can provide temporary relief from pain and promote relaxation.
- Maintain a Healthy Lifestyle: Eating a balanced diet, staying hydrated, and getting sufficient sleep can support overall healing and recovery.
FAQs:
A plantar plate tear is a condition where the ligament under the ball of the foot becomes damaged or torn. This ligament, called the plantar plate, helps stabilize the toes and is prone to injury due to repetitive stress or trauma.
Symptoms may include pain and tenderness under the ball of the foot, especially near the affected toe, swelling, instability, or pain when walking or standing, and sometimes a sensation of “walking on a marble.”
Plantar plate tears can result from activities that put excessive strain on the forefoot, such as running, jumping, wearing improper footwear, or having certain foot deformities that affect mechanics.
A diagnosis typically involves a physical examination by a healthcare professional, possibly including imaging tests like X-rays or MRI to assess the extent of the tear and rule out other conditions.
Mild tears might heal with conservative measures like rest, immobilization, and proper footwear. However, severe or chronic tears might require more specialized treatment.
Treatment can range from rest, ice, and elevation to orthotic devices, physical therapy, and in some cases, surgery to repair the tear.
While complete prevention might not always be possible, you can reduce the risk by wearing proper footwear, avoiding overuse, maintaining a healthy weight, and being mindful of foot mechanics.
If you suspect you have a plantar plate tear due to persistent pain, swelling, or discomfort in the ball of your foot, it’s important to consult your doctor for an accurate diagnosis and appropriate treatment.
While certain home remedies like rest, ice, and supportive footwear might help manage symptoms, it’s essential to consult a medical professional for proper diagnosis and guidance before trying any home treatments.
Ignoring or not properly treating a plantar plate tear can lead to chronic pain, instability in the affected toe, and potential changes in gait, which could contribute to other foot and leg issues over time.
Surgery might be considered if conservative treatments don’t provide relief, or if the tear is severe. A healthcare provider will assess the extent of the tear and recommend the most appropriate treatment plan.
Depending on the extent of the tear and the selected course of therapy, recovery times might change. Mild cases might improve within a few weeks with conservative treatments, while more severe cases or cases requiring surgery might take several months for full recovery.
It’s generally recommended to avoid high-impact activities that could worsen the tear while you’re undergoing treatment and recovery. Your healthcare provider will provide guidance on suitable activities during this time.
If left untreated, plantar plate tears can potentially contribute to other foot problems such as hammertoes, metatarsalgia (forefoot pain), and changes in gait mechanics.
Severe or chronic plantar plate tears, if not properly managed, could lead to ongoing pain, discomfort, and potential deformities that affect foot function.
Yes, physical therapy can play a significant role in the recovery process. A physical therapist can provide exercises to strengthen and stretch the muscles in your foot, improve flexibility, and enhance overall foot mechanics.
During a physical exam, a healthcare provider will assess your foot’s range of motion, stability, and any areas of tenderness. They might also perform specific tests to check for plantar plate integrity.
Corticosteroid injections might provide temporary pain relief, but they are generally not considered a primary treatment for plantar plate tears. In some cases, injections could weaken the ligament, making the condition worse.
Recurrence is possible, especially if the underlying causes (such as poor foot mechanics or excessive strain) are not addressed. Following proper rehabilitation and preventive measures can help minimize the risk.
Exercises that focus on toe and foot strengthening, as well as improving overall foot mechanics, can help reduce the risk of injuries like plantar plate tears. A physical therapist can guide you on suitable exercises based on your individual needs.
